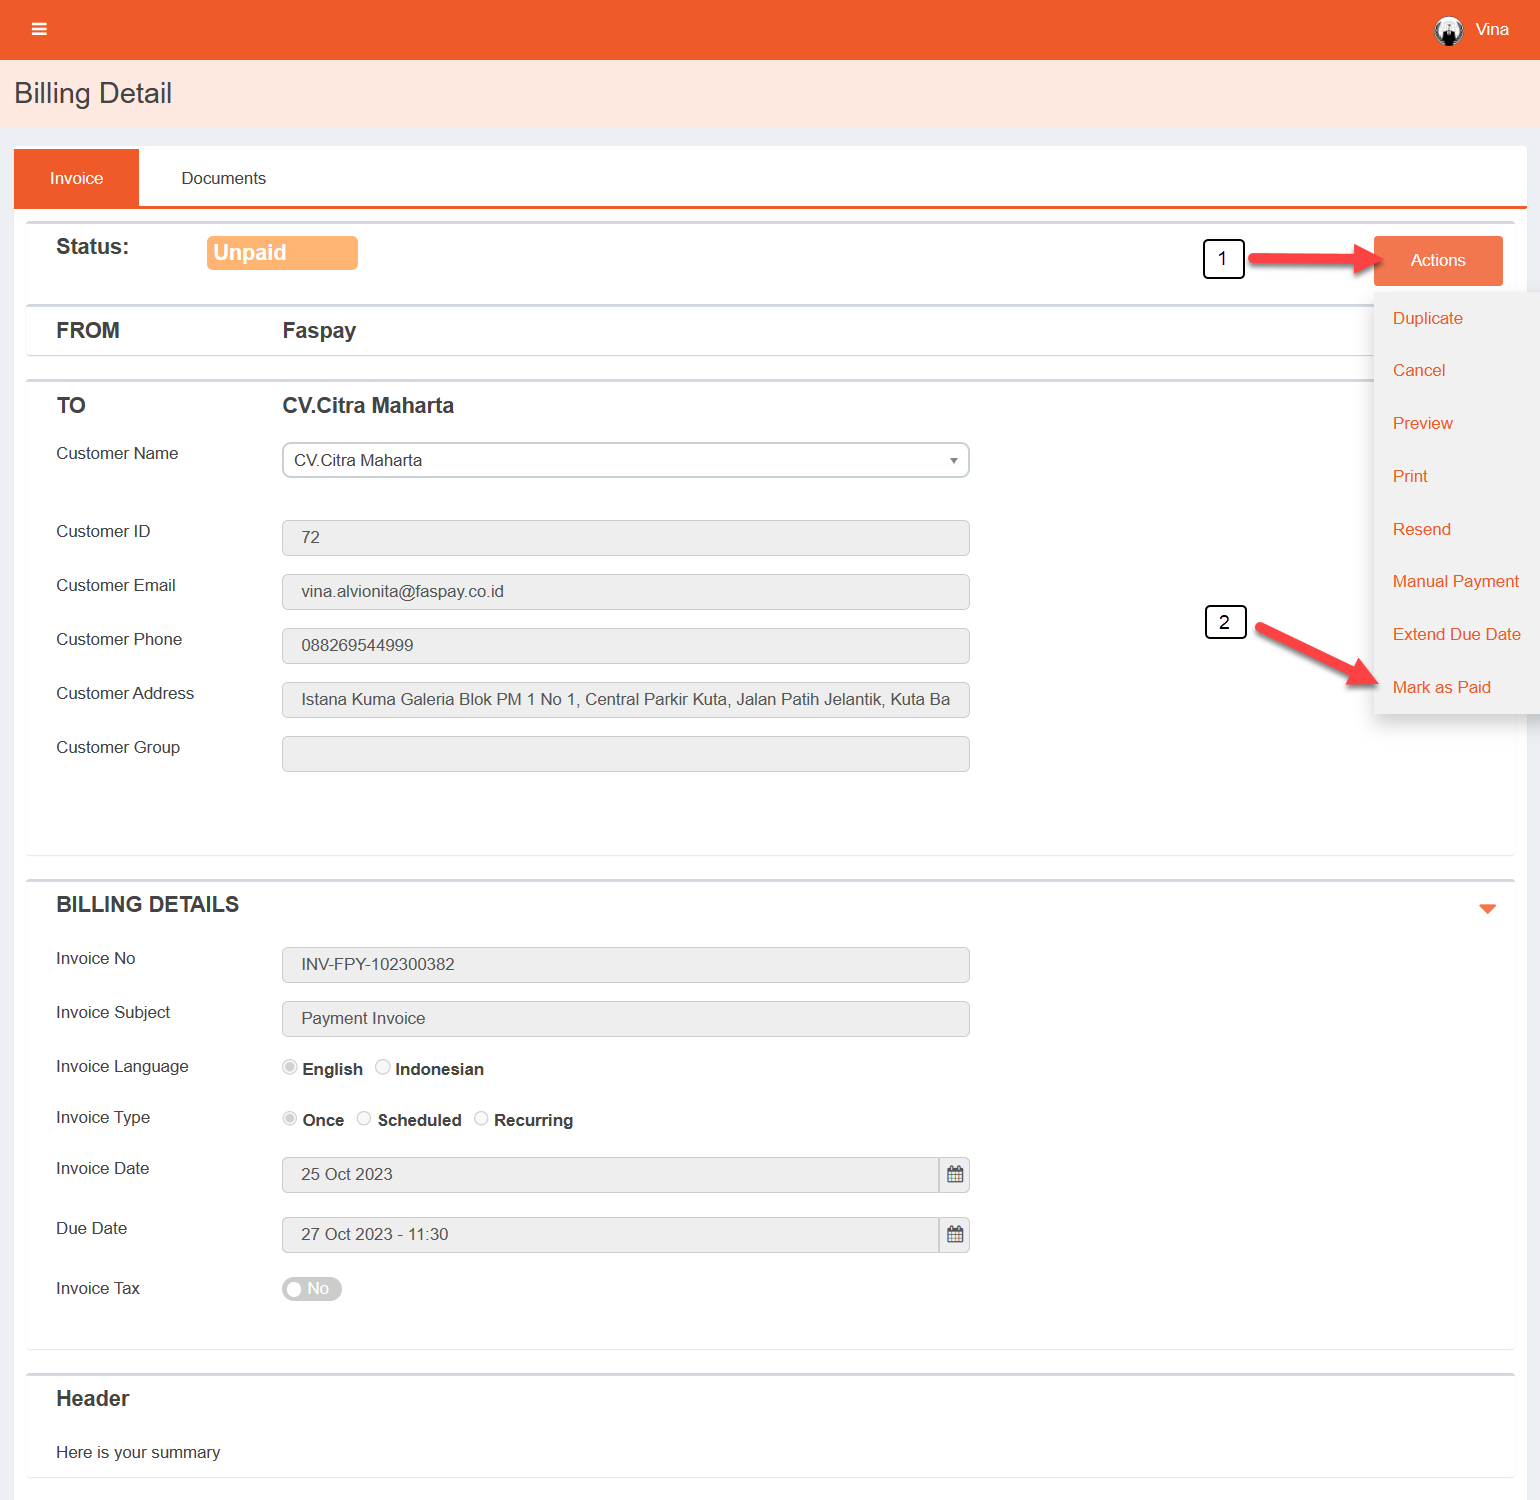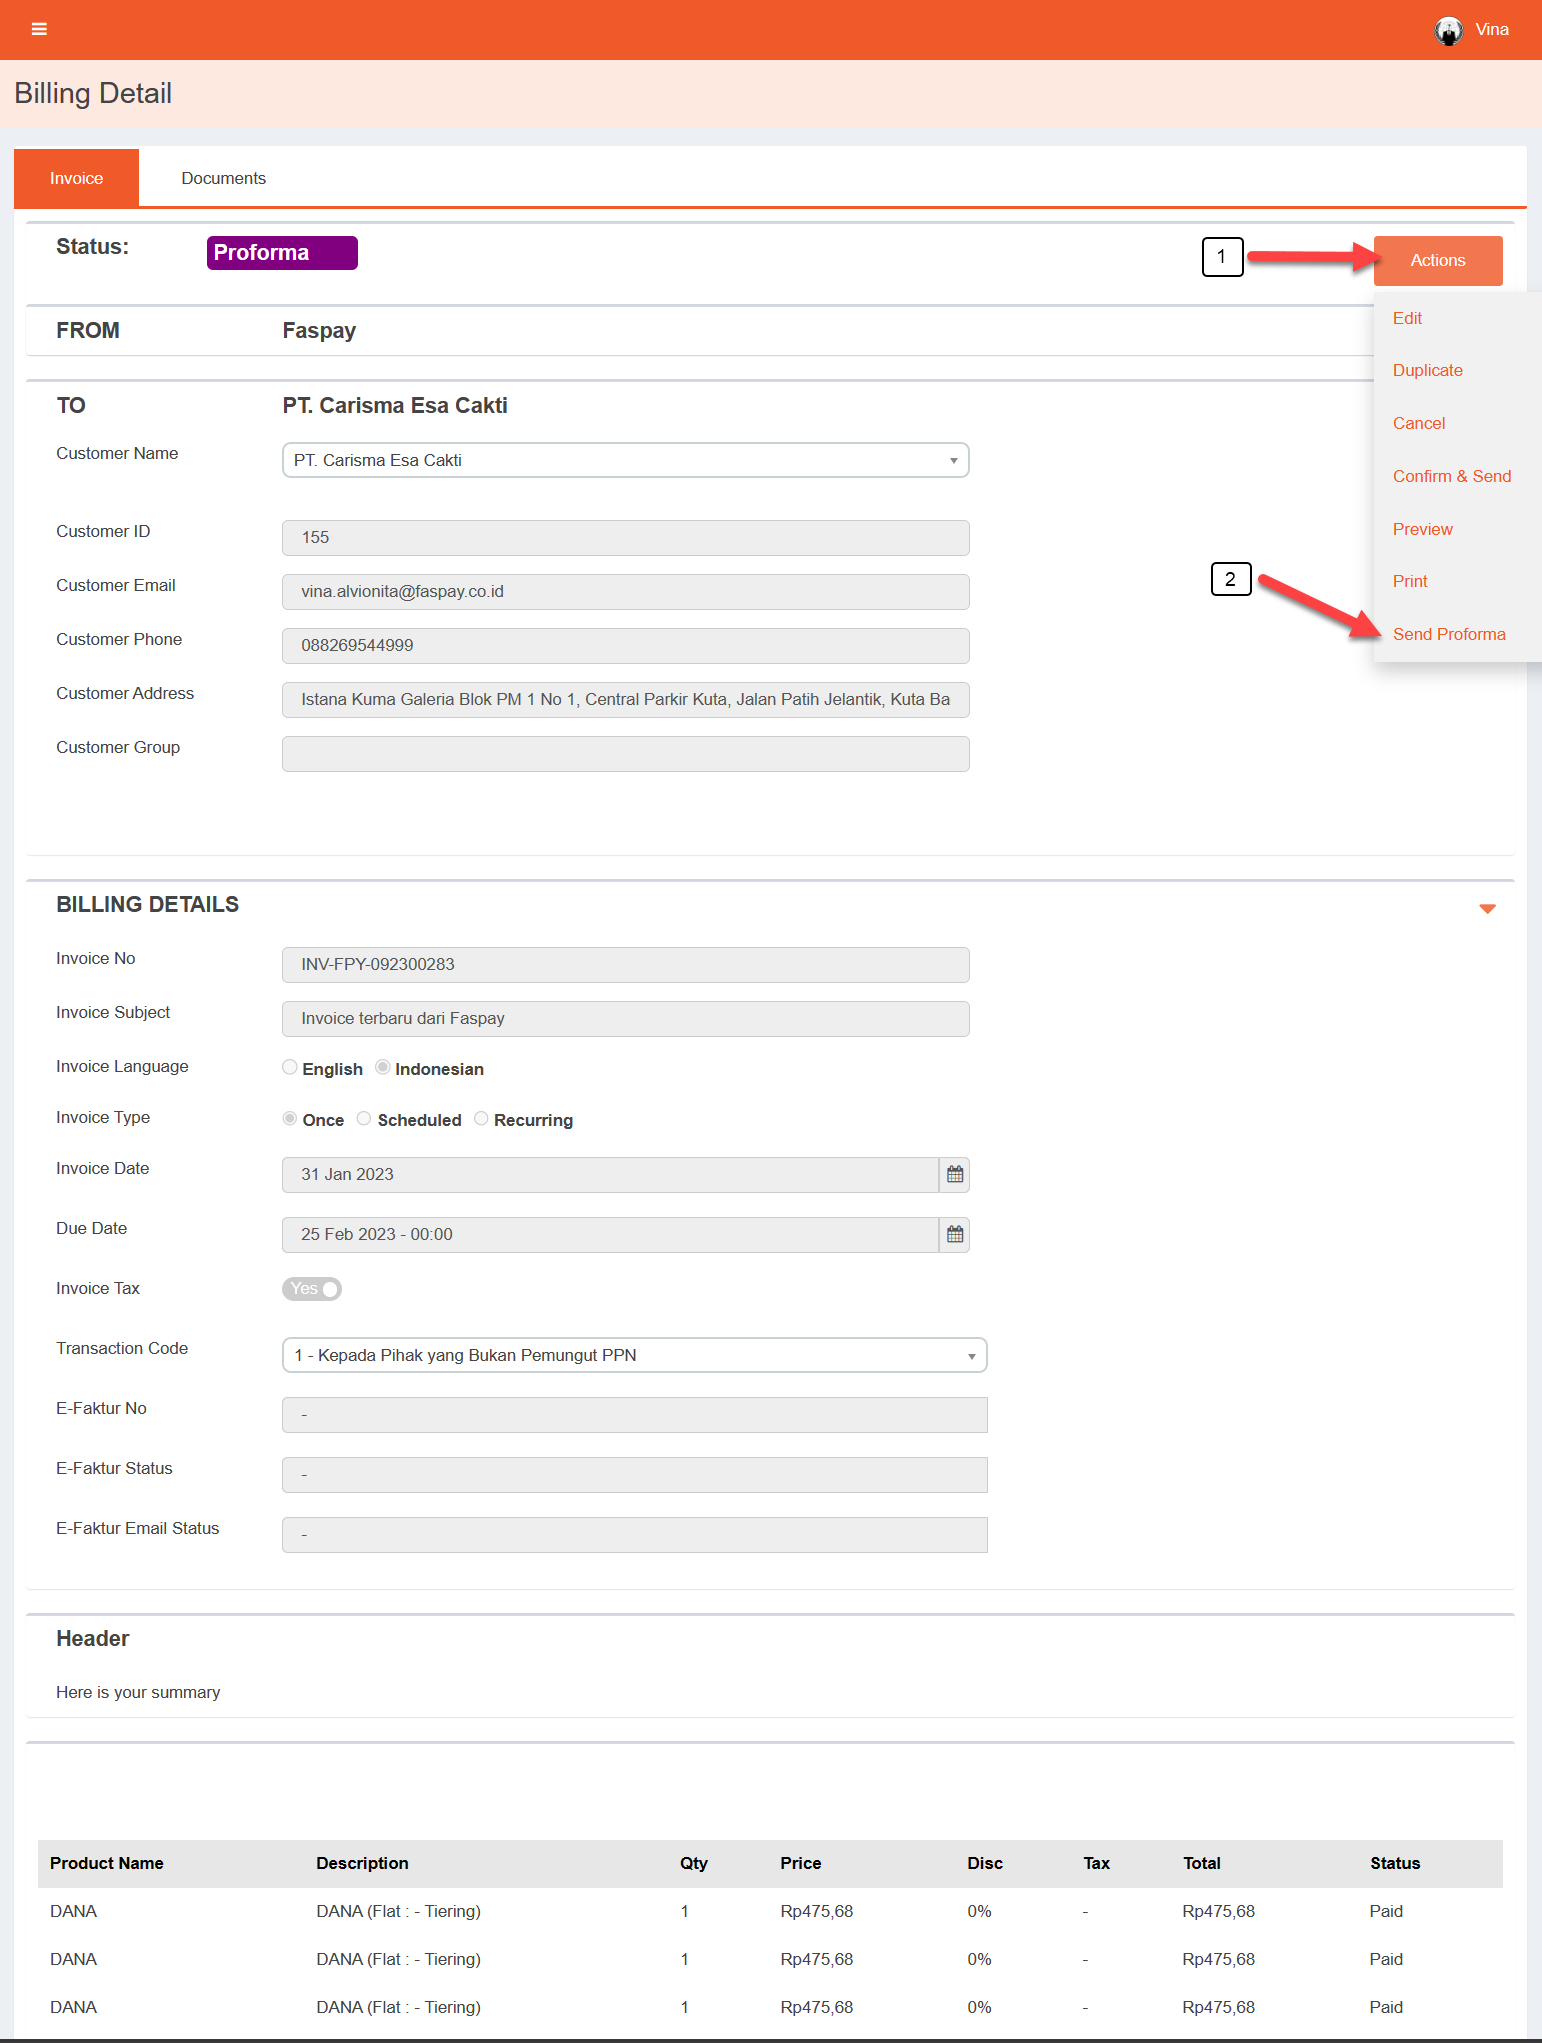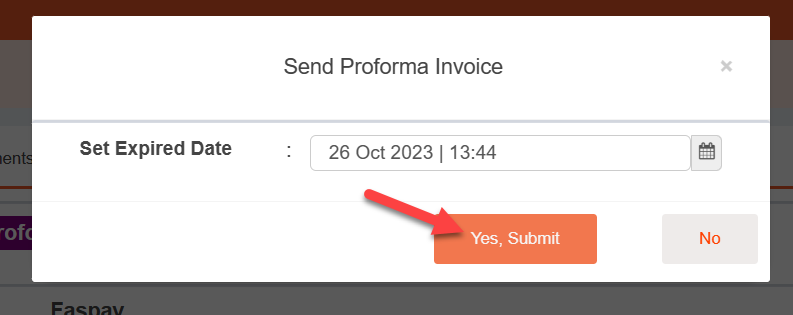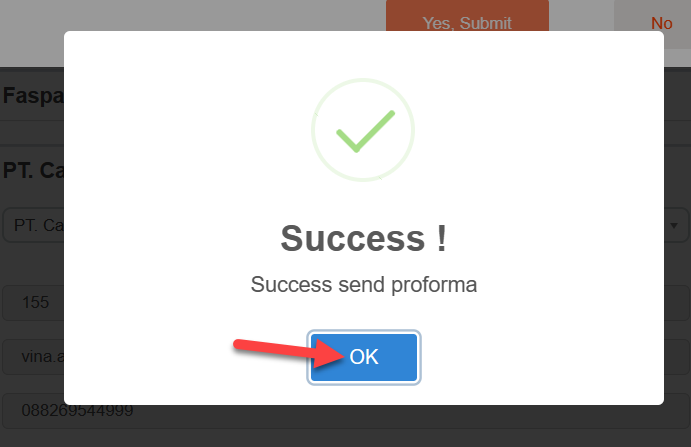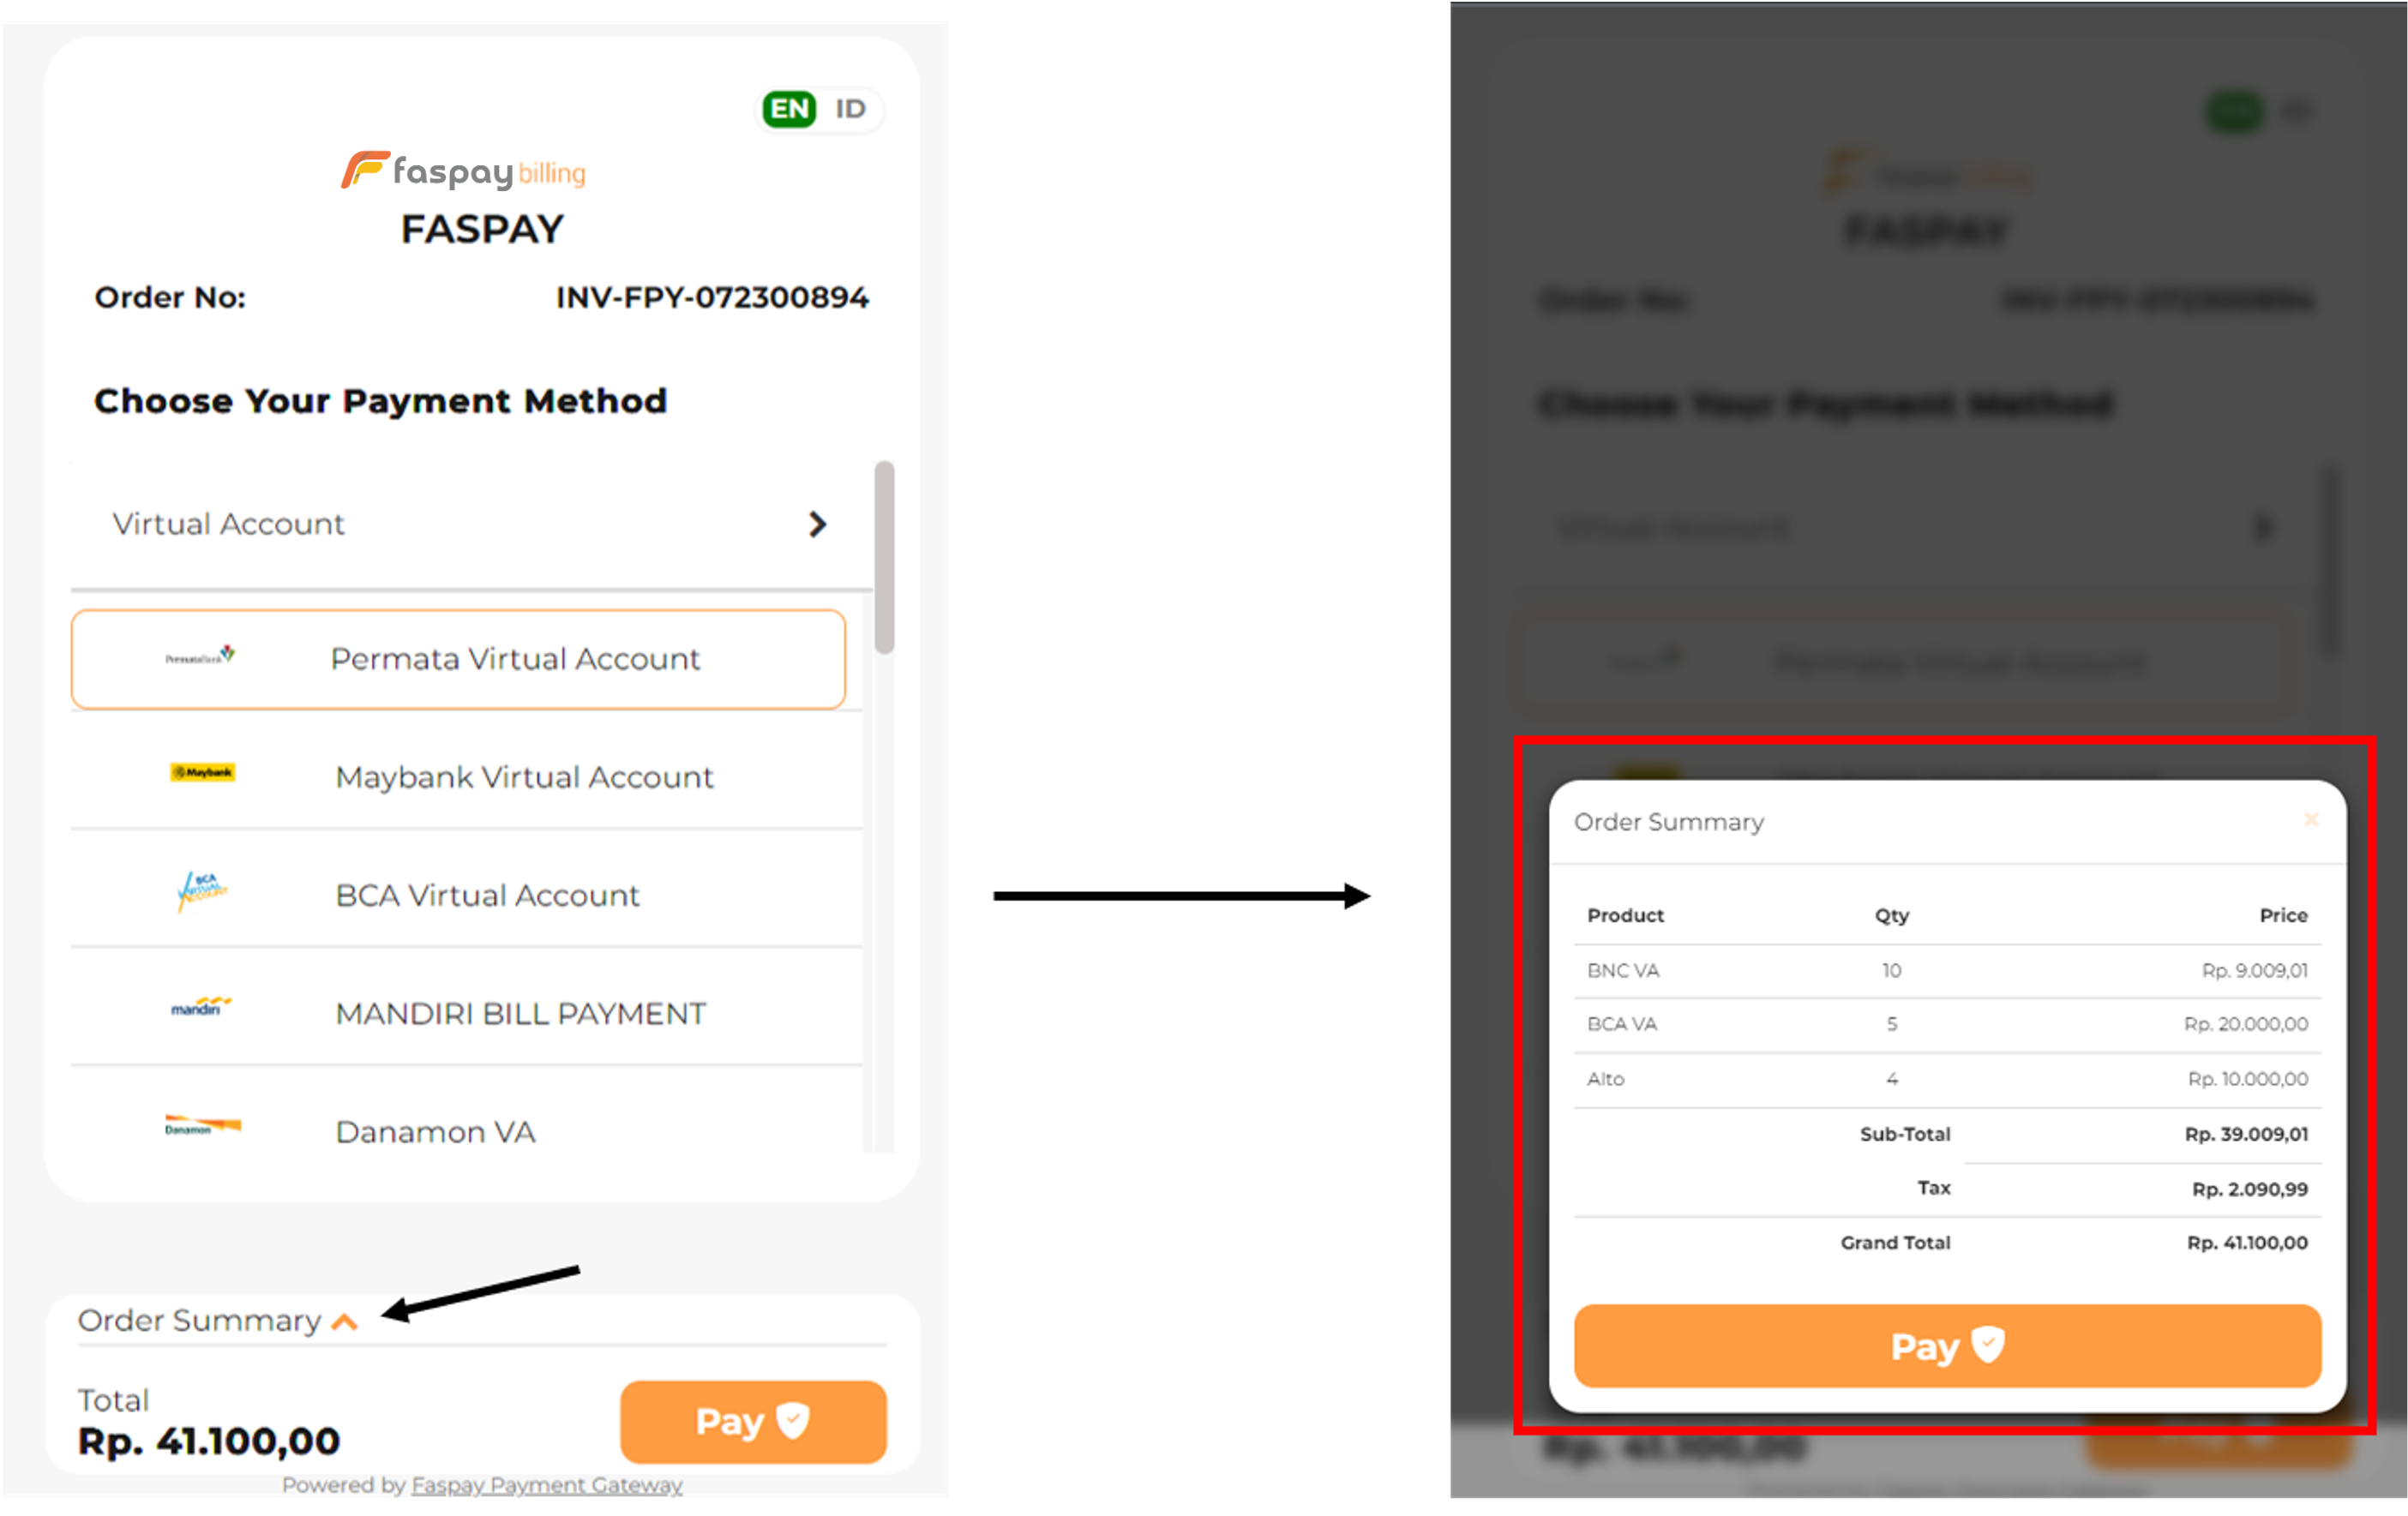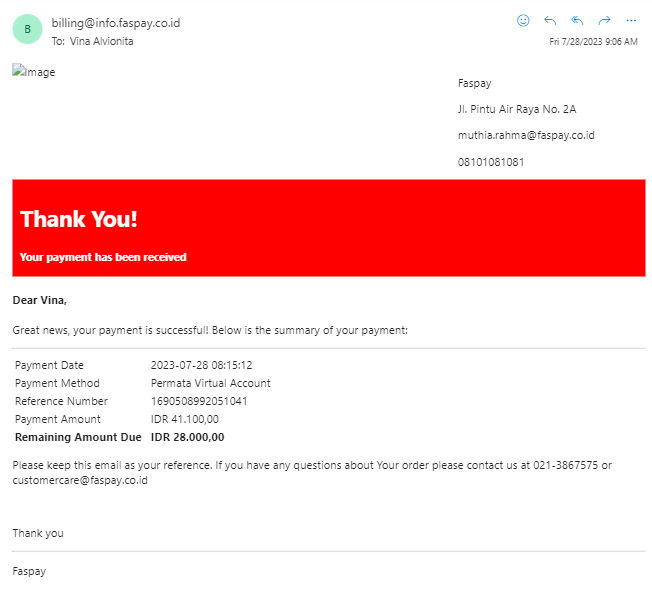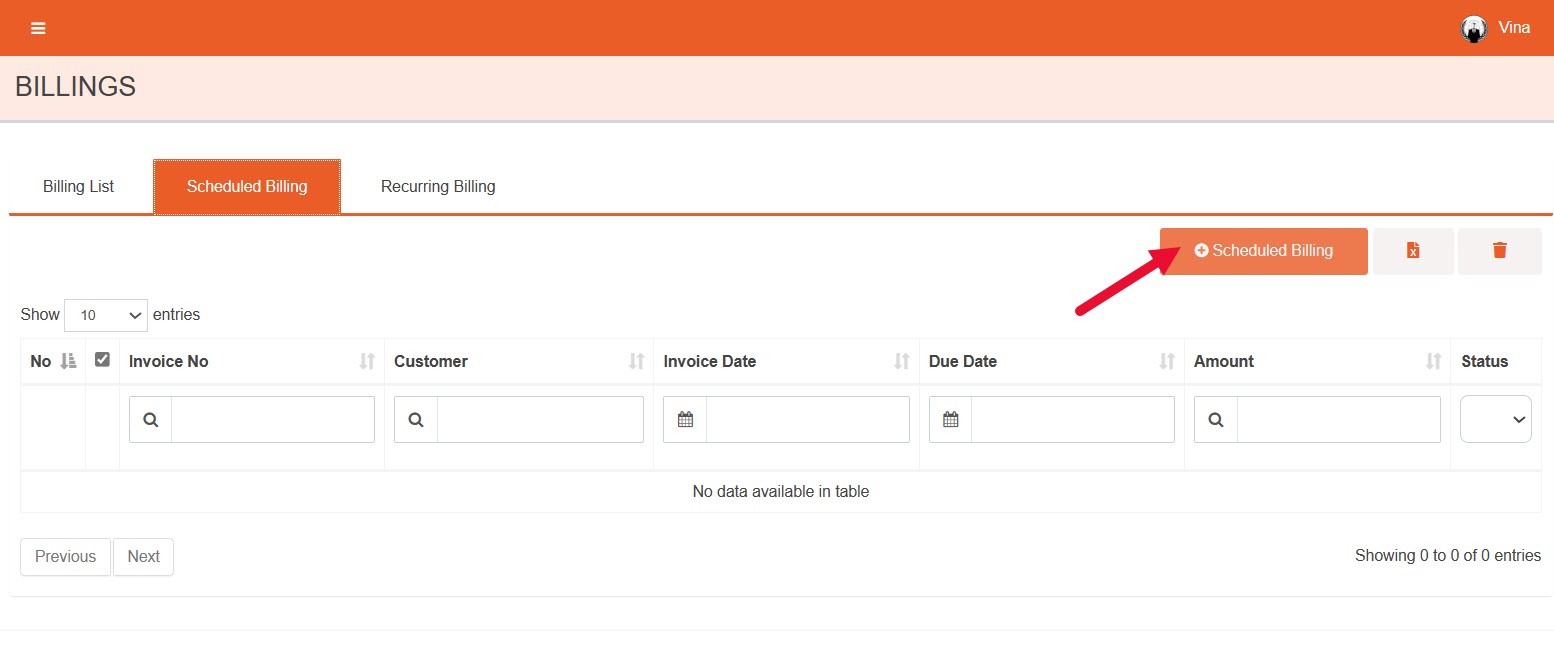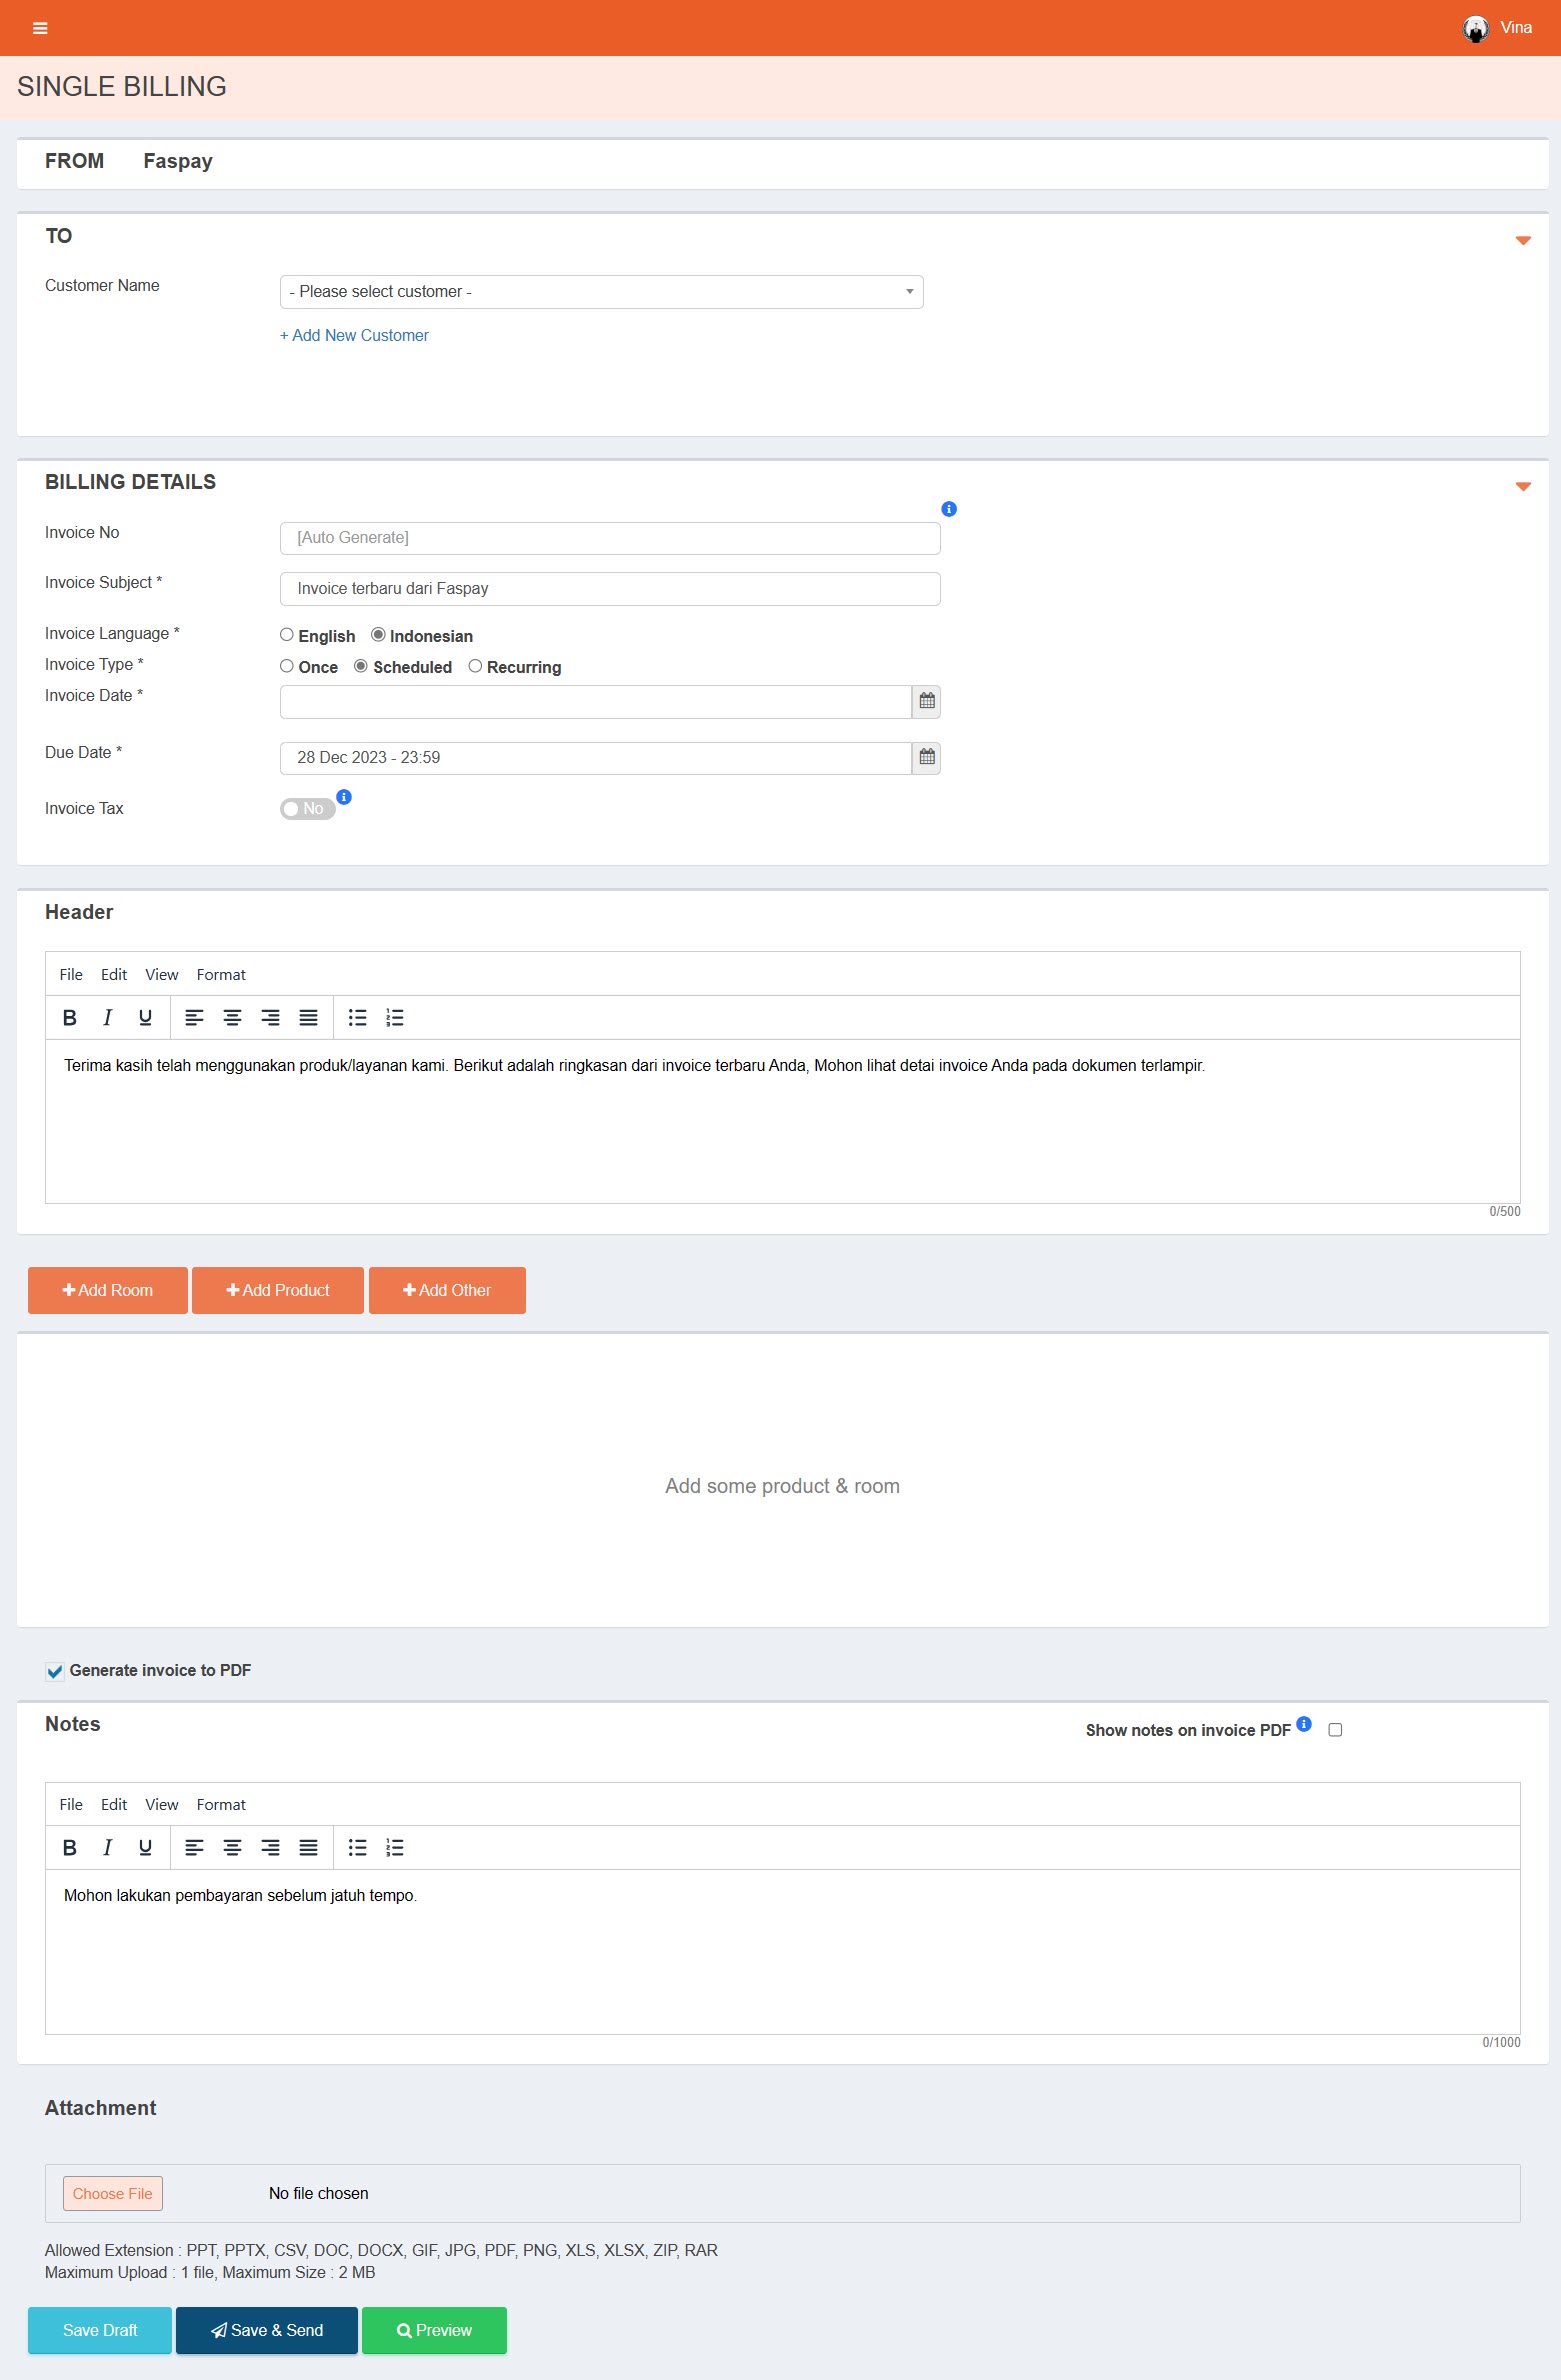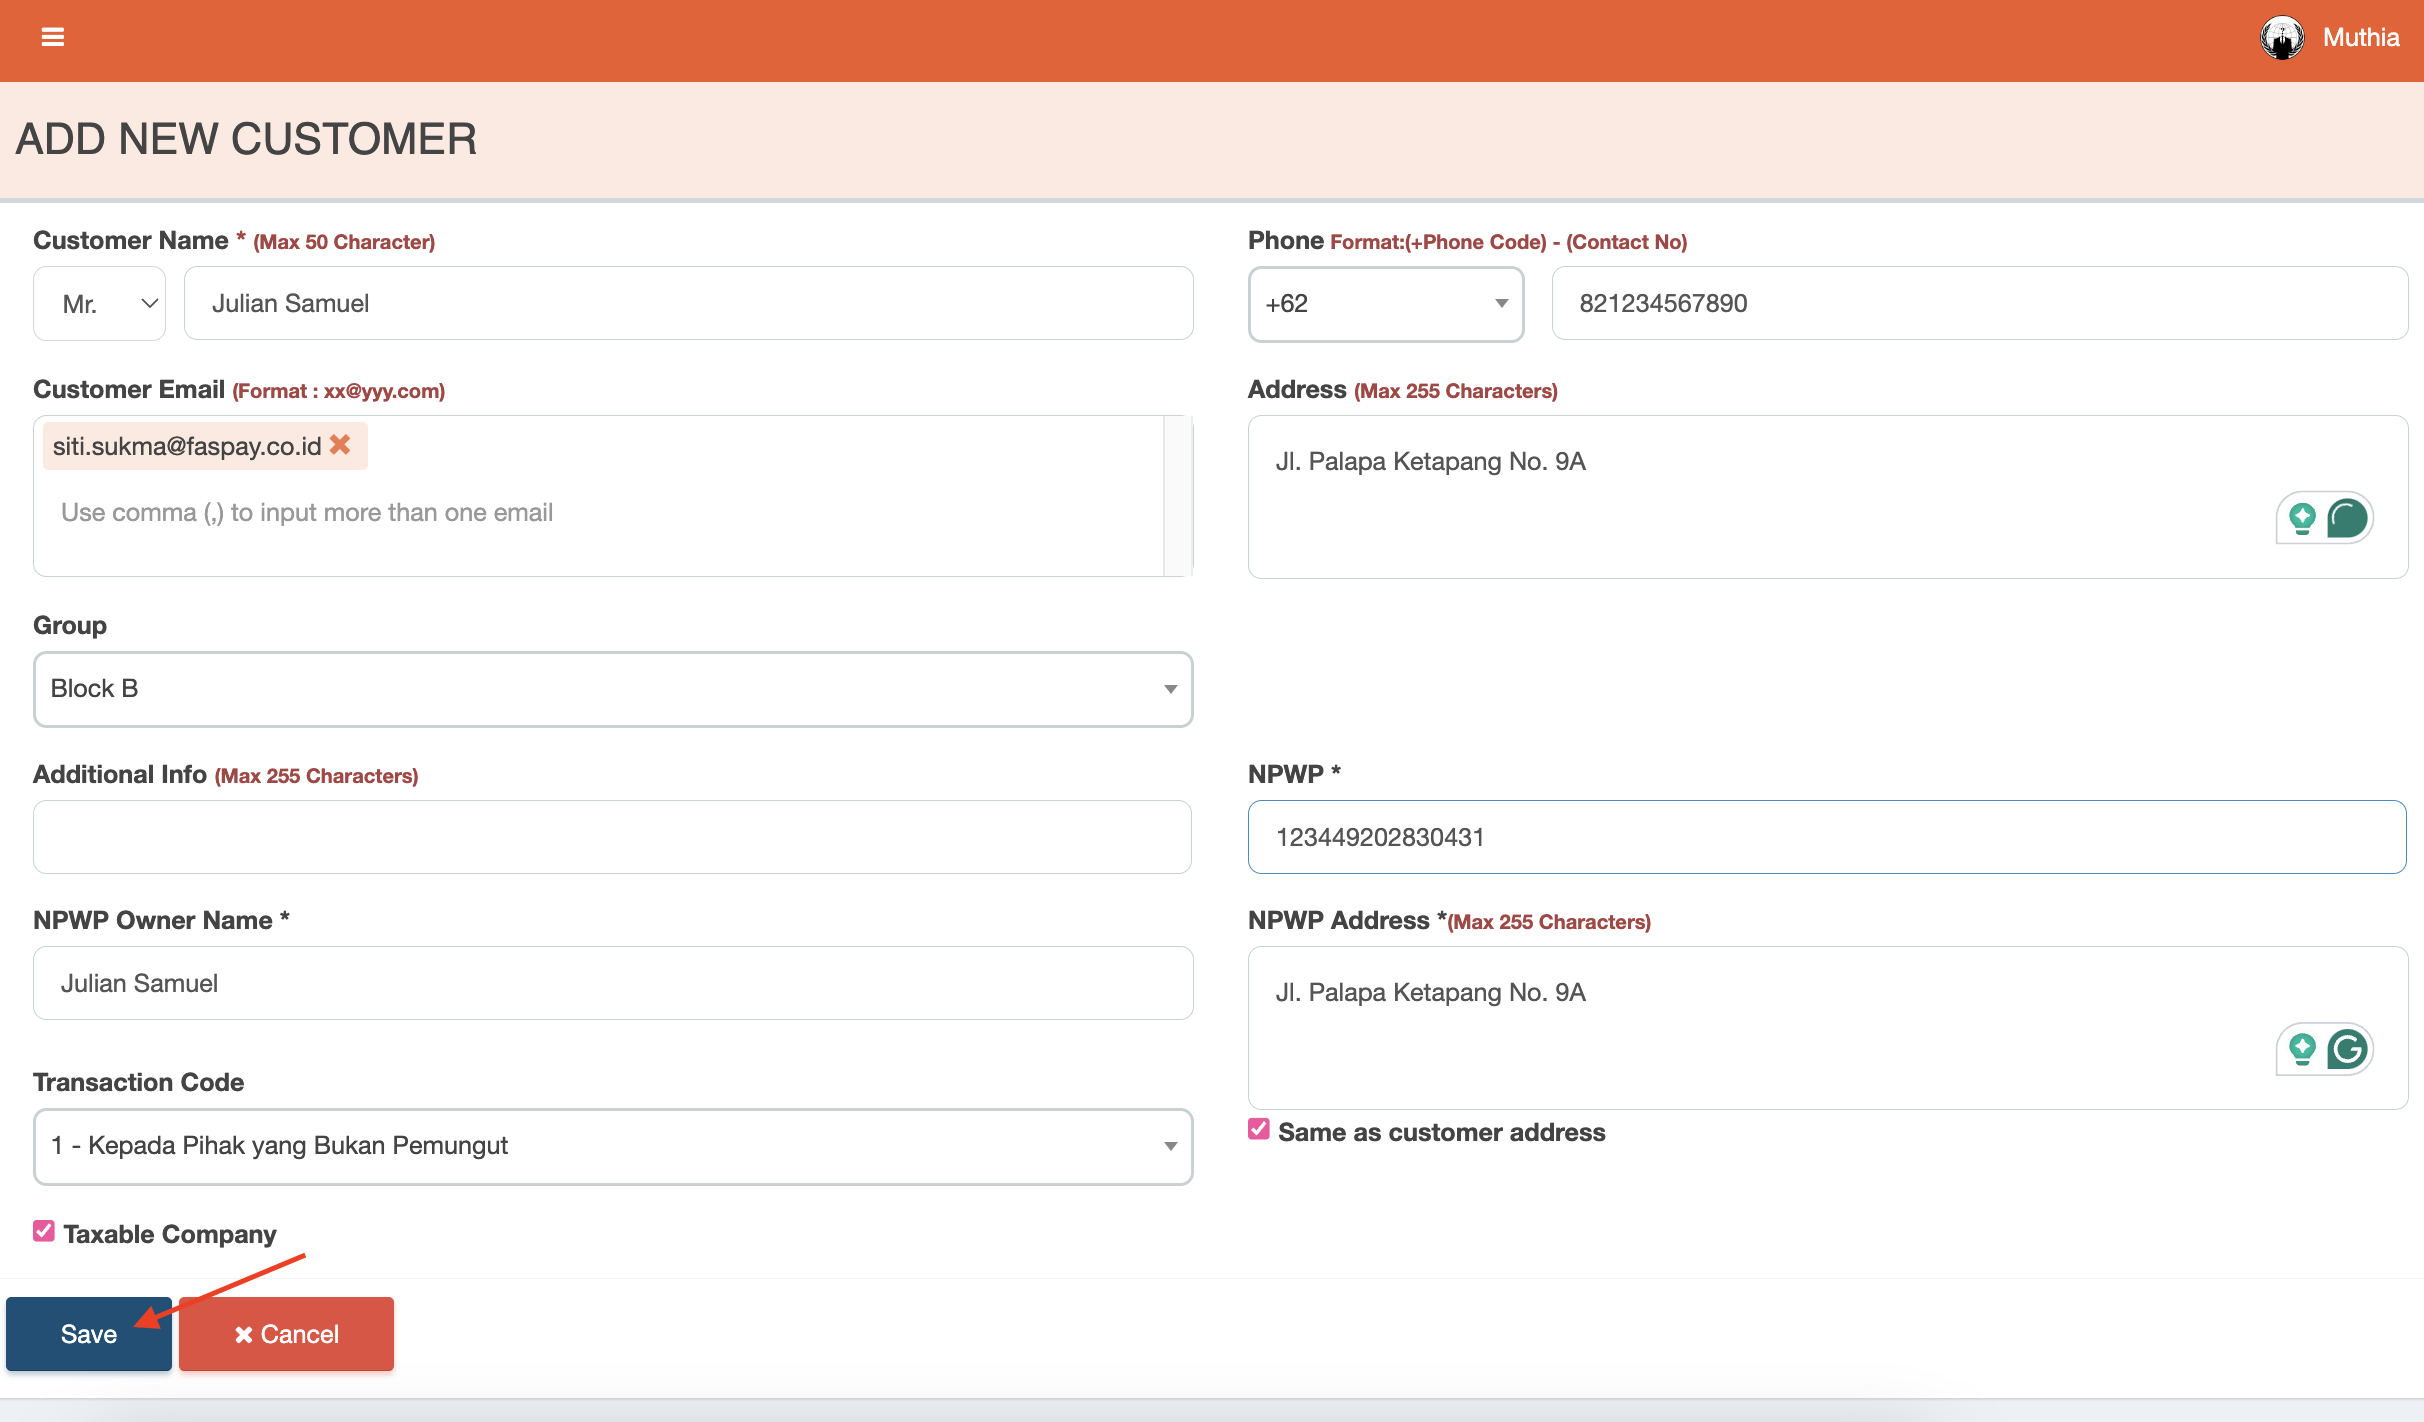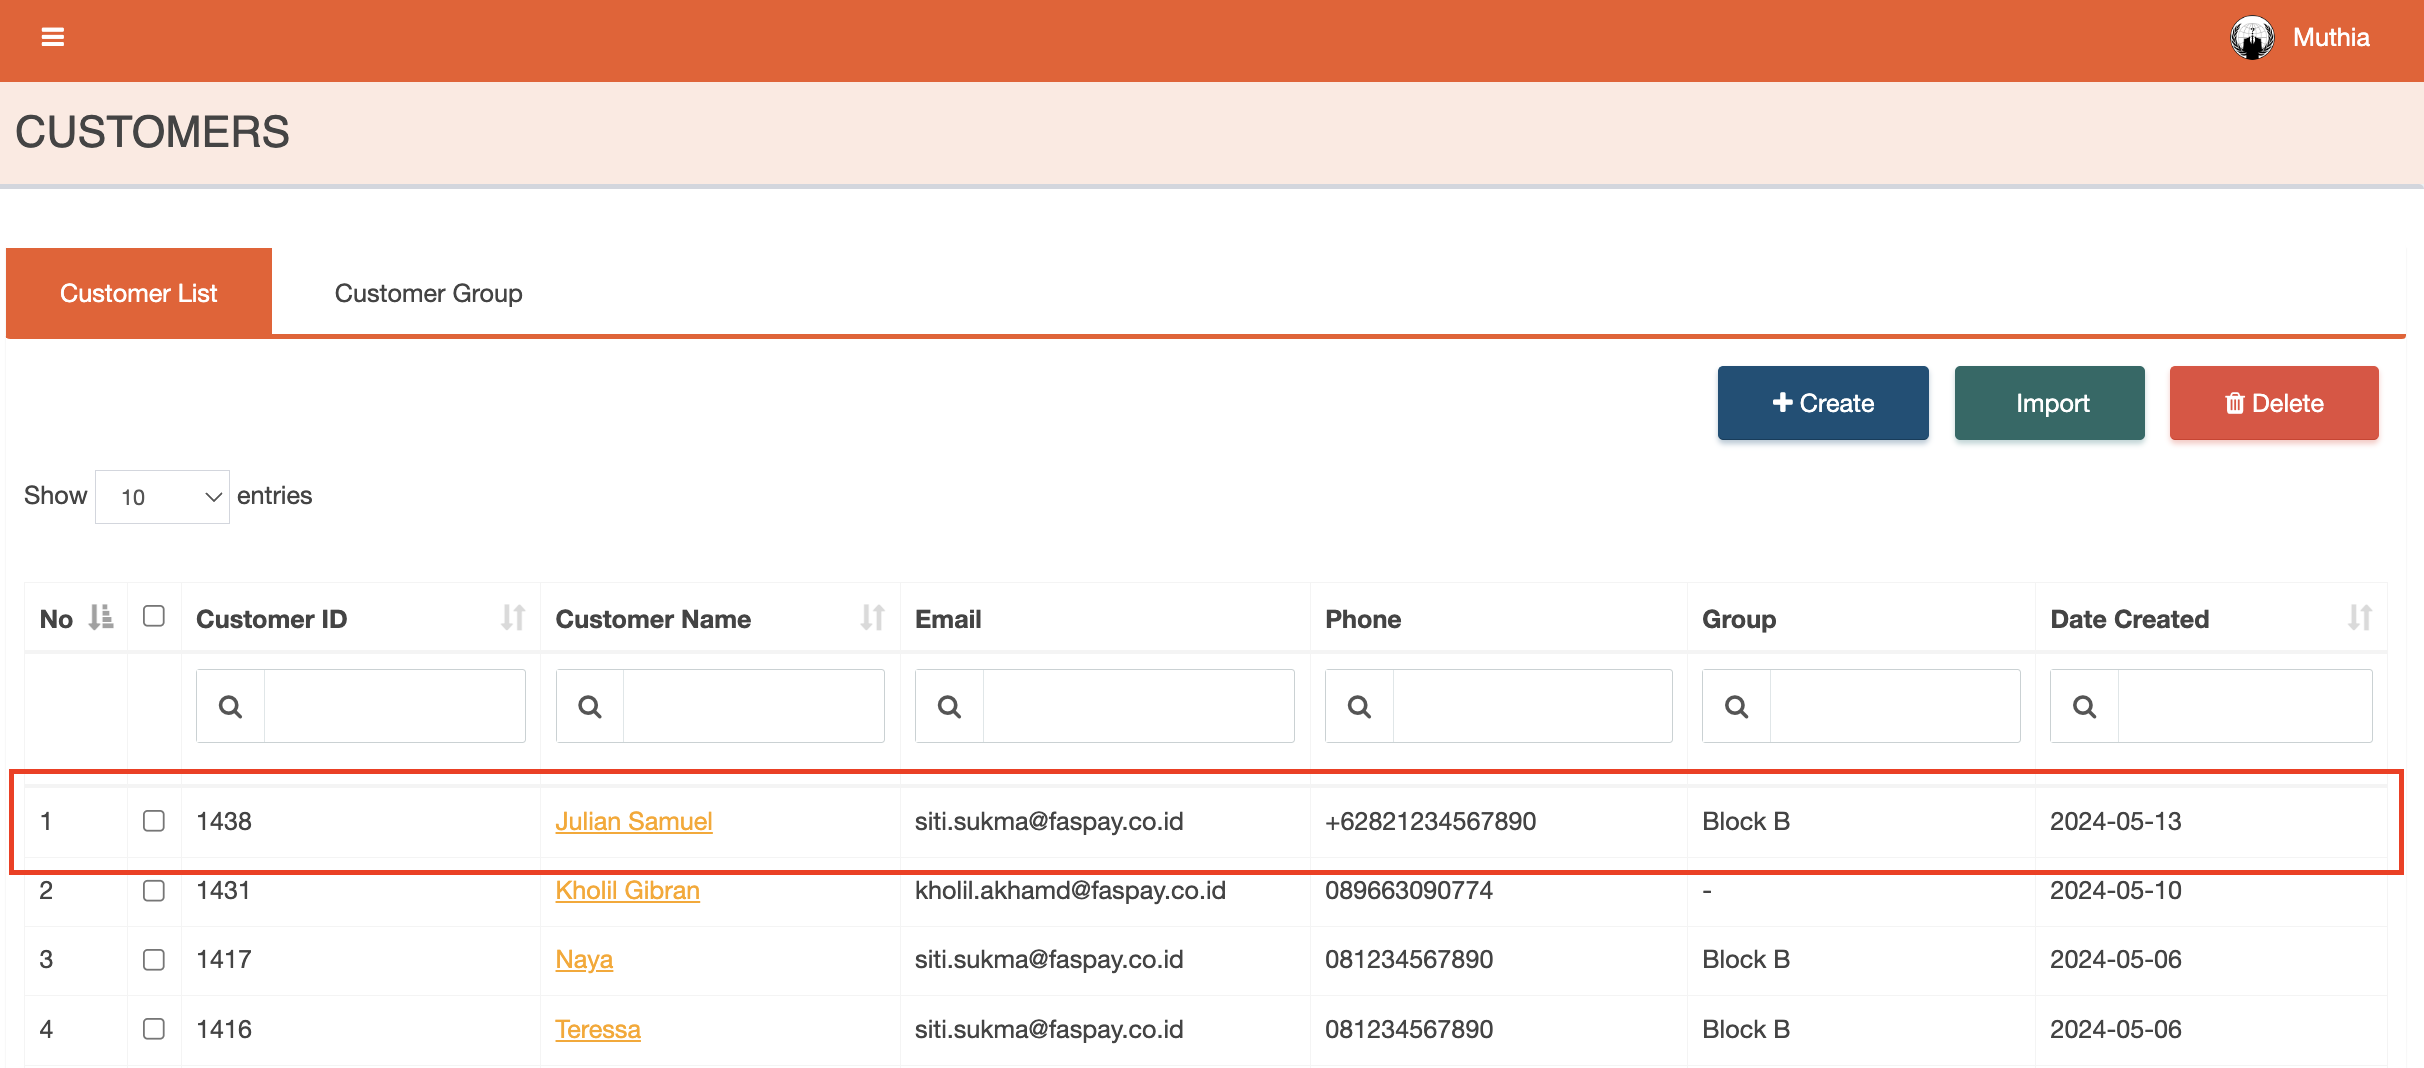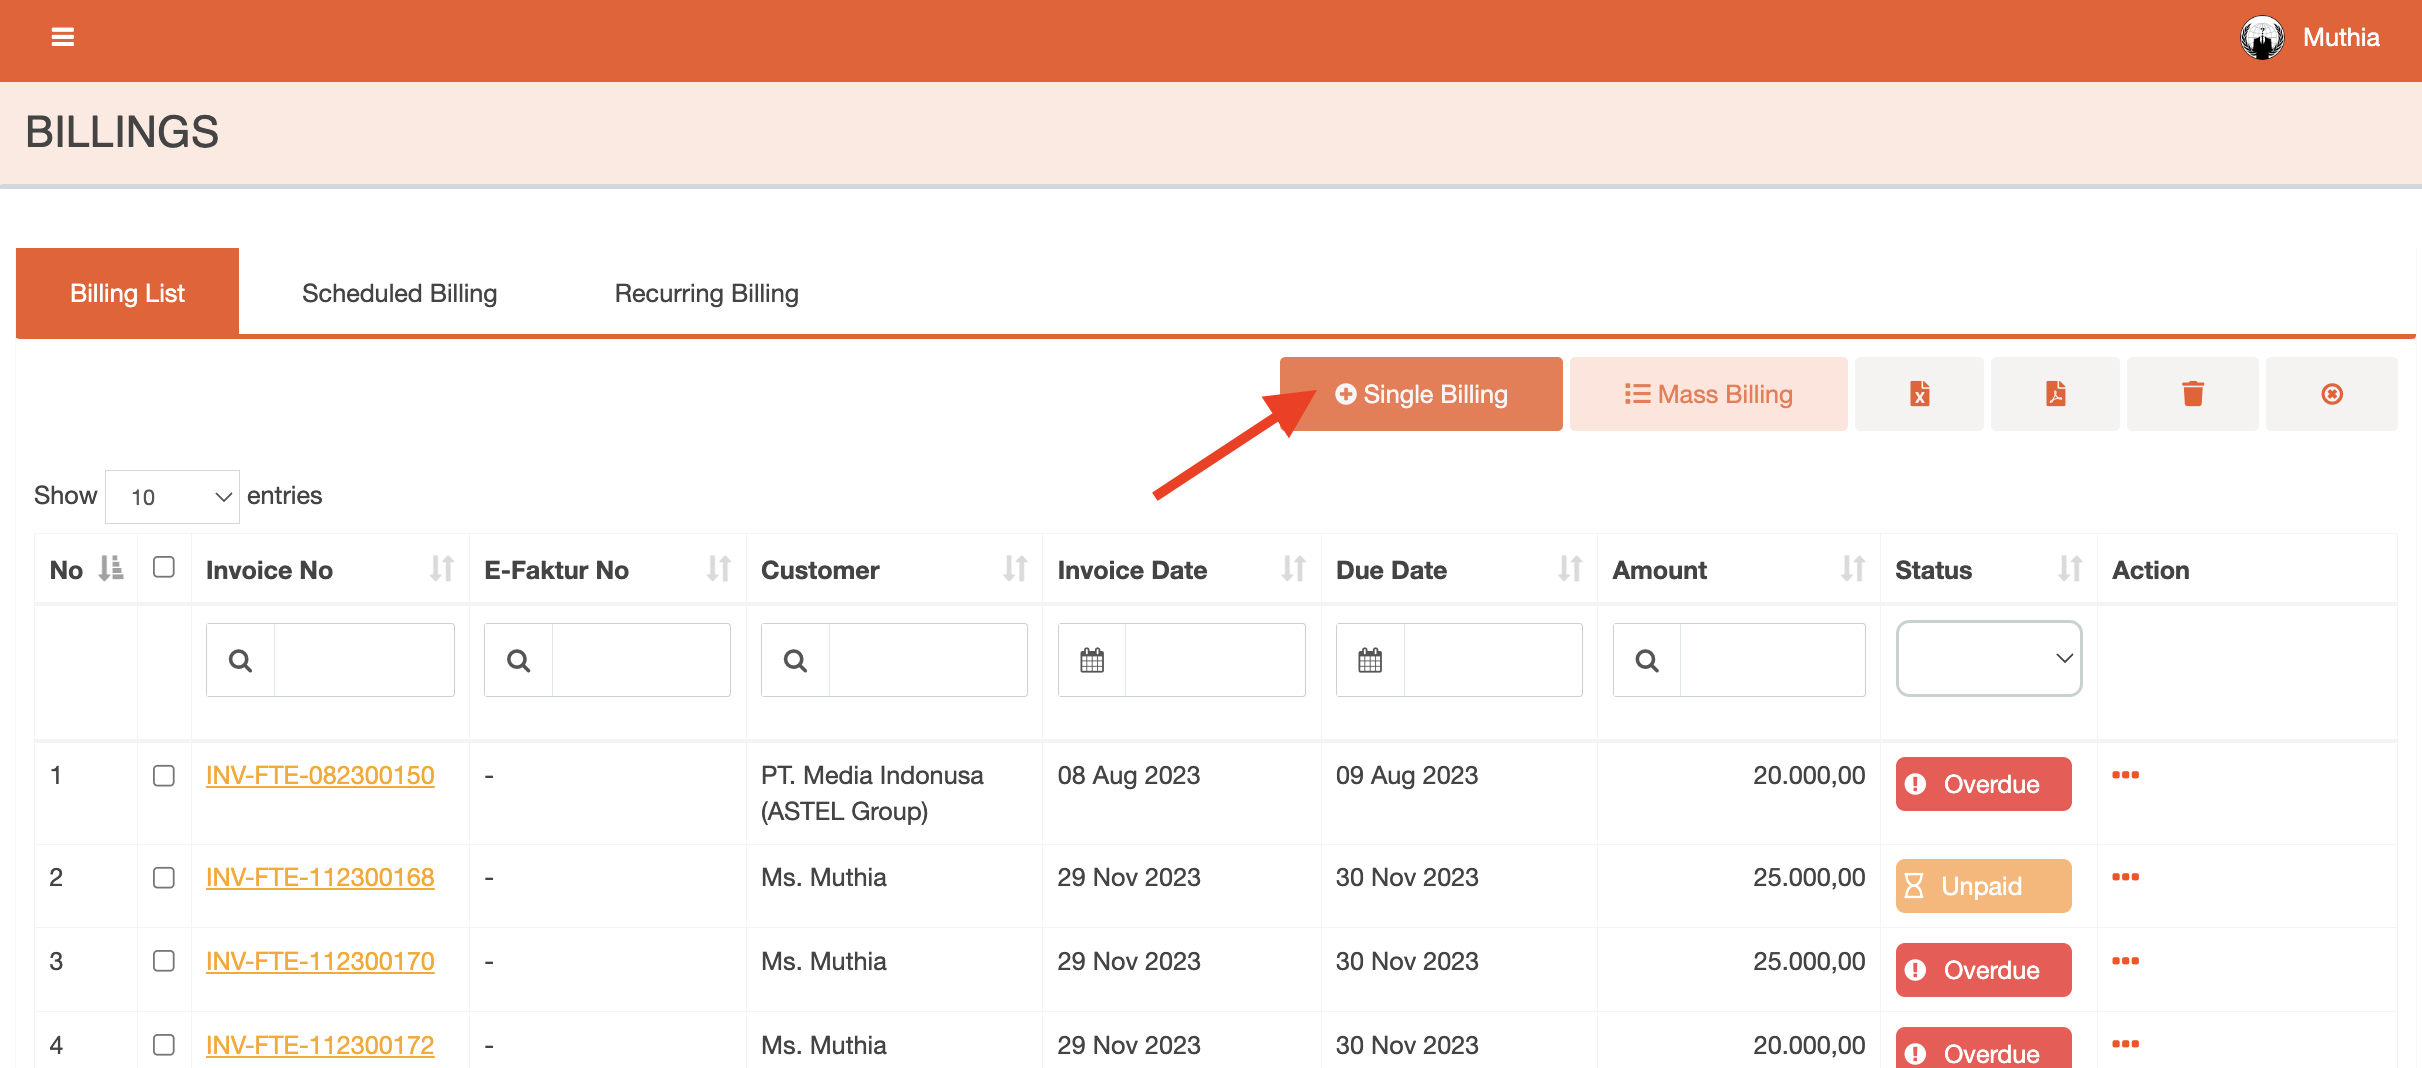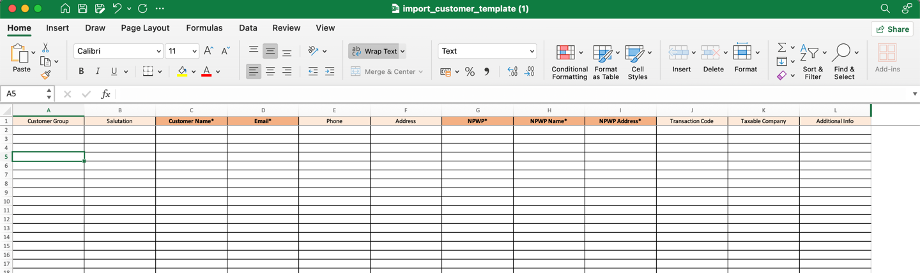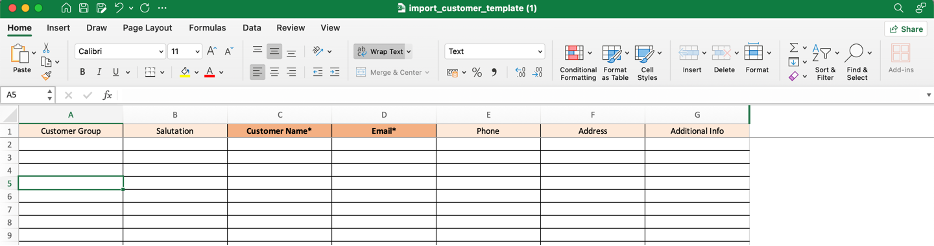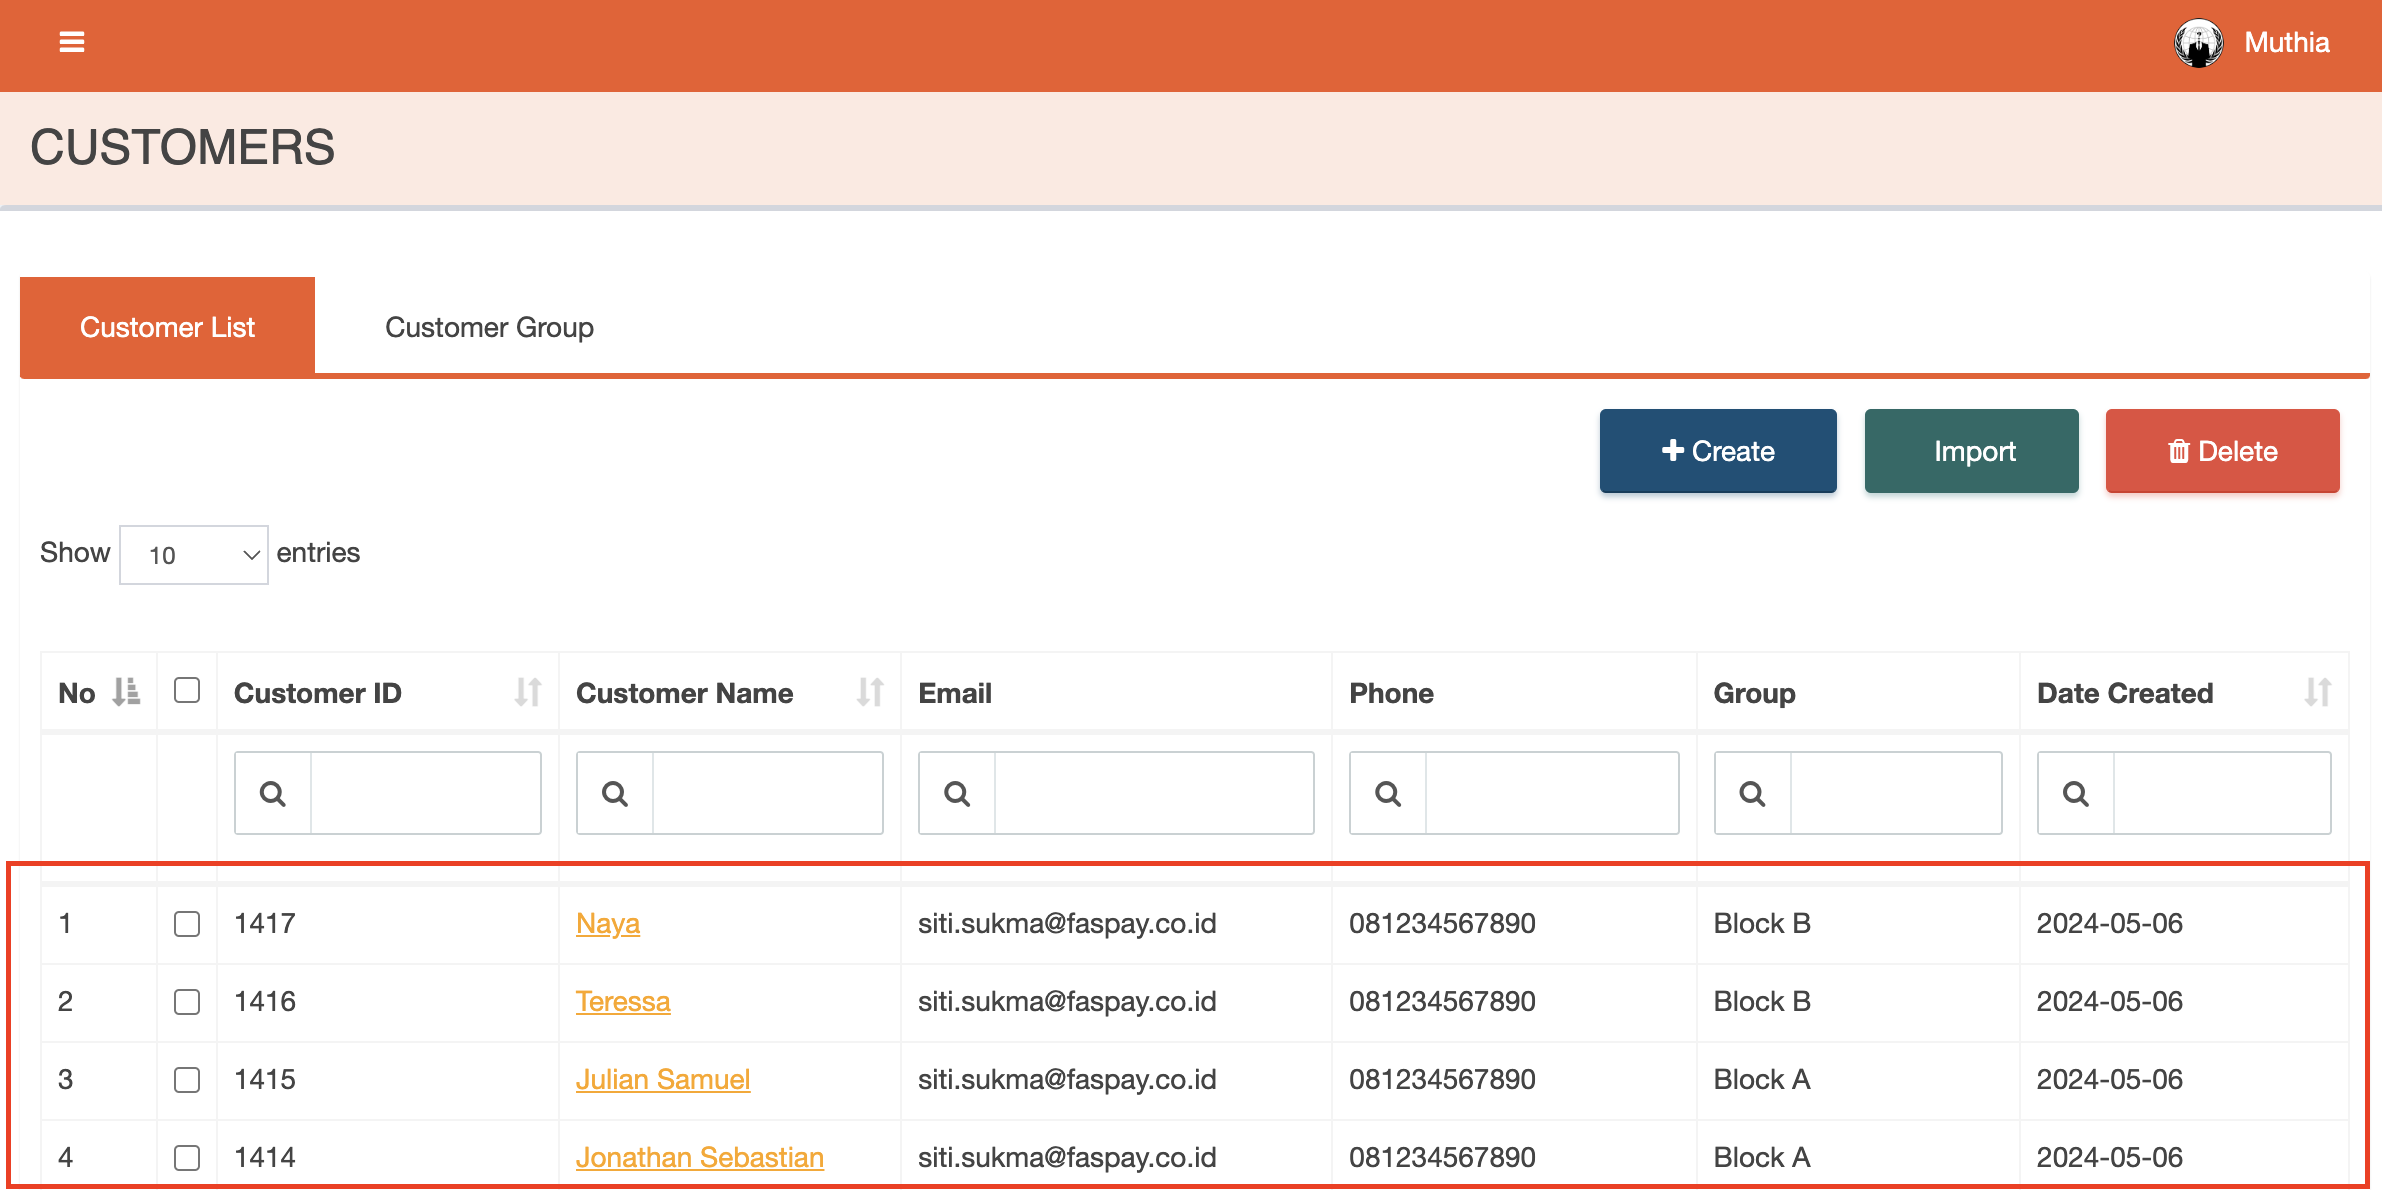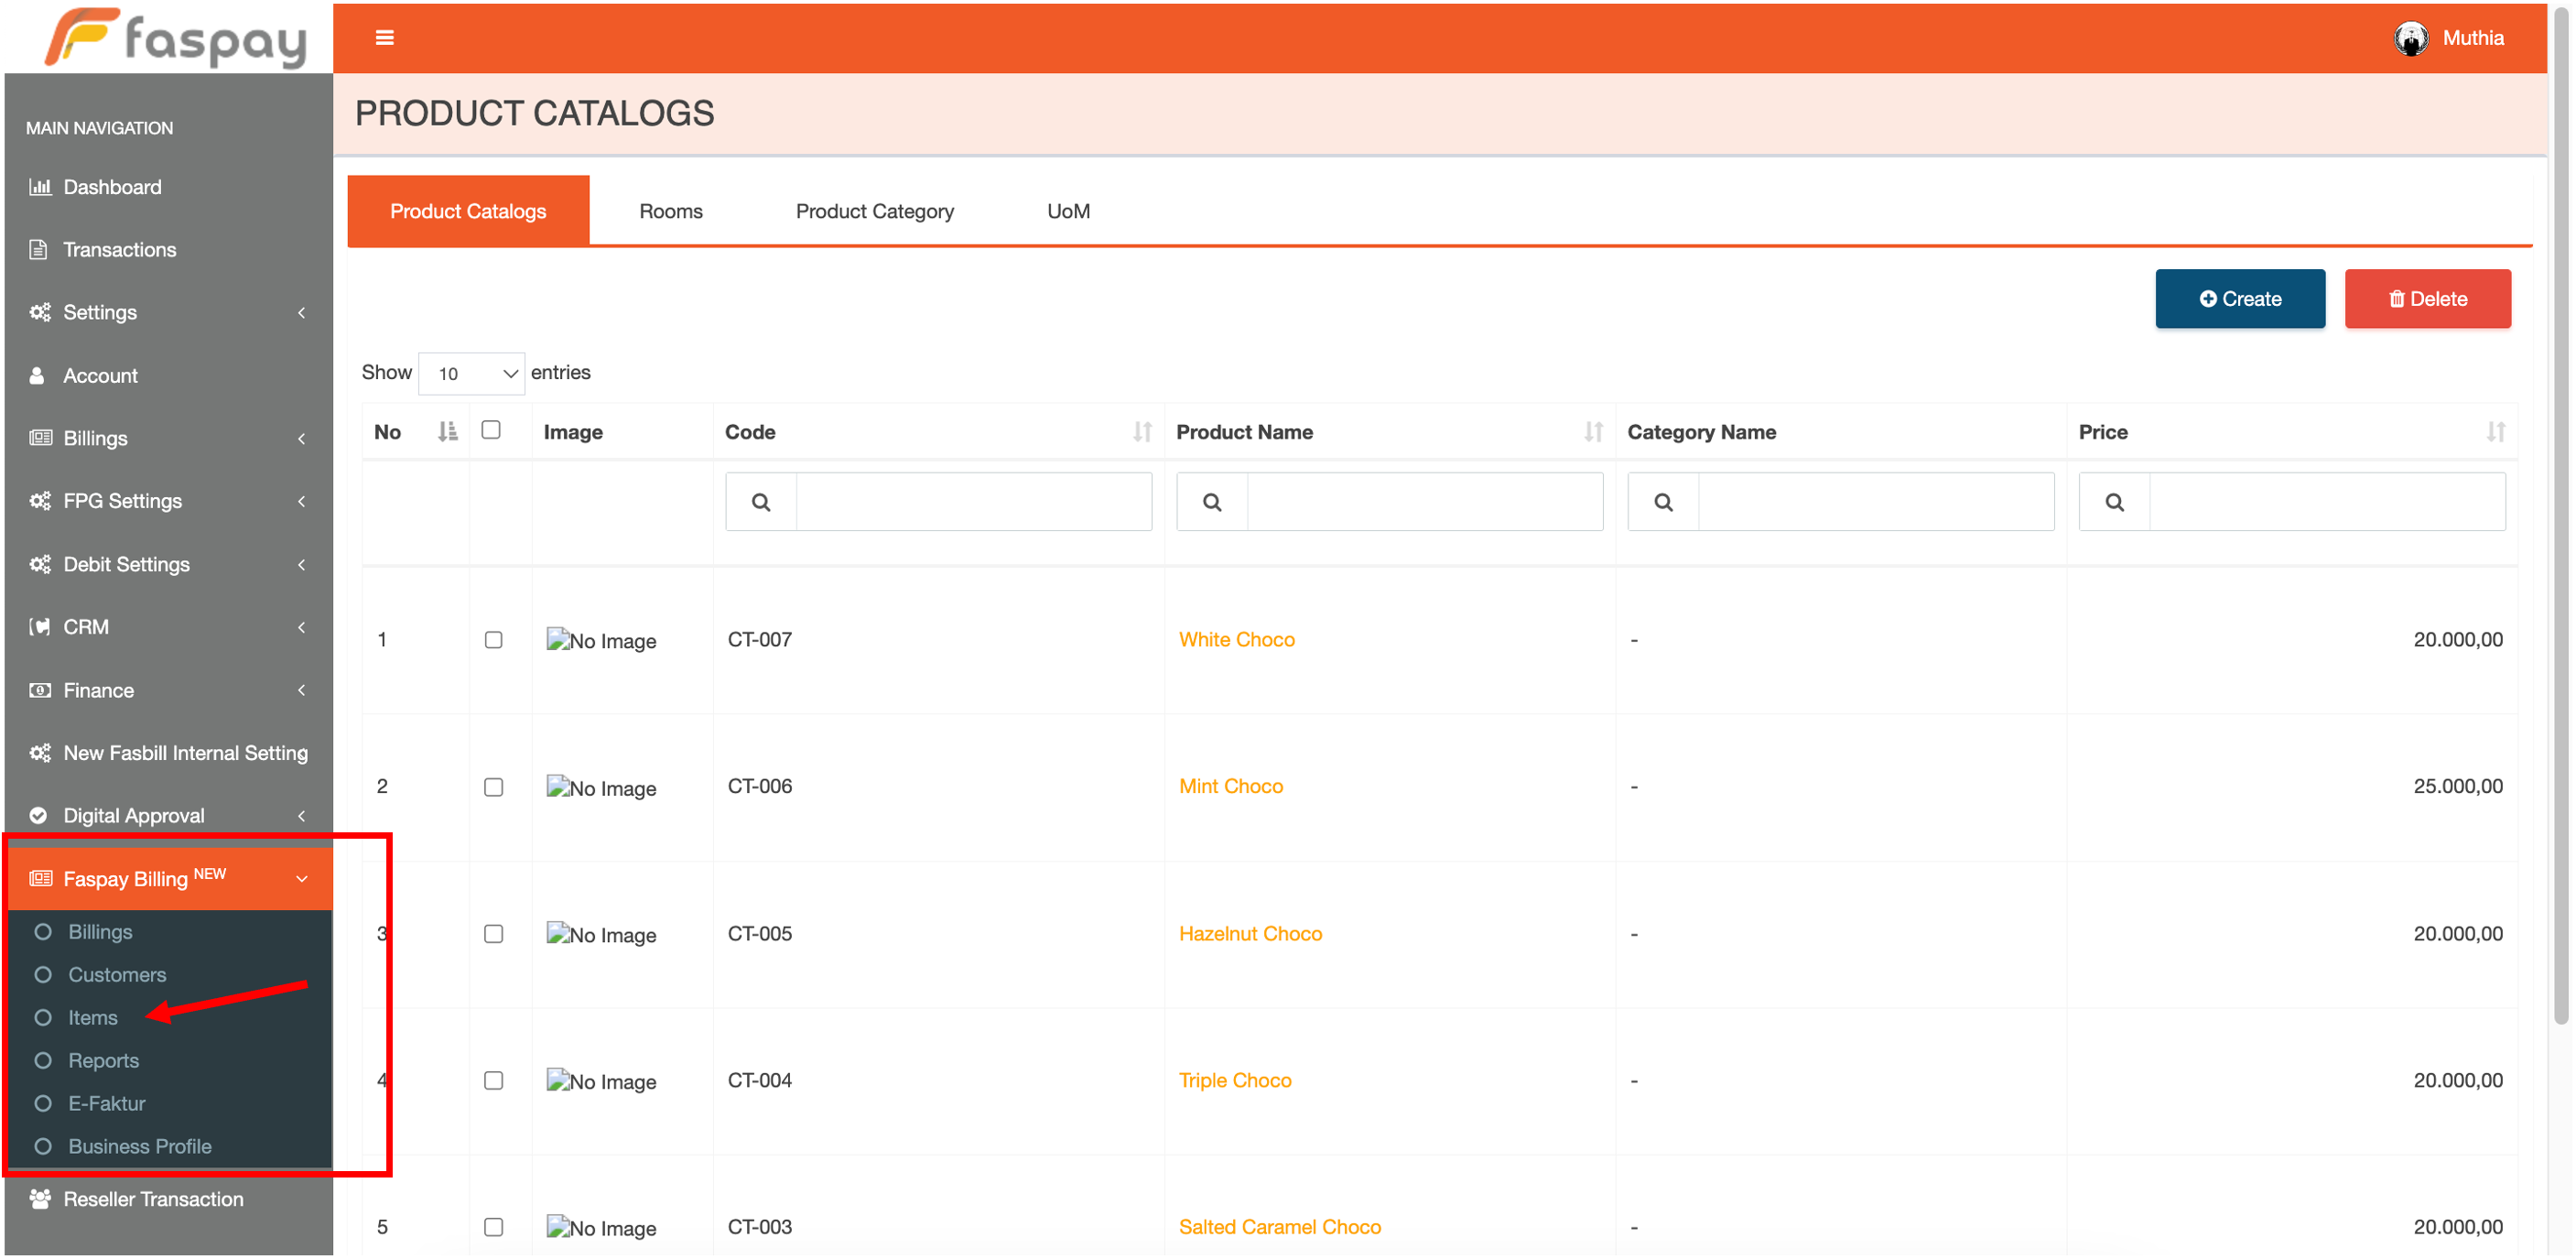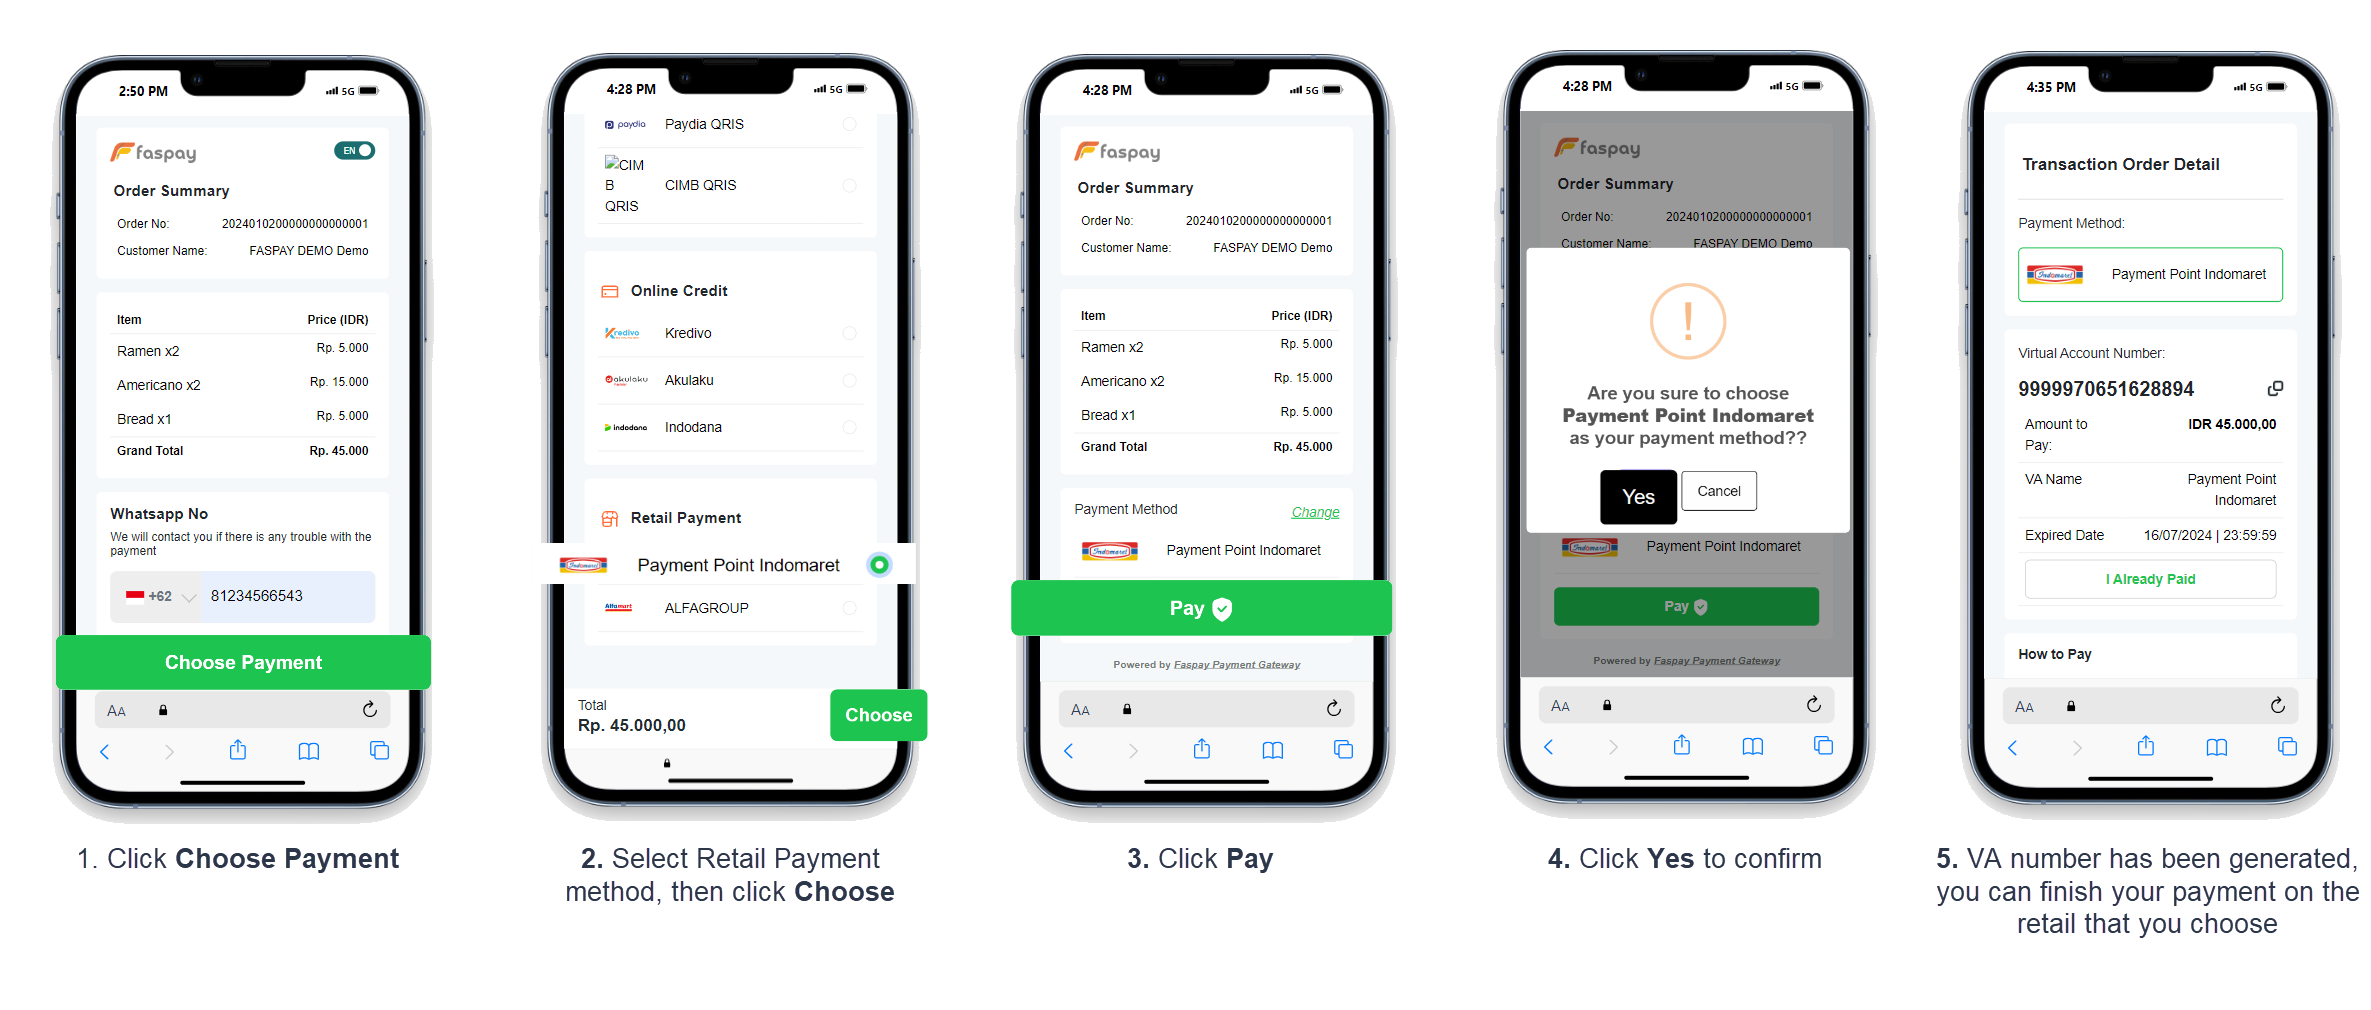
# Homepage

## Welcome to Faspay!

Faspay is an online payment gateway provider that helps and provides solutions to online merchants to simplify the payment process. The main goal of Faspay is to enable merchants to accept all types of payments in whatever form they want, be it payments via debit transaction platforms or transactions using credit cards.&#x20;

### More documentation of our products:

<table data-view="cards"><thead><tr><th></th><th></th><th></th><th data-hidden data-card-target data-type="content-ref"></th><th data-hidden data-card-cover data-type="image">Cover image</th></tr></thead><tbody><tr><td></td><td>Faspay Business</td><td></td><td><a href="/pages/-MHl2ab4EvU3T0GpxeoD">/pages/-MHl2ab4EvU3T0GpxeoD</a></td><td data-object-fit="contain"><a href="/files/ah1BN8bKF3yR6d21Sa43">/files/ah1BN8bKF3yR6d21Sa43</a></td></tr><tr><td></td><td>Faspay Billing</td><td></td><td><a href="/pages/-MHl2QvYSaVY-UcJaWYR">/pages/-MHl2QvYSaVY-UcJaWYR</a></td><td data-object-fit="contain"><a href="/files/cmvp79aE0LliurY9bDkK">/files/cmvp79aE0LliurY9bDkK</a></td></tr><tr><td></td><td>Faspay Xpress</td><td></td><td><a href="/pages/-MHli59pphwxq8T5BXGt">/pages/-MHli59pphwxq8T5BXGt</a></td><td data-object-fit="contain"><a href="/files/ZkWPly1jzKgq3Ho19o5K">/files/ZkWPly1jzKgq3Ho19o5K</a></td></tr><tr><td></td><td>Faspay SendMe</td><td></td><td><a href="/pages/-MHliDr0WaS7eJ8BL-XW">/pages/-MHliDr0WaS7eJ8BL-XW</a></td><td data-object-fit="contain"><a href="/files/bLS7VWBxkttMAvB6zMxJ">/files/bLS7VWBxkttMAvB6zMxJ</a></td></tr><tr><td></td><td>SNAP</td><td></td><td><a href="/pages/1Ton0upNTQ2505NPh8W6">/pages/1Ton0upNTQ2505NPh8W6</a></td><td data-object-fit="contain"><a href="/files/CyALMzRZRlQ5vxymMcUU">/files/CyALMzRZRlQ5vxymMcUU</a></td></tr></tbody></table>


# Online Registration Guide

Here are the quick guide to do Online Registration.

### Online Registration for Merchant Individual

**In English Language**

{% file src="/files/lDIBN3BExi2SYtpLvTSK" %}

**In Indonesian Language**

{% file src="/files/FRBSXdBnMzpJVaBmIDA1" %}

### Online Registration for Merchant Corporation

**In English Language**

{% file src="/files/I8DzMhFTwIykhrOdkQfB" %}

**In Indonesian Language**

{% file src="/files/vsX0eEk7Cbx7QigEUEju" %}


# Faspay Business

### Introduction

Faspay Business allows your online business to receive payment online, you can choose between Credit or Debit Channels, ranging from Internet Banking, Mobile Banking, Virtual Accounts, e-money, Retail Payment, and Credit Cards to Online Credit.

<table data-view="cards"><thead><tr><th></th><th></th><th data-hidden data-card-target data-type="content-ref"></th></tr></thead><tbody><tr><td></td><td>Debit Transaction</td><td><a href="/pages/-MHlXY3FfflRpakVPi8P">/pages/-MHlXY3FfflRpakVPi8P</a></td></tr><tr><td></td><td>Credit Card Transaction</td><td><a href="/pages/-MHlkmY0iu6j1ykuTF8l">/pages/-MHlkmY0iu6j1ykuTF8l</a></td></tr></tbody></table>


# Debit Transaction

## Overview

Faspay is an online payment gateway that provides convenience to the merchant in online transactions. Faspay provides convenience in various payment types, one of them being Debit Card transactions with Faspay Debit. Faspay Debit is a product that facilitates Faspay's debit card transactions at the merchant's website.

Types of payment channels that can be integrated with debit transactions in Faspay:

{% tabs %}
{% tab title="ATM / VIRTUAL ACCOUNT" %}

<table><thead><tr><th width="130">Code</th><th>Payment Channel</th></tr></thead><tbody><tr><td>402</td><td>Permata Virtual Account / PermataNet</td></tr><tr><td>408</td><td>Maybank Virtual Account</td></tr><tr><td>702</td><td>BCA Virtual Account</td></tr><tr><td>708</td><td>Danamon Virtual Account</td></tr><tr><td>718</td><td>BNC Virtual Account</td></tr><tr><td>723</td><td>BSI Virtual Account</td></tr><tr><td>800</td><td>BRI Virtual Account</td></tr><tr><td>801</td><td>BNI Virtual Account</td></tr><tr><td>802</td><td>Mandiri Virtual Account</td></tr><tr><td>818</td><td>Sinarmas Virtual Account</td></tr><tr><td>825</td><td>CIMB Virtual Account</td></tr><tr><td>837</td><td>BTN Virtual Account</td></tr></tbody></table>
{% endtab %}

{% tab title="INTERNET BANKING" %}

<table><thead><tr><th width="144">Code</th><th>Payment Channel</th></tr></thead><tbody><tr><td>402</td><td>PermataNet</td></tr><tr><td>405</td><td>BCA KlikPay</td></tr><tr><td>700</td><td>Octo Clicks</td></tr><tr><td>701</td><td>Danamon Online Banking</td></tr></tbody></table>
{% endtab %}

{% tab title="ONLINE DEBIT" %}

<table><thead><tr><th width="150">Code</th><th>Payment Channel</th></tr></thead><tbody><tr><td>810</td><td>B-Secure</td></tr><tr><td>714</td><td>BRI Direct Debit</td></tr></tbody></table>
{% endtab %}

{% tab title="ONLINE CREDIT" %}

<table><thead><tr><th width="165">Code</th><th>Payment Channel</th></tr></thead><tbody><tr><td>709</td><td>Kredivo</td></tr><tr><td>721</td><td>BRI Ceria</td></tr><tr><td>807</td><td>Akulaku</td></tr><tr><td>820</td><td>Indodana</td></tr></tbody></table>
{% endtab %}

{% tab title="e-MONEY" %}

<table><thead><tr><th width="161">Code</th><th>Payment Channel</th></tr></thead><tbody><tr><td>302</td><td>LinkAja</td></tr><tr><td>715</td><td>LinkAja QRIS</td></tr><tr><td>716</td><td>LinAja AppLink</td></tr><tr><td>704</td><td>Sakuku</td></tr><tr><td>711</td><td>ShopeePay QRIS</td></tr><tr><td>713</td><td>ShopeePay Jump App</td></tr><tr><td>720</td><td>OVO Tokenize</td></tr><tr><td>722</td><td>DANA Subscription</td></tr><tr><td>812</td><td>OVO</td></tr><tr><td>819</td><td>DANA</td></tr><tr><td>836</td><td>Paydia QRIS</td></tr></tbody></table>
{% endtab %}

{% tab title="RETAIL PAYMENT" %}

<table><thead><tr><th width="152">Code</th><th>Payment Channel</th></tr></thead><tbody><tr><td>706</td><td>Indomaret Payment point</td></tr><tr><td>707</td><td>Alfagroup</td></tr></tbody></table>
{% endtab %}
{% endtabs %}

## Transaction Flow

For The Debit Transaction we distinct into two kinds of transaction flow:

{% tabs %}
{% tab title="One Step Transaction" %}
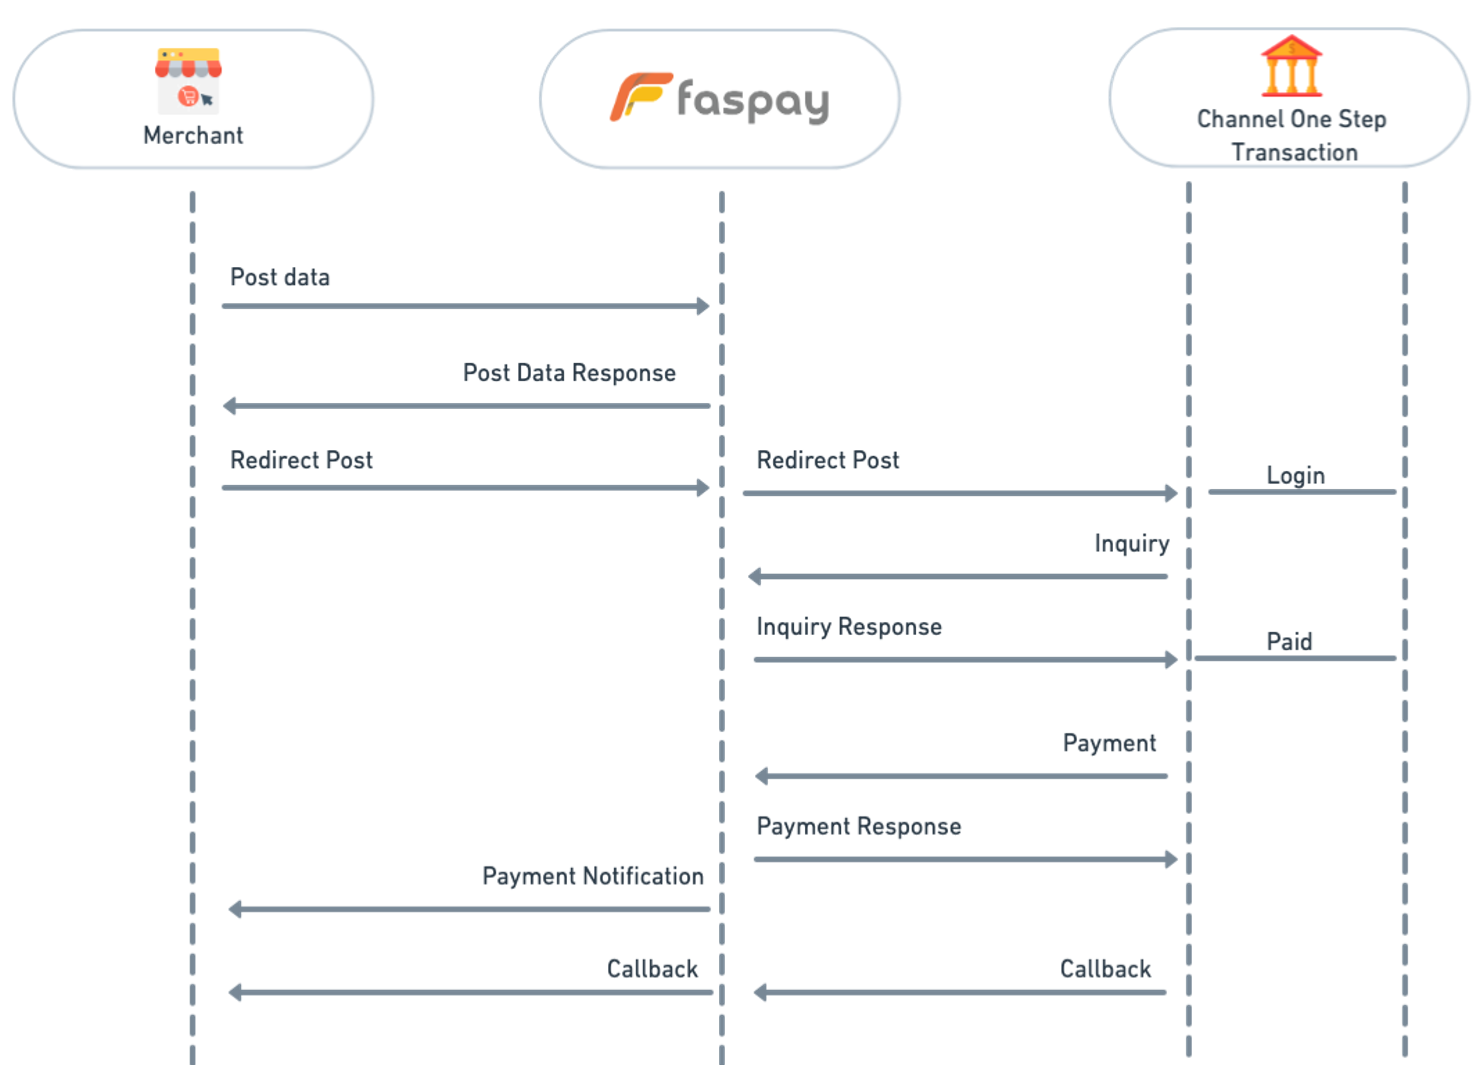
The type of payment on Faspay made end to end (1 cycle) is completed on the same page and can be completed immediately. After the buyer makes a payment on the Faspay website, the buyer will be redirected back to the merchant page. \
\
In a one-step transaction, the buyer will provide data on the merchant's web page and the buyer will be redirected from the merchant's web page to the Faspay page, Faspay will redirect the buyer to the selected payment channel page, and then the customer enters the data/login (if needed) and performs payment on the payment channel chosen. \
\
After the transaction is complete, the transactions channel will notify Faspay and inform the buyer whether the transaction was successful or failed.

<figure><img src="/files/whFUjWDq7Nl78ybKX4UK" alt=""><figcaption><p>One Step Transaction Flow</p></figcaption></figure>

#### List Of One Step Payment Channel&#x20;

| Code         | Payment Channel         |
| ------------ | ----------------------- |
| 302          | LinkAja                 |
| 401          | BRI e-PAY               |
| 402          | PermataNet              |
| 405          | BCA KlikPay             |
| 700          | Octo Clicks             |
| 701          | Danamon Online Banking  |
| 704          | Sakuku                  |
| 708          | Danamon Virtual Account |
| 709          | Kredivo                 |
| 713          | ShopeePay Jump App      |
| 714          | BRI Direct Debit        |
| 720          | OVO Tokenize            |
| 721          | BRI Ceria               |
| 722          | DANA Subscription       |
| 807          | Akulaku                 |
| 810          | B-Secure                |
| 812          | OVO                     |
| 814          | Maybank2U               |
| 819          | DANA                    |
| 820          | Indodana                |
| {% endtab %} |                         |

{% tab title="Two Step Transaction" %}
Types of payments directed to Faspay's page are for payment procedures and buyers are not redirected to the payment page directly. Transactions can be made through other media, for example via an ATM or a handset for payment. \
\
In a two-step transaction, the buyer will provide data on the merchant's web page after which the buyer will be redirected from the merchant's web page to the Faspay page. The Faspay page will display payment channel options for buyers to choose from. The system will wait for the buyer to complete a separate payment. \
\
Faspay will receive a payment notification from the transaction channel and provide notification information to the buyer on whether the transaction is successful or failed.<br>

<figure><img src="/files/8PSd8xosJzVO4Sip5DkV" alt=""><figcaption><p>Two Step Transaction Flow</p></figcaption></figure>

#### List of Two Step Payment Channel

| Code          | Payment Channel          |
| ------------- | ------------------------ |
| 402           | Permata Virtual Account  |
| 408           | Maybank Virtual Account  |
| 702           | BCA Virtual Account      |
| 706           | Indomaret Payment point  |
| 707           | Alfagroup                |
| 711           | ShopeePay QRIS           |
| 718           | BNC Virtual Account      |
| 723           | BSI Virtual Account      |
| 801           | BNI Virtual Account      |
| 802           | Mandiri Virtual Account  |
| 818           | Sinarmas Virtual Account |
| 825           | CIMB Virtual Account     |
| 836           | Paydia QRIS              |
| {% endtab %}  |                          |
| {% endtabs %} |                          |


# Features


# Static Transaction

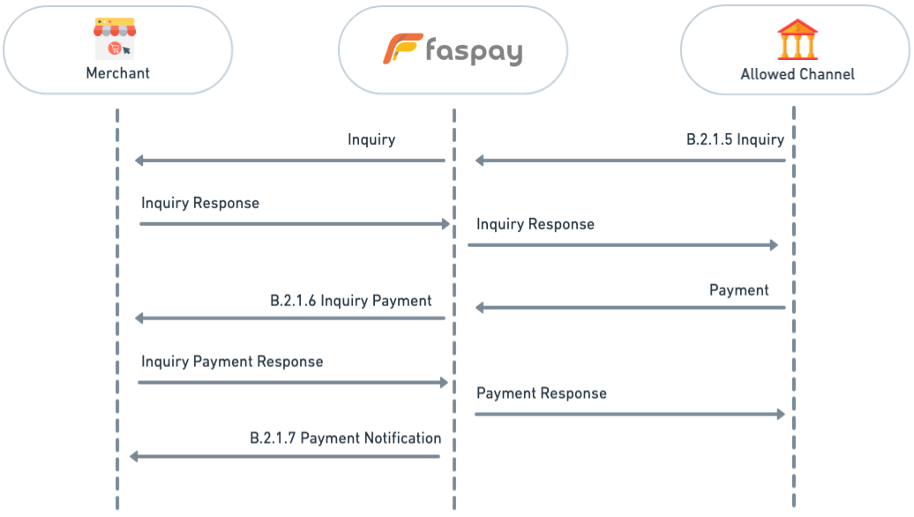
In a static transaction, the integration process differs from a standard transaction flow, where the static transaction TRX ID/transaction ID static can be paid many times.&#x20;

For a static merchant, a transaction is permitted to use the 10-digit transaction ID and the merchant must prepare one additional URL for the inquiry and payment.&#x20;

**In this process the system will perform inquiry URL 2 times, That is :**

1. **Inquiry Transaction**

In this step, the customer inputs a transaction ID in the channel (eg, ATM or Internet Banking) and if customers click the "**NEXT**" or "**CONTINUE**" Faspay will access the URL inquiry merchant to check transaction ID exists or not on the merchant and the merchant will send a response to an inquiry to Faspay and the customer will be visible UI display details of the transaction.[^1]&#x20;

&#x20; 2\. **Inquiry Payment**

After the customer checks the transaction ID and proceeds to the payment, Faspay goes inquiry payment via URL inquiry merchants to provide transaction information that has been paid by the customer in which the value of the amount is the same (for the type of close amount) or the value of the amount is different (for the type of open amount) with the value of the transaction amount. Merchants will respond to Faspay that the transaction is approved or disapproved by the merchant. If the merchant declines the transaction, the customer UI display will show that the transaction failed, and if the merchant approves the transaction, the customer UI display will show the success of the transaction.

&#x20; **Payment Channel List :**

| Payment Channel          | Open Amount | Close Amount |
| ------------------------ | ----------- | ------------ |
| Permata Virtual Account  | Yes         | Yes          |
| Maybank Virtual Account  | No          | Yes          |
| BCA Virtual Account      | Yes         | Yes          |
| Indomaret                | No          | Yes          |
| Alfamart                 | No          | Yes          |
| Danamon Virtual Account  | Yes         | Yes          |
| BRI Virtual Account      | Yes         | Yes          |
| Mandiri Virtual Account  | Yes         | Yes          |
| Sinarmas Virtual Account | Yes         | Yes          |
| CIMB Virtual Account     | Yes         | Yes          |

![How it Works Static Transaction](/files/-MMa8QBjYNYThbmB3D1m)

{% hint style="info" %}
For channels -> VA Mandiri and VA Maybank merchants are required to use 8-digit transaction codes because this channel assigns an 8-digit prefix to transactions from the bank.
{% endhint %}

<figure><img src="/files/OqByXMN7TnfE3kb45j5L" alt=""><figcaption><p>Static Transaction Flow</p></figcaption></figure>

[^1]:


# Virtual Account Static

## BNI Virtual Account Static

#### Introduction

BNI Virtual account is a Faspay Collection product which is a payment method with a special account given to customers of cooperation companies as a means of bill payment, making it easier for cooperative companies to identify the remittances they receive. In BNI Virtual Account Static, this is a type of static transaction TRX ID / static Transaction ID that can be paid multiple times with one virtual account number.

#### Transaction BNI Virtual Account Static

<figure><img src="/files/DNM2Orp38OJrPM5Tbha8" alt=""><figcaption><p>BNI VA Static Transaction Flow</p></figcaption></figure>

**Description:**

1. After the user checks out at the web merchant and selects payment using the BNI VA method. Merchants post data to Faspay.
2. Faspay will create a billing request to BNI, and then BNI will send a response back from the billing request to Faspay.
3. Faspay will forward the post-data response to the Merchant.
4. Then wait until the user has finished making the VA payment.
5. After the transaction, BNI will send a payment notification to Faspay and Faspay will forward the payment notification to Merchant.

#### Update Transaction

<figure><img src="/files/XOjw2f1Iyudhu8Y7jBsM" alt=""><figcaption><p>BNI VA Update Transaction Flow</p></figcaption></figure>

## BNC Virtual Account Static

#### Introduction

The transaction process in BNC VA is divided into **static transaction** flow and **dynamic transaction** flow. The difference between static and dynamic transactions is post-data used. The Post-Data service in the static transaction is the same as dynamic Post-Data. However, there are differences in `bill_no` parameter.

If the static transaction, Faspay will generate a Virtual Account number when sending post-data to the BNC System.

#### Transaction BNC Virtual Account Static

<figure><img src="/files/Fz2HTR4ou1sVUoUDhbc7" alt=""><figcaption><p>BNC VA Static Flow Transaction</p></figcaption></figure>

**Description:**&#x20;

1. The customer/User checks out the product and chooses a payment method with BNC Virtual Account.
2. Merchant will send a post data request to Faspay, and Faspay will forward post data VA static to BNC VA
3. BNC VA will send a response virtual account static number which Faspay will forward to the Merchant.
4. Merchant will inform the virtual account static number to the Customer/User.
5. The customer/User will make payment transactions.
6. After the transaction, BNC sends a payment notification to the Faspay side.
7. Faspay forwards the payment notification to the merchant side, and from the BNC side, it will also display the payment status to the Customer/User.

## BTN Virtual Account

#### Introduction

BTN VA (Virtual Account) from Bank Tabungan Negara is a new payment channel that is integrated into Faspay Collection. It operates through Virtual Accounts, which are digitally generated for individual customers. To initiate payments, customers are directed to their respective Virtual Accounts, each identified by a unique customer ID number. &#x20;

In BTN Virtual Account Static, this is a type of static transaction TRX ID / static Transaction ID that can be paid multiple times with one virtual account number.

#### Transaction BTN Virtual Account Static

<figure><img src="/files/Q0giZ9mhp5R6iPhNklfs" alt=""><figcaption><p>BTN VA Static Flow Transaction</p></figcaption></figure>

**Description:**

1. After the user checkout at the web merchant and selects payment using the BTN VA method. Merchants post data to Faspay.
2. Faspay will create a billing request to BTN, and then BTN will send a response back from the billing request to Faspay.
3. Faspay will forward the post-data response to the Merchant.
4. Then, wait until the user has finished making the VA payment.
5. After the transaction, BTN will send a payment notification to Faspay and Faspay will forward the payment notification to Merchant.

The API Reference can be found here

<table data-view="cards"><thead><tr><th></th><th></th><th></th><th data-hidden data-card-target data-type="content-ref"></th></tr></thead><tbody><tr><td></td><td>BNI VA Static Integration</td><td></td><td><a href="/pages/9RojTnZ37IJgAyuYz43R">/pages/9RojTnZ37IJgAyuYz43R</a></td></tr><tr><td></td><td>BNC VA Static Integration</td><td></td><td><a href="/pages/wgAot3iIsKn1QyJ8Citz">/pages/wgAot3iIsKn1QyJ8Citz</a></td></tr><tr><td></td><td></td><td></td><td></td></tr></tbody></table>

{% hint style="info" %}
The integration of the BTN Virtual Account static  is the same as the existing API integration
{% endhint %}


# UNIcount

UNIcount Faspay is one of the features used in the transaction ID to make a payment into the payment channel appropriate to the customer's choice.

| Payment Channel | Dynamic Type | Static Type | Open Amount | Close Amount |
| --------------- | ------------ | ----------- | ----------- | ------------ |
| BRI Mocash      | Yes          | Yes         | No          | Yes          |
| Permata VA      | Yes          | Yes         | Yes         | Yes          |
| Maybank VA      | Yes          | Yes         | No          | Yes          |
| BCA VA          | Yes          | Yes         | Yes         | Yes          |
| Indomaret       | Yes          | Yes         | No          | Yes          |
| Alfamart        | Yes          | Yes         | No          | Yes          |
| Danamon VA      | Yes          | Yes         | Yes         | Yes          |
| BRI VA          | Yes          | Yes         | Yes         | Yes          |
| Mandiri VA      | Yes          | Yes         | Yes         | Yes          |
| Sinarmas VA     | Yes          | Yes         | Yes         | Yes          |
| CIMB VA         | Yes          | Yes         | Yes         | Yes          |

## &#x20;**Transaction Type UNIcount**

1. **Static Transaction**

Static transactions using a different process flow, the merchant will generate transactions and prepare one additional URL for the inquiry process transactions from the channel (Inquiry Inquiry transaction and payment) and the customer will pay the ATM or Internet banking channel.

2. **Dynamic Transaction**

A dynamic transaction using standard process flow where the merchant POST data to a payment channel Faspay using code 410.

## &#x20;**Payment Type UNIcount**

1. **Open Amount**

Is the actual value amount (payment amount) paid by the customer may differ from the value of the transaction amount

2. **Close Amount**

Is the actual value amount (payment amount) paid by the customer shall be equal to the value of the transaction amount

![How it Works UNIcount](/files/-MMbs5PFZZAHgZP-03CD)

For the UNIcount transaction, the customer will use the 10-digit code from the merchant's transaction with a combination of the first 6-digit prefix number from one payment channel used to pay for a transaction. When the customer pays the transaction using an ATM or internet banking, they would pay using a 6-digit BIN/prefix they received from the selected channel payment followed by a 10-digit transaction number.

## **UNIcount - Static Transaction**

UNIcount static transaction integration process differs from a standard transaction flow, which for UNIcount static transaction permits to use seven-digit merchant transaction ID and the merchant must prepare one additional URL for the inquiry and payment.

Once customers make transactions at the merchant and receive a transaction ID (UNIcount), customers make payments at ATMs or via Internet banking. In this process the system will perform inquiry URL 2 times, that is:

### **Inquiry Transaction**

In this step the customer inputs the transaction ID in the channel (eg, ATM or Internet Banking) and if customers click the "NEXT" or "CONTINUE" Faspay will access the URL inquiry merchant to check transaction ID exists or not on the merchant and the merchant will send a response to an inquiry to Faspay and the customer will be visible UI display details of the transaction.

### **Inquiry Payment**

After the customer checks the transaction ID and proceeds to the payment, Faspay goes inquiry payment via URL inquiry merchants to provide transaction information that has been paid by the customer in which the value of the amount is the same (for the type of close amount) or the value of the amount is different (for the type of open amount) with the value of the transaction amount. Merchants will respond to Faspay that the transaction is approved or disapproved by the merchant. If the transaction is declined by the merchant, the customer UI display will show that the transaction failed, and if the transaction is approved by the merchant, the customer UI display will show the success of the transaction.

![How it Works UNIcount - Static Transaction](/files/-MMbsby-RVcYLgDBiq5y)

{% hint style="info" %}
For channel: VA Mandiri, VA Maybank merchant must use 8 digits for the transaction because this channel gave 8 prefix transactions from the bank.

For channel: VA Danamon merchant must use 6 digits for transactions because this channel gave 6 prefix transactions from the bank.
{% endhint %}

<figure><img src="/files/KhppWdNjhJdATTF7tkP9" alt=""><figcaption><p>UNIcount Transaction Flow</p></figcaption></figure>


# Credit Card Transaction

Faspay provides convenience in various payment types, including a credit card transaction with Credit Faspay. Credit Faspay is one product that facilitates credit card transactions at merchants.

#### **Types of credit cards that have integration with credit Faspay:**

1. Visa
2. MasterCard
3. JCB
4. Amex (American Express)

Credit card payment is the most widely used online payment facility worldwide. However, for online e-commerce payment using a credit card, you need to know which credit card payment model you will be using:

* **Sales/Purchase** – requires one single transaction to transfer funds from the cardholder’s account to your acquiring bank merchant account.
* **Authorization/Capture** – requires two transactions, the Authorization request, followed separately by a Capture request.

For the first model, i.e. **Sales/Purchase model**, the transaction is sent to the bank as a ‘Sales’ request, and the customer will be automatically charged by the bank upon approval of the transaction.&#x20;

For the second model, i.e. **Authorization/Capture** model, during online payment, the transaction is sent to the bank as an **‘Authorization’** request only, i.e. bank will check whether the card information is correct and has sufficient funds, if yes, the bank will mark and reserve the transaction amount from cardholder’s credit limit. At this point, the cardholder is not charged yet.

To complete the transaction cycle for the second model after an authorization approval is received, a separate **‘Capture’** request is required to be sent to the bank so that the cardholder is billed. This can be done by manually login into administration module FPG to capture the transaction or it can be done through the ‘Advance Functionality – Credit Card Capture API’. If an authorized transaction is not captured after certain days, the card-issuing bank will automatically release the reserved amount.

For online E-Commerce credit card transactions, we always recommend using the second model, i.e. **Authorization/Capture** model. Using this model, you have allowance time to check and verify the transaction and the genuineness of the cardholder to prevent fraudulent transactions. If you are suspicious of the cardholder, you may choose not to capture the transaction.

<figure><img src="/files/KzBs660eKXWaxLMpd0X2" alt=""><figcaption><p>Credit Card Flow Transaction</p></figcaption></figure>


# Recurring Payment

FASPAY payment gateway facilitates a recurring payment model where members authorize merchants to withdraw funds from their accounts automatically and periodically to make purchases via websites with merchant/third-party banks

* Register New Member: Merchants will register their new member directly on Faspay page.
* Update Member: Merchants will update their member's details without redirecting to Faspay page.
* Update Member's Card: Merchants will update their member's card details directly to Faspay page.

### Flow Recurring Transaction

<figure><img src="/files/qnwT9MGRtHm96WcSj2o8" alt=""><figcaption><p>FPG - Recurring Flow Transaction</p></figcaption></figure>

#### Description:

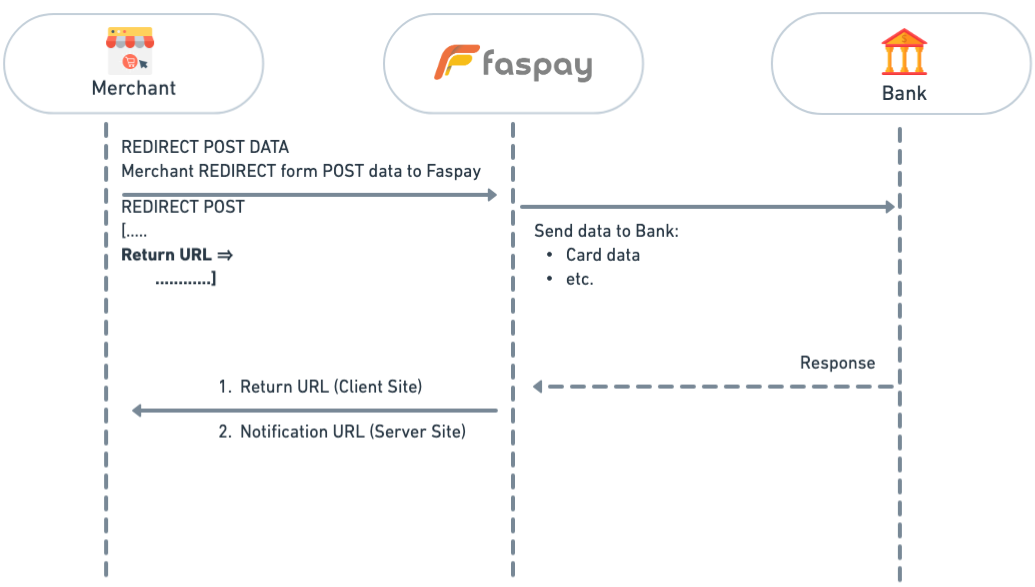
1. Merchant redirects post data from merchant's website to Faspay system.
2. Faspay will process and send the data to the bank.
3. The bank sends a response and sends it to Faspay.
4. Faspay will send a payment notification status response to the Merchant.&#x20;


# Faspay Billing

Faspay Billing allows you to create email invoicing that will let you to collect payment with various channel. Use this advance payment tool to grab your offline order sorted in more sophisticated form. Track down your invoices with our dashboard, paid or pending. The best part is that no integration is required.


# Introduction

Faspay Billing is a Faspay product that makes it easy for merchants to create and process billing transaction data.

Faspay billing is integrated with various types of payments, including:

* Credit Card
* Internet Banking
* ATM
* E-Money
* Retail Payment

![Flow Biliing Transaction](/files/-MHsCiepeG1B1EldqMXE)


# Feature

Faspay billing is equipped with various features to make it easier for merchants to process billing transaction data, including:

* Create Billing Statement
* No Integration process
* Multi payment channels
* Email notification to merchant
* Email notification to customer
* Recurring
* Download transaction report
* Upload data
* Upload attachment
* Use your own logo
* Change the bill’s color
* Send mass bill
* Bill expiry date
* Payment status information
* Masked email sender with your name
* Multiple items in one bill
* Scheduled bill
* Can be used anywhere & anytime
* Multi privilege user


# How To Use

This section contains everything that you need to know to use Faspay Billing. It will take you from the very beginning while opening Faspay Billing at Merchant Page through entering and working with data that you have and finish with saving or sharing it, from merchant to customer.

### **Get to know more about Faspay Billing.**

<table data-view="cards"><thead><tr><th></th><th></th><th></th><th data-hidden data-card-target data-type="content-ref"></th></tr></thead><tbody><tr><td></td><td>Getting Started</td><td></td><td><a href="/pages/-MHsLcVdck6qJG9fa633">/pages/-MHsLcVdck6qJG9fa633</a></td></tr><tr><td></td><td>Dashboard</td><td></td><td><a href="/pages/-MHsMid5kDkRBJqDmhba">/pages/-MHsMid5kDkRBJqDmhba</a></td></tr><tr><td></td><td>Recipient</td><td></td><td><a href="/pages/-MHsMnD15zz4-tKUGIQj">/pages/-MHsMnD15zz4-tKUGIQj</a></td></tr><tr><td></td><td>Scheduled Status</td><td></td><td><a href="/pages/-MHsNx_hUQCKZW82BzHv">/pages/-MHsNx_hUQCKZW82BzHv</a></td></tr><tr><td></td><td>Invoice</td><td></td><td><a href="/pages/-MHsMpsxuyEYZDpmrEpe">/pages/-MHsMpsxuyEYZDpmrEpe</a></td></tr><tr><td></td><td>Report</td><td></td><td><a href="/pages/-MHsMwKDFeqBA27axmYe">/pages/-MHsMwKDFeqBA27axmYe</a></td></tr><tr><td></td><td>Create Billing System</td><td></td><td><a href="/pages/-MHsN2cWqkNekn9tQcaP">/pages/-MHsN2cWqkNekn9tQcaP</a></td></tr><tr><td></td><td>Billing Setting</td><td></td><td><a href="/pages/-MKp5QOonYmLeoe-X4Mj">/pages/-MKp5QOonYmLeoe-X4Mj</a></td></tr></tbody></table>


# Getting Started

To be able to log into the Faspay billing merchant application, you must first register with Faspay to get access rights in the form of a username and password to enter the Faspay Billing system.

Faspay Billing access URL : <https://faspay.co.id/merchantpage/auth/login>

![](/files/-MHsIQMniigv_Wrppaf1)

{% hint style="info" %}
&#x20;Login on the Faspay Billing page using the username / email and password that has been registered from Faspay. Also enter the captcha code that appears then click Login
{% endhint %}

![Merchant Main Page after success login](/files/-MHsJnbXlpkVz3Z_6A2l)

Click Billings on the left menu to go to the main page of Faspay Billing like the following bellow.

![Faspay Billing Main Page](/files/-MHsMXyzNco2h7wMoj0t)


# Dashboard

Is a menu to display billing transaction data in the form of a dashboard. Dashboard displays transactions based on billing status.

The steps display the dashboard

* Click the **Dashboard** menu on the left navigation panel.

![Faspay Billing Dashboard page view](/files/-MHzv80DK5nvo7Ise2DQ)

**Transaction Status Bar :**

Displays the total summary amount of transactions based on their status.

* Paid : Total billing transactions that have been paid
* Expired : Total billing transactions that have not been paid but have passed the due date.

&#x20;**Graphic Chart :**

Displays a comparison between the total amount of the sales transaction and the amount of the transaction that has been paid and the amount of the transaction that has expired in the form of a graphic display. The data on the chart chart shows billing transactions per month.

{% hint style="info" %}

* Hover the mouse pointer on the bar chart to display the details of the sales amount, paid and expired
* Total sales on the right panel displays a summary total of all billing transactions based on their status
* Click on the chart menu to display the chart download options in various formats
* The parameters at the top of the graph are used to change the data options displayed by year
  {% endhint %}


# Recipient

Is a menu that functions to manage billing recipient data. Data on billing recipients can be made into groups to facilitate sending billing bills to customers


# List Recipient

A menu to display a detailed list of all billing recipients that have been created. Billing recipient data search can be done using filtering based on all columns or filtering using additional filtering found at the top of the table. For each data record, the billing recipient can update the data or delete the data.

The steps display a list of recipients

* Click the Recipient menu on the left menu panel
* Click on the List Receipt tab to display a list of billing recipients in table form

![Recipient List Page Display](/files/-MHzxnph0Hm-PdeC7IoQ)

| Field             | Description                                                                                                            |
| ----------------- | ---------------------------------------------------------------------------------------------------------------------- |
| Show Entries      | Select the number of records / lines of billing data that should appear on the display one page                        |
| Recipient Number  | The contents of the billing recipient to filter data based on the number of billing recipient                          |
| Recipient Name    | The contents of the billing recipient to filter data based on the name of the billing recipient                        |
| Recipient Email   | The contents of the billing recipient to filter data based on the recipient's email address billing                    |
| Recipient Address | The contents of the billing recipient to filter data by the recipient address billing                                  |
| Phone number      | The contents of the billing recipient to filter data based on the recipient's phone number billing                     |
| Group             | The contents of the billing recipient to filter data based group of recipients billing                                 |
| Department        | Sender department                                                                                                      |
| View              | Button to view the data receiver billing                                                                               |
| Update            | Button to update the data receiver billing                                                                             |
| Delete            | Button to delete the data receiver billing                                                                             |
| Previous          | Click to go to the previous page in the billing data record \[If artifacts more than one page of records]              |
| Next              | Click to go to the next page on the billing data record \[If artifacts more than one page of records]                  |
| Page Number       | Click to go to the page record billing data based on the selected number \[If artifacts more than one page of records] |

**Create New Recipient**

A menu to register the billing recipient data. Billing recipient data will be used when making a transaction billing.

**Steps to register the recipient's data billing**

* Click menu **Recipient** on the left menu panel
* Click on the button **New** to display a registration form receiver billing
* Fill in the billing recipient and then click the **Save**

| **Field**             | Description                                                 |
| --------------------- | ----------------------------------------------------------- |
| **Recipient Number**  | Fill in with the code of the billing recipient              |
| **Recipient Name**    | Fill in with the name of the billing recipient              |
| **Recipient Email**   | Fill it with the recipient's email billing                  |
| **Phone Number**      | Fill in the recipient's phone number billing                |
| **Recipient Address** | Fill the recipient address billing                          |
| **Department**        | Sender department                                           |
| **Group**             | Select a recipient group for billing                        |
| **Email Language**    | Select the standard language used for billing his statement |

* Click Button **Export To Excel** On the top right of the panel to export billing receipt data to excel.

<div align="center"><img src="/files/-MI-LFicbk_GCyB327M6" alt="Window view to download Report billing recipient"></div>


# Recipient Group

A menu to register a group for grouping of the billing recipient. These billing data receiver group will be used when making a transaction billing.

**Steps registering group billing recipient**

* Click menu **Recipient** on the left menu panel
* Click on the tab **Recipient Group** to display the billing recipient group registration form

![View register form Grup recipient](/files/-MI-LpRMNaH-47CNzpNv)

| Field           | Description                                                                  |
| --------------- | ---------------------------------------------------------------------------- |
| **Group Name**  | Fill in with the name of the billing recipient group                         |
| **Description** | Fill with a description / explanation of the billing recipient group created |
| **Members**     | Jumlah anggota di grup billing                                               |
| **Department**  | Sender Department                                                            |
| **Actions**     | Update Buttons                                                               |

<div align="center"><img src="/files/-MJ2KnLBzN-4KmSrju0P" alt="Click Update Button"></div>

| Field           | Description                                                                  |
| --------------- | ---------------------------------------------------------------------------- |
| **Group Name**  | Fill in with the name of the billing recipient group                         |
| **Description** | Fill with a description / explanation of the billing recipient group created |
| **Members**     | The number of members in the billing group                                   |
| **Department**  | Sender Department                                                            |

&#x20;**Create New Group**

A menu to display the detailed list of all groups that have been created billing recipient. Receiver group billing data search can be performed using filtering based on all the columns and filtering using additional filtering that sits at the top of the table. For each record group billing recipient to do the update data and delete data.

&#x20;**Steps display a list of the billing recipient group**

* Click menu **Recipient** on the left menu panel
* Click on the button **New** to display a registration form receiver billing
* Click on the tab **Recipient Group** to display the billing recipient group registration form

| Field           | Description                                                                                |
| --------------- | ------------------------------------------------------------------------------------------ |
| **Group Name**  | Fill to filter recipient group based billing group name                                    |
| **Department**  | Sender Department                                                                          |
| **Description** | Fill to filter group based on the description / description of the billing recipient group |

&#x20;**Selected** Click to delete billing recipient group


# Recurrence Status

A menu to display the detailed list of all transactions that are recurring billing / recurring follows with its status or change the billing transaction. Searches can be done using the billing data filtering based on all the columns and filtering using additional filtering that sits at the top of the table.

&#x20;**Steps display the transaction data billing recurrence**

* Click menu **Recipient** in the menu bar to the left
* Click menu **Recurrence Status** in the menu bar to the left

![Billing recurrence Page View Status](/files/-MJ6_4ViQVTsSRRIEhd4)

| Field                | **Description**                                                                                                        |
| -------------------- | ---------------------------------------------------------------------------------------------------------------------- |
| **Recipient Number** | Recipient billing number                                                                                               |
| **Start Time**       | Start date recurring                                                                                                   |
| **End Time**         | End date recurring                                                                                                     |
| **Total Amount**     | Total transaction amount                                                                                               |
| **Event Time**       | Reccuring date happens                                                                                                 |
| **Department**       | Sender Department                                                                                                      |
| **Active**           | Choose to filter data based on active or not invoice billing                                                           |
| **Previous**         | Click to go to the previous page in the billing data record \[If artifacts more than one page of records]              |
| **Next**             | Click to go to the next page on the billing data record \[If artifacts more than one page of records]                  |
| **Page** Number      | Click to go to the page record billing data based on the selected number \[If artifacts more than one page of records] |

{% hint style="success" %}
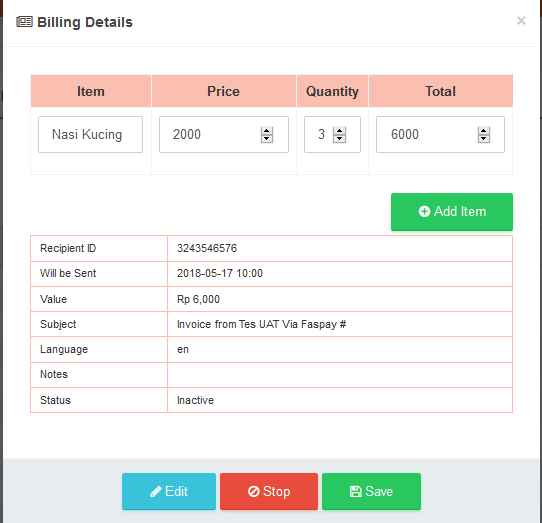
&#x20;Click at column **Active** on specified criteria click on the desired transaction to bring up a window **Billing Details**
{% endhint %}

<div align="left"><img src="/files/-MJ9XVD-30mi0SH-LSxI" alt="                        Detail Billing recurrence Page Status"></div>

| Field            | Description                                                            |
| ---------------- | ---------------------------------------------------------------------- |
| **Item**         | Contains information item name goods                                   |
| **Price**        | Contains information about the price of items of goods                 |
| **Quantity**     | Qty information contains items of goods                                |
| **Total**        | Contains information about the total amount of billing transaction     |
| **Recipient ID** | Contains a recipient ID number billing information                     |
| **Value**        | Contains information about the value of the transaction amount billing |
| **Status**       | Contains information about transaction status billing recurring        |
| **Edit**         | Button to edit billing transactions                                    |
| **Stop**         | Button to stop the change and ignore the changes that have been made   |

&#x20;**Steps edit the transaction data billing recurrence**

* Click Button **Edit** to change data item billing then click **Save** to keep the change
* Click Button **Add Item** to add data item billing then click **Save** to keep

<div align="left"><img src="/files/-MJ9ZJs9opqbvJKkHDNZ" alt="                              Edit Detail Page Billing"></div>


# Scheduled Status

A menu to display the detailed list of all billing transactions scheduled following the bill is sent to the status or change the billing transaction. Searches can be done using the billing data filtering based on all the columns and filtering using additional filtering that sits at the top of the table.

&#x20;**Steps display the transaction data scheduled billing**

* Click menu **Recipient** in the menu bar to the left
* Click submenu **Scheduled Status** the menu bar to the left

![Scheduled Billing Status page view](/files/-MJ9_uzo6YMojYpQr4bf)

| Field                | **Description**                                              |
| -------------------- | ------------------------------------------------------------ |
| **Recipient Number** | Recipient billing number                                     |
| **Start Time**       | Start date recurring                                         |
| **End Time**         | End date recurring                                           |
| **Total Amount**     | Total transaction amount                                     |
| **Event Time**       | Reccuring date happens                                       |
| **Department**       | Sender Department                                            |
| **Active**           | Choose to filter data based on active or not invoice billing |

{% hint style="success" %}
Click at column **Active** on specified criteria click on the desired transaction to bring up a window **Billing Details**
{% endhint %}

| Field                | Description                                                  |
| -------------------- | ------------------------------------------------------------ |
| **Recipient Number** | Recipient billing number                                     |
| **Start Time**       | Start date recurring                                         |
| **End Time**         | End date recurring                                           |
| **Total Amount**     | Total transaction amount                                     |
| **Event Time**       | Reccuring date happens                                       |
| **Department**       | Sender Department                                            |
| **Active**           | Choose to filter data based on active or not invoice billing |

{% hint style="success" %}
Click at column **Active** on specified criteria click on the desired transaction to bring up a window **Billing Details**
{% endhint %}

<div align="left"><img src="/files/-MJA-s7fEouda1Cb2dVx" alt="                                         Detail Billing Page View"></div>

**Steps edit the transaction data billing recurrence**

* Click Button **Edit** to change data item billing then click **Save** to keep the change
* Click Button **Add Item** to add data item billing then click **Save** to keep
* Click Button **Stop** to stop scheduled billing

| **Field**        | Description                                                            |
| ---------------- | ---------------------------------------------------------------------- |
| **Item**         | Contains information item name goods                                   |
| **Price**        | Contains information about the price of items of goods                 |
| **Quantity**     | Qty information contains items of goods                                |
| **Total**        | Contains information about the total amount of billing transaction     |
| **Recipient ID** | Contains a recipient ID number billing information                     |
| **Will be Sent** | Contains information about billing invoice delivery date               |
| **Value**        | Contains information about the value of the transaction amount billing |
| **Subject**      | The title of the bill contains billing information                     |
| **Language**     | Contains information about the language used in billing                |
| **Status**       | Contains information about transaction status billing                  |
| **Edit**         | Button to edit billing transactions                                    |
| **Delete**       | Button to delete the billing transaction data                          |


# Invoice

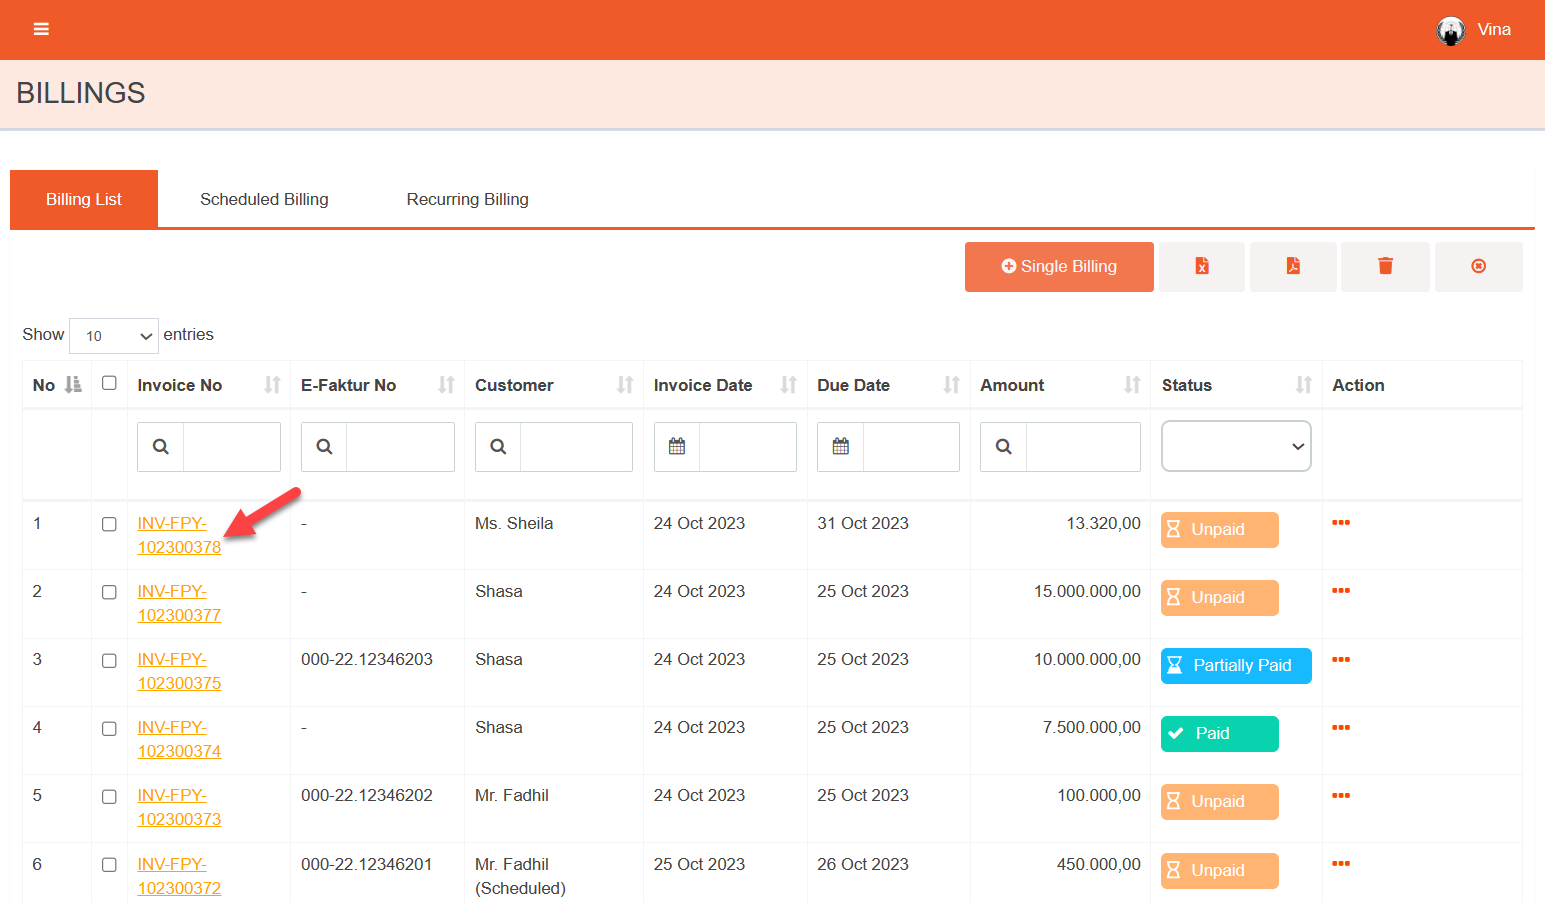
A menu to display the detailed list of all billing transactions scheduled following the bill is sent to the status or change the billing transaction. Searches can be done using the billing data filtering based on all the columns and filtering using additional filtering that sits at the top of the table.

**Steps to view invoice**

* Click menu **Invoice** in the menu bar to the left

![Invoice Page View](/files/-MJA3VYVAI4Zr9VJOjKj)

| **Field**          | Description                |
| ------------------ | -------------------------- |
| **Invoice Number** | Number of Invoice          |
| **Recipient Name** | Name of billing recipient  |
| **Billing date**   | Billing delivery date      |
| **Due date**       | Payment due date           |
| **Amount**         | Total transaction value    |
| **Send Date**      | Date of invoice submission |
| **Department**     | Sender Department          |
| **Status**         | Invoice Status             |
| **Delete**         | Delete invoice             |

<div align="left"><img src="/files/-MJA4QsGL4xgywBdTHG8" alt="      List Status"></div>

| Status        | Description                        |
| ------------- | ---------------------------------- |
| **Unsettled** | Unpaid                             |
| **Expired**   | Unpaid status until maturity       |
| **Paid**      | Already paid                       |
| **Cancelled** | Cancelled / not paid               |
| **Void**      | Canceled after paid by credit card |

* Click at column **Status** on specified criteria click on the desired transaction to bring up a window **Billing Details**

![Billing Detail](/files/-MJA5KxIPxhztADzFapF)

| Field                                   | Description                                                                                           |
| --------------------------------------- | ----------------------------------------------------------------------------------------------------- |
| **Item**                                | Contains information item name goods                                                                  |
| **Price**                               | Contains information about the price of items of goods                                                |
| **Quantity**                            | Qty information contains items of goods                                                               |
| **Total**                               | Contains information about the total amount of billing transaction                                    |
| **Bill Number**                         | Contains information about billing numbers                                                            |
| **Recipient Invoice ID**                | Contains a recipient ID number billing information                                                    |
| **Date**                                | Contains the transaction date billing information                                                     |
| **Recipient Name**                      | Billing information contains the recipient's name                                                     |
| **Recipient Email**                     | Contains information about the recipient's email address billing                                      |
| **Recipient Address**                   | Billing information contains the recipient's address                                                  |
| **Language**                            | Contains information about the language used in the billing statement                                 |
| **Resend Date**                         | Contains information about the delivery date of billing transactions \[if billing resubmitted]        |
| **Due Date**                            | Contains information due date billing transactions                                                    |
| **Value**                               | Contains information about the value of the transaction amount billing                                |
| **Email Customer Billing**              | Contains information billed billing date                                                              |
| **Email Customer Notification Billing** | Contains information about the date of notification is sent to the recipient billing billing payments |
| **Email Merchant Notification Billing** | Contains information about billing payment date notification is sent to the merchant                  |
| **Extra Param 1**                       | Contains a description of the additional information contained in Faspay Billing \[if any]            |
| **Extra Param 2**                       | Contains a description of the additional information contained in Faspay Billing \[if any]            |
| **Status**                              | Contains information about transaction status billing                                                 |
| **Payment Channel**                     | Contains payment information channel used in billing transactions                                     |
| **Payment Date**                        | Contains information about transaction payment date billing                                           |
| **Pay URL**                             | The URL address for the payment of billing transactions                                               |

| Button             | Description                                                                                                                  |
| ------------------ | ---------------------------------------------------------------------------------------------------------------------------- |
| **Resend**         | A button that serves to re-submit the bill billing                                                                           |
| **Settle**         | A button that serves to change the status of billing transactions manually be Paid                                           |
| **Delete**         | A button that serves to remove the transaction data billing \[billing that can be removed simply billing status has expired] |
| **Cancel Payment** | A button that serves to cancel the bill billing \[billing that can be canceled only billing status has not Paid]             |

**Steps to resend billing**

* Click **Resend** untuk update delivery information billing then click **Save & Resend** untuk save and resend the billing.

![Resend Billing Detail](/files/-MJA8OGcquLjRGU9gkxI)

| **Field**                | Description                                                                                                                             |
| ------------------------ | --------------------------------------------------------------------------------------------------------------------------------------- |
| **Item**                 | Contains information item name goods                                                                                                    |
| **Price**                | Contains information about the price of items of goods                                                                                  |
| **Quantity**             | Qty information contains items of goods                                                                                                 |
| **Total**                | Contains information about the total amount of billing transaction                                                                      |
| **Bill Number**          | Contains information about billing numbers                                                                                              |
| **Recipient Invoice ID** | Contains a recipient ID number billing information                                                                                      |
| **Date**                 | Contains the transaction date billing information                                                                                       |
| **Recipient Name**       | Billing information contains the recipient's name                                                                                       |
| **Recipient Email**      | Contains information about the recipient's email address billing                                                                        |
| **Recipient Address**    | Billing information contains the recipient's address                                                                                    |
| **Language**             | Contains information about the language used in the billing statement                                                                   |
| **Resend Date**          | Contains information about the delivery date of billing transactions \[if billing resubmitted]                                          |
| **Due Date**             | Contains information due date billing transactions                                                                                      |
| **Value**                | Contains information about the value of the transaction amount billing                                                                  |
| **Note**                 | Fill it with additional information \[if needed]                                                                                        |
| **Payment Date**         | Contains information about transaction payment date billing                                                                             |
| **Status Change By**     | Contains information that changes the user name of billing transaction status \[if the user changed the status of billing transactions] |


# Report

A menu to display the detailed list of all billing transactions that have been made in the form of viewing report. Searches can be done using the billing data filtering based on all the columns and fi

&#x20;**Steps display data billing transactions**

* Click **Report** in the menu bar to the left

![Report Billing page view](/files/-MKcS6e6GqcvT1vewH0K)

| Field              | **Description**            |
| ------------------ | -------------------------- |
| **Invoice Number** | Number of Invoice          |
| **Recipient Name** | Name of billing recipient  |
| **Billing date**   | Billing delivery date      |
| **Due date**       | Payment due date           |
| **Amount**         | Total transaction value    |
| **Send Date**      | Date of invoice submission |
| **Department**     | Sender Department          |
| **Status**         | Invoice Status             |

<div align="left"><img src="/files/-MKcTXlYK6ipoOYiA6Mj" alt="List of Status"></div>

| **Status**    | **Description**                    |
| ------------- | ---------------------------------- |
| **Unsettled** | Unpaid                             |
| **Expired**   | Unpaid status until maturity       |
| **Paid**      | Already paid                       |
| **Cancelled** | Cancelled / not paid               |
| **Void**      | Canceled after paid by credit card |

* Click **Export to Spreadsheet** convert to report excel format


# Create Billing System

System process for making the billing of Faspay Billing system who will then proceed to the customer for payment. Payment in Faspay Billing can be divided into two methods of payment

| Method           | Description                                                                                                                                                           |
| ---------------- | --------------------------------------------------------------------------------------------------------------------------------------------------------------------- |
| Direct Payment   | For the manner of payment of direct and finished at that time. Buyers can enter the data Faspay Billing payment page and redirected to the website payment channel    |
| Indirect Payment | For the manner of payment of the buyer is not redirected to the payment page directly. Transactions can be through any other media eg via ATM or handset for payment. |


# Single Billing

Create single billing process aims to create a billing invoice to the billing recipient with transaction details are inputted in Faspay Billing. Billing and merchant receiver will both receive a notif

&#x20;**Steps Create Single Billing**

* Click the menu **Recipient** in the menu bar to the left and then click tab **Recurrence status** / tab **Scheduled status**
* Click button **Single Billing** on the top right page
* Billing Form Fill in the data receiver billingnya then click **Submit**

| **Field**             | Description                                                                                    |
| --------------------- | ---------------------------------------------------------------------------------------------- |
| **Recipient ID**      | The contents of the billing recipient Id number                                                |
| **Recipient Name**    | Fill in with the name of the billing recipient                                                 |
| **Recipient Email**   | Fill in the recipient's email address billing                                                  |
| **Recipient Address** | Fill in the recipient's home address billing                                                   |
| **Billing Number**    | Filled automatically by the system. Contains billing numbers                                   |
| **Billing Date**      | The contents of the billing date                                                               |
| **Due Date**          | Fill in your billing due date                                                                  |
| **Invoice Subject**   | Fill in the title which will be displayed at the time of billing sent to the billing recipient |
| **Language**          | Fill with the language used to display billing                                                 |
| **Department**        | Fill with the merchant's existing department                                                   |
| **ONCE**              | Choose if you want once done sending billing                                                   |
| **SCHEDULED**         | Choose if you want to arrange the delivery time billing                                        |
| **RECURRING**         | Choose if you want the delivery to repeated billing for a specific delivery period             |

![Form Fields for Delivery Time Billing](/files/-MKd3p79WE-YL1_ilCQH)

* Input the items purchased and then click **Send Bill**. Ensure that there is *notif Your Invoice Has Been Saved*

![](/files/-MKd45gzKtEVK2sYDTxL)

![Form Filling Goods Item Details](/files/-MKd4TfHWSHebTU46Don)

| Field                | Description                                                                       |
| -------------------- | --------------------------------------------------------------------------------- |
| **Client**           | Filled automatically by the system. Contains data including the recipient billing |
| **From**             | Filled automatically by the system. Contains data including merchant              |
| **Item Description** | Fill with the data item name                                                      |
| **Qty**              | Fill with the amount purchased qty                                                |
| **Unit Price**       | Fill in the amount of unit price of goods                                         |
| **Total**            | Filled automatically by the system. Contains the total amount per line item       |
| **Sub Total**        | Filled automatically by the system. Contains a total amount across the line       |
| **Grand Total**      | Filled automatically by the system. Contains the total transaction to be paid     |
| **Add More Item**    | Button to add the detail items of goods                                           |
| **Add Detail**       | Button to add an additional item details                                          |
| **Pay Here**         | Button to create a new single billing                                             |
| **Note**             | Fill it with additional information \[if needed]                                  |
| **Browse**           | Button to add an attachment billing                                               |
| **Send Bill**        | Button to submit the recipient's email address to the billing billing             |
| **Preview**          | Button to see the display before it is sent to the recipient's billing billing    |

<div align="center"><img src="/files/-MKd6y7mY7k7T_oBQlPX" alt="Preview"></div>

{% hint style="success" %}
Billing recipient will receive an email notification to be paid billing display. Recipients can click the button billing **Pay Here** to proceed to the payment process. Billing recipient will be redirected to the payment page Faspay Xpress.
{% endhint %}

![Display Billing Notification Email](/files/-MKd7JVrhX8bscO3qT6Q)

* Click on the term and condition then click check out to go to the payment option page

![term and condition page](/files/-MKdjMHcMKGr7cPrFUsy)

* Select the desired payment channel for payment billing. There are 7 types of payments, namely:

  * Virtual Account
  * Internet Banking
  * Mobile Banking
  * Credit Card
  * E-Money
  * Online Credit
  * Retail Payment

![Payment Option Page](/files/-MKdo1KzTtaD7M8db3yi)


# Mass Billing

Create mass billing process aims to create a billing invoice to more than one recipient billing with transaction details are inputted in Faspay Billing. Billing receiver can be inputted through the Co

&#x20;**Steps Create Mass Billing**

* Click the menu **Recipient** in the menu bar to the left and then click tab **Recurrence status** / tab **Scheduled status**
* Click button **Mass Billing** on the top right page

*Create Mass Billing by Template Excel*

Create mass billing process aims to create a billing invoice to more than one recipient billing with transaction details are upload via Excel Template

![Form Filling Upload Billing Recipient](/files/-MKiGhnDihBj4o4DLJ4M)

| **Field**            | Description                                                                                    |
| -------------------- | ---------------------------------------------------------------------------------------------- |
| **Upload Recipient** | Upload recipient billing format via excel file                                                 |
| **Department**       | Fill with the merchant's existing department                                                   |
| **Invoice Subject**  | Fill in the title which will be displayed at the time of billing sent to the billing recipient |
| **Language**         | Fill with the language used to display billing                                                 |
| **Billing Date**     | The contents of the billing date                                                               |
| **Due Date**         | Fill in your billing due date                                                                  |
| **ONCE**             | Choose if you want once done sending billing                                                   |
| **SCHEDULED**        | Choose if you want to arrange the delivery time billing                                        |
| **RECURRING**        | Choose if you want the delivery to repeated billing for a specific delivery period             |

![Form Fields for Delivery Time Billing](/files/-MKo5XGBEhKLjZ3Av7Tf)

* Choose billing type ONCE, Scheduled, RECURRING ) then Click **Submit** to show upload files list.

![Upload Billing Recipient list](/files/-MKo6IvKQcjE0kYb3EdB)

{% hint style="danger" %}
Add comma to add column / field in excel.
{% endhint %}

&#x20;***Upload Document***

Upload additional billing recipient files according to excel that has been uploaded before.

* Click **Add Files** to upload documents
* Click *List Uploaded Documents* untuk view uploaded documents

![Upload Document](/files/-MKo72R0Xjj7cQjfBDUa)

![Billing Recipient Upload List](/files/-MKo7IYFoYX_2Hq0nBbt)

{% hint style="info" %}
Upload Maksimal Size 10 MB
{% endhint %}

&#x20;*Download Template Excel*

Excel Template provide by Faspay for mass billing

* **Click Here** to download excel template
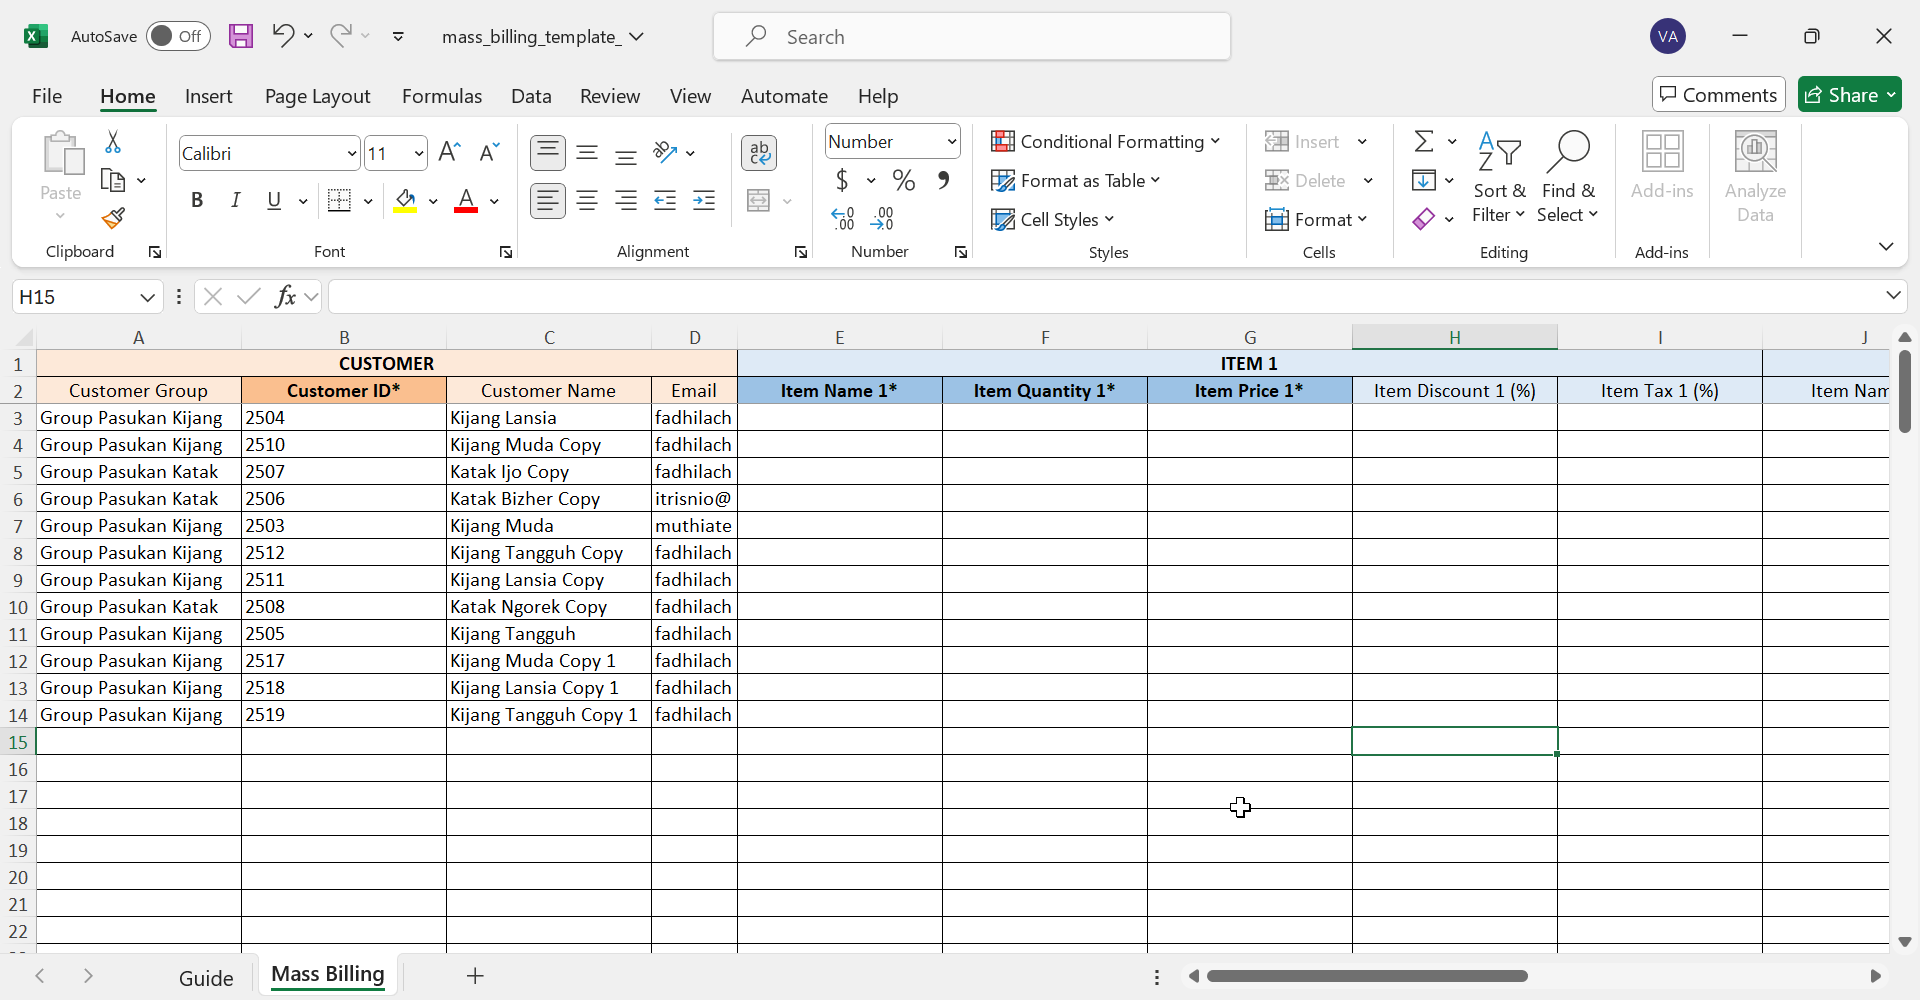
* Fill in billing recipient data in downloaded excel template

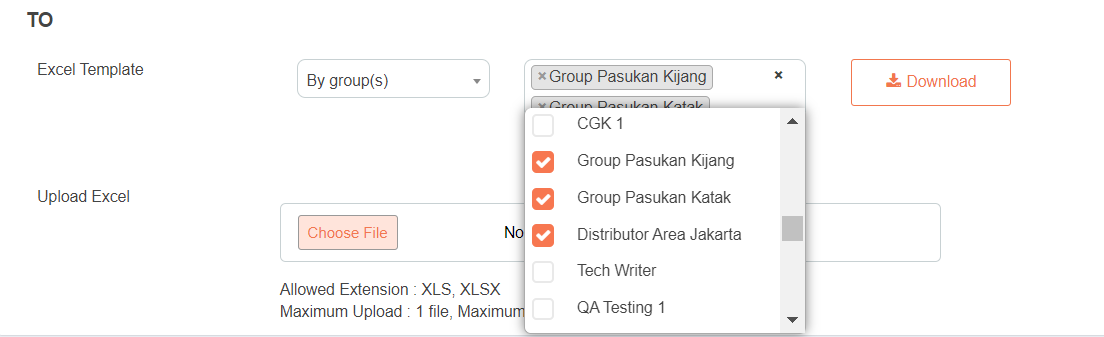
![Download Template Excel](/files/-MKo7mrR_fprFztB3rd9)

| ***Field***        | Description                                                                       |
| ------------------ | --------------------------------------------------------------------------------- |
| **no pelanggan**   | Fill in your customer number data                                                 |
| **name**           | Fill in with the name of the billing recipient                                    |
| **address**        | Fill the recipient address billing                                                |
| **email**          | Fill the recipient address billing                                                |
| **Invoice ID**     | Fill with invoice number of transactions                                          |
| **Notes**          | Fill it with additional information regarding the transaction billing \[optional] |
| **Item Name 1**    | Fill in the name of goods 1                                                       |
| Amount Item Name 1 | Fill to the price of 1                                                            |
| **Item Name 2**    | Fill in the name of goods 2                                                       |
| Amount Item Name 2 | Fill in the price of goods 2                                                      |
| **Item Name 3**    | Fill in the name of goods 3                                                       |
| Amount Item Name 3 | Fill in the price of goods 3                                                      |

{% hint style="info" %}
For the item name and amount item name adjust to the billing to be inputted.
{% endhint %}

![Template Mass Mail Billing](/files/-MKoz-GOhcro3Y6PBPjk)

![Examples Charging Templates Mass Mail Billing](/files/-MKoz5XtHsF61f8CkH8Q)

&#x20;*Create Mass Billing by Contact Group*

Create mass billing process aims to create a billing invoice to more than one recipient billing with user profile already in grouping first

&#x20;**Use Contact Group**

* Fill in the **Use Contact Group** the data receiver bill then click **Continue**

![Use Contact Group](/files/-MKozOUiX4WDk5hYkB0b)

| *Field*                            | Description                                                                                    |
| ---------------------------------- | ---------------------------------------------------------------------------------------------- |
| **Department**                     | Fill with the merchant's existing department                                                   |
| **Select Group**                   | Fill in with the name of the billing recipient group                                           |
| \**Invoice Subject \**             | Fill in the title which will be displayed at the time of billing sent to the billing recipient |
| **Language**                       | Fill with the language used to display billing                                                 |
| **Billing Date**                   | The contents of the billing date                                                               |
| **Due Date**                       | Fill in your billing due date                                                                  |
| **Bill Number Pattern Start With** | Fill with billing numbering format                                                             |

&#x20;Input the items purchased and then click **Send Bill**. Ensure that there is notif *Your Invoice Has Been Saved*

![](/files/-MKp-s4DCd0epKytNliM)

![Form Filling Goods Item Details](/files/-MKp00K7hUxoCM9tU_h8)

| *Field*              | Description                                                                       |
| -------------------- | --------------------------------------------------------------------------------- |
| **Client**           | Filled automatically by the system. Contains data including the recipient billing |
| **From**             | Filled automatically by the system. Contains data including merchant              |
| **Item Description** | Fill with the data item name                                                      |
| **Qty**              | Fill with the amount purchased qty                                                |
| **Unit Price**       | Fill in the amount of unit price of goods                                         |
| **Total**            | Filled automatically by the system. Contains the total amount per line item       |
| **Sub Total**        | Filled automatically by the system. Contains a total amount across the line       |
| **Grand Total**      | Filled automatically by the system. Contains the total transaction to be paid     |
| **Add More Item**    | Button to add the detail items of goods                                           |
| **Add Detail**       | Button to add an additional item details                                          |
| **Pay Here**         | Button to create a new single billing                                             |
| **Note**             | Fill it with additional information \[if needed]                                  |
| **Browse**           | Button to add an attachment billing                                               |
| **Send Bill**        | Button to submit the recipient's email address to the billing billing             |
| **Preview**          | Button to see the display before it is sent to the recipient's billing billing    |

<div align="center"><img src="/files/-MKp1OJybi1QsAgni8i7" alt="Preview"></div>

* Billing recipient will receive an email notification to be paid billing display. Recipients can click the button billing **Pay Here** to proceed to the payment process. Billing recipient will be redirected to the payment page Faspay Xpress.

![Display Email Notification Billing Statement](/files/-MKp1gz9J1JuAaL1CN6r)

* Select the desired payment channel for payment billing. There are 7 types of payments, namely:

  * Virtual Account
  * Internet Banking
  * Mobile Banking
  * Credit Card
  * E-Money
  * Online Credit
  * Retail Payment

* Settlement payments are made on Faspay Billing pages, redirected to the payment page of the channel or through ATM / handset.

![Xpress Faspay page views for Settlement Payments Billing](/files/-MKdo1KzTtaD7M8db3yi)

{% hint style="success" %}

* Allowed Extension : PPT, PPTX, CSV, DOC, DOCX, GIF, JPG, PDF, PNG, XLS, XLSX
* Maximum Upload : 2 files Maximum Size : 2 MB / files
  {% endhint %}


# Billing Setting

A menu to display the detailed list of all transactions that have been made following billing with its status or change the status of billing transactions. Searches can be done using the billing data


# Reminder Setting

A menu to set content reminder email

![Reminder page view](/files/-MKpAYTKxcZbHthBstHD)

| Field             | Description                  |
| ----------------- | ---------------------------- |
| **Reminder Name** | Name of reminder             |
| **Department**    | Department reminder          |
| **Active**        | Status reminder              |
| **View**          | Show reminder email template |
| **Delete**        | Delete reminder email.       |
| **New**           | Create new reminder email.   |

<div align="center"><img src="/files/-MKpBOC8AURanRy_nBwB" alt="Email Reminder view"></div>

| Item Template                     | Description                                                     |
| --------------------------------- | --------------------------------------------------------------- |
| **Checkbox Enable this reminder** | activate reminder                                               |
| **Department**                    | Sender department                                               |
| **Reminder Name**Name of reminder | Name of reminder                                                |
| **Remind**                        | Name group to be reminder                                       |
| **day(s)**                        | total days reminder sent                                        |
| **due date**                      | consist of before / after ( days before atau or after due date) |

&#x20;**Step create new email reminder**

* Click menu **Settings** in the menu bar to the left
* Click sub menu **Billing settings** in the menu bar to the left
* Click tab **Reminder Settings**
* Click Green button *New*

<div align="left"><img src="/files/-MKpCPNvXZY5sGWpNbGI" alt="                                                      *New Reminder Email *"></div>

| Item Template                     | **Description**                                                 |
| --------------------------------- | --------------------------------------------------------------- |
| **Checkbox Enable this reminder** | activate reminder                                               |
| **Department**                    | Sender department                                               |
| **Reminder Name**                 | Name of reminder                                                |
| **Remind**                        | Name group to be reminder                                       |
| **day(s)**                        | total days reminder sent                                        |
| **due date**                      | consist of before / after ( days before atau or after due date) |


# Template Setting

A menu to set a template design view billing sent to the recipient's email billing. Display can be changed is the color display of design templates billing.

**The steps to edit the template billing**

* Click menu **Settings** in the menu bar to the left
* Click submenu **Billing settings** in the menu bar to the left
* Click tap **Template settings**
* Click on the item template to its color changed on the panel **Template Properties**

<div align="left"><img src="/files/-MKp74dpD8X6nuU4X8Si" alt="Panel for Color Changing Billing Template"></div>

| Item Template    | Description                                                        |
| ---------------- | ------------------------------------------------------------------ |
| **Bg Color**     | Used to change the background color / background templates billing |
| **Header Table** | Used to change the color of the table header template billing      |
| **Footer Color** | Used to change the color of the bottom of the template billing     |

* In the color picker window select the desired color

<div align="left"><img src="/files/-MKp9x09e2cLTJtIlsTA" alt="Window Color Picker view"></div>

* Click **Save Template** when done making changes color

<div align="center"><img src="/files/-MKpAEPXvwUdv4jcgtYt" alt="Billing Template Page Views Already Edited"></div>


# Invoice Status

A menu to make arrangements relating to the merchant / publisher billing.

![Invoice Setting page view](/files/-MKp5z4yzLDL5h-IaCsC)

| **Field**           | Description                                                            |
| ------------------- | ---------------------------------------------------------------------- |
| **Your Logo**       | Merchant logo displays currently in use                                |
| **Phone Number**    | Fill with merchant phone number                                        |
| **Email**           | Fill in your email address merchant                                    |
| **Address**         | Fill in your full address merchant                                     |
| **Invoice Subject** | Fill in the title which will be displayed in the email invoice billing |

* Click **Save** to keep the update.


# Faspay Billing 2.0

Faspay Billing 2.0 allows you to create email invoicing that will let you to collect payment with various channel. Use this advance payment tool to grab your offline order sorted in more sophisticated form. Track down your invoices with our dashboard. It also allows you share your business profile easily just using one QR code. The best part is that no integration is required


# How to Use

This section contains everything that you need to know to use Faspay Billing 2.0. It will take you from the very beginning while opening Faspay Billing at Merchant Page through entering and working with data that you have and finish with saving or sharing it, from merchant to customer.

### **Get to know more about Faspay Billing 2.0.**

<table data-view="cards"><thead><tr><th></th><th></th><th></th><th data-hidden data-card-target data-type="content-ref"></th></tr></thead><tbody><tr><td></td><td>Getting Started</td><td></td><td><a href="/pages/gyIMFzinCiOAsWv2vJ0s">/pages/gyIMFzinCiOAsWv2vJ0s</a></td></tr><tr><td></td><td>Billings</td><td></td><td><a href="/pages/yof4yxKkQHLm8rVPYSjF">/pages/yof4yxKkQHLm8rVPYSjF</a></td></tr><tr><td></td><td>Customers</td><td></td><td><a href="/pages/AfIfaUsFGgi5MhZPLyNC">/pages/AfIfaUsFGgi5MhZPLyNC</a></td></tr><tr><td></td><td>Items</td><td></td><td><a href="/pages/QbSTwCNpTrXX0fIR8cb8">/pages/QbSTwCNpTrXX0fIR8cb8</a></td></tr><tr><td></td><td>E-Faktur</td><td></td><td><a href="/pages/vs8cEL3PG1d5Rv5xMqVw">/pages/vs8cEL3PG1d5Rv5xMqVw</a></td></tr><tr><td></td><td>QR Business Profile</td><td></td><td><a href="/pages/7ej1h5zSbJrMfyjMOJMp">/pages/7ej1h5zSbJrMfyjMOJMp</a></td></tr><tr><td></td><td>Billing Settings</td><td></td><td><a href="/pages/Ud68Z917I99GYu7W7Ka6">/pages/Ud68Z917I99GYu7W7Ka6</a></td></tr><tr><td></td><td>Settings Profile</td><td></td><td><a href="/pages/iIwwuwwiTm4Y1sag17SB">/pages/iIwwuwwiTm4Y1sag17SB</a></td></tr></tbody></table>


# Getting Started

## **Overview**

Faspay Billing is an online invoicing platform used to create bills and receive bill payments from various online payment channels. Users can simply look at the dashboard to see the status of payment. Login to [Merchant Page](/merchant-page-reference) to get started.

## Guide

The following are the steps on how to use Faspay Billing:

1. Open Merchant Page website → <https://faspay.co.id/merchantpage/auth/login>. Input **Username, Password,** and **Captcha** then click **Login**.

<figure><img src="/files/AsUIO4jpkcQx12bXK486" alt=""><figcaption><p>Merchant Page Login</p></figcaption></figure>

2. The dashboard Faspay Merchant Page will be displayed. Click on the dropdown button "**Faspay Billing**" and 5 sub-menus will appear, specifically **Billings, Customer, Reports, Items, E-Faktur,** and **Business Profile**.&#x20;

<figure><img src="/files/3BOsXaIKT7AZ6WYy4e0v" alt=""><figcaption><p>Dashboard Merchant Page</p></figcaption></figure>


# Billings

Billings is a menu used to manage Customer invoice data.

Billings menu is accessible on Merchant Page

1. Click **Faspay Billing**.
2. Then click **Billings**.

<figure><img src="/files/dxfu0ZrFczH1rsL4VkAe" alt=""><figcaption></figcaption></figure>

3. Shows Billings page.

<figure><img src="/files/gtvQ1RlstpWcd1z827y6" alt=""><figcaption></figcaption></figure>


# Billings List

Billings is a menu used to manage Customer invoice data.

## Billing List

The **Billing List** is a submenu of **Billings**. To access this menu click **"Faspay Billing" → "Billings"**. The following is a view of the Billing List page.

<figure><img src="/files/KyAHj3ES8fDV1iBLDm7A" alt=""><figcaption></figcaption></figure>

**Notes:**

A description of the invoice status on the Billing List page is as follows:

1. **Draft**: Invoice data is stored in a draft that hasn’t yet been sent to the customer.
2. **Unpaid**: An invoice has been sent to the customer but no payment has been made.
3. **Partially Paid**: Partial payment has been made, but not yet full.
4. **Paid**: A full/full payment has been made.
5. **Overdue**: Overdue is past the payment due determined.
6. **Cancelled**: Cancellation of the submitted invoice.
7. **Proforma**: A temporary invoice is submitted to the customer to confirm the bill, invoice data can still be changed if it is inappropriate.

The following is an action that can be taken on invoices that have been created:

### **Export CSV**

Invoice files can be exported into Excel and PDF format, the following are the steps to export:

1. Select the invoice file on the Billing List page, → checklist the selected file and click the "**Excel**" icon to export the file into an Excel format.

<figure><img src="/files/FvPS81gTI4COMLJw41dC" alt=""><figcaption></figcaption></figure>

2. Invoice files in Excel format will be displayed.

<figure><img src="/files/BLu9fAQp4gJeIwcG8fq4" alt=""><figcaption><p>Invoice in Excel format file</p></figcaption></figure>

3. As for exporting into PDF format, select the invoice file on the Billing List page, then check the file. Next, click the "**PDF**" icon to export the file into PDF format.

<figure><img src="/files/t0dSCyp4ay4hPQRsTn8T" alt=""><figcaption></figcaption></figure>

4. The invoice file will be displayed in PDF Format.

<figure><img src="/files/htbbzwSAGVK53X5Zgto7" alt=""><figcaption><p>Invoice with PDF Format</p></figcaption></figure>

### **Search Invoice**

1. Search data on the Billing List page, can be done by inputting the invoice data keyword in the search field.

<figure><img src="/files/FVIR6H7s2hojDSRQUal7" alt=""><figcaption></figcaption></figure>

2. The search results such as the following will be displayed.

<figure><img src="/files/NUbpBGoIJD00iFqFSTE9" alt=""><figcaption></figcaption></figure>

### **Cancel Invoice**

Cancel invoice on the billing list menu page can be done by:

1. Select invoice by checklist the row of invoice data on the billing list menu.

<figure><img src="/files/dpHy4ecM0pOKrDAHnyeX" alt=""><figcaption><p>Billing List Menu</p></figcaption></figure>

2. Next, click “**Cancel Billing**” icon.

<figure><img src="/files/5kf6UiQjCOhAdg5UtomV" alt=""><figcaption></figcaption></figure>

3. The confirmation message will displayed, and then click “**Yes**”.

<figure><img src="/files/CqtKKSHJdcgKgfUlwtYt" alt="" width="307"><figcaption><p>Cancel validation notification</p></figcaption></figure>

4. A notification that the invoice has been canceled will be displayed.

<figure><img src="/files/Y5k1sHGh3lwQkJlZTCSm" alt="" width="375"><figcaption><p>Notification success cancel billing</p></figcaption></figure>

5. Below is a list of invoices with the status '**Cancelled**' on the billing page.

<figure><img src="/files/VRQ77UjOCXPnPDRJiEhR" alt=""><figcaption></figcaption></figure>

### **Delete Invoice**

Delete invoice on the billing list menu page can be done by:

1. Select invoice by checklist the invoice on the billing list menu.

<figure><img src="/files/sMJckppVC5klPyP3t4cS" alt=""><figcaption><p>Billing list menu</p></figcaption></figure>

2. Next, click the "**Delete Billing**" icon.

<figure><img src="/files/H5Diy1O75T7UIqwciQ0A" alt=""><figcaption><p>Delete billing</p></figcaption></figure>

3. It will display a confirmation message, click "**Yes**" to continue deleting.

<figure><img src="/files/j72NDtGBKLTZkxiFTz9t" alt="" width="307"><figcaption><p>Delete validation notification</p></figcaption></figure>

4. Data is successfully deleted.

<figure><img src="/files/KpH4Bhx7uSc46GEyCcV1" alt="" width="375"><figcaption><p>Notification successfully delete</p></figcaption></figure>

### Single Billing

Single Billing is an invoice that is made singly using the once, scheduled, or recurring type.

#### **Create a single billing**

1. Select the Billing List menu on the Faspay Billing menu, then display the Billing List menu page. Click "**+ Single Billing**" to add new invoice data.

<figure><img src="/files/o7d5iexB24qXYDWPp22G" alt=""><figcaption><p>Billing List Menu</p></figcaption></figure>

1. Next, the **Single Billing** form will be displayed.&#x20;

<figure><img src="/files/Yfb65p3Ip4jl4ICTWOK5" alt=""><figcaption><p>New Single Billing form</p></figcaption></figure>

**Field Parameter Single Billing form**

<table><thead><tr><th width="258">Field</th><th>Description</th></tr></thead><tbody><tr><td>To</td><td>Customer data</td></tr><tr><td>    Customer Name</td><td>Customer name (registered)</td></tr><tr><td>    Add New Customer</td><td>Add new customer data</td></tr><tr><td>Billing Details</td><td>Complete billing data</td></tr><tr><td>    Invoice No</td><td>Invoice number (auto generate)</td></tr><tr><td>    Invoice Subject</td><td>Invoice subject</td></tr><tr><td>    Invoice Language</td><td>Language used on the invoice</td></tr><tr><td>    Invoice Type</td><td>Invoice type (choose as needed)</td></tr><tr><td>    Invoice Date</td><td>Date the invoice was created</td></tr><tr><td>    Due Date</td><td>Payment limit/due invoice created</td></tr><tr><td>    Invoice Tax</td><td><p>Will appear if customer enable E-Faktur module.</p><p>If you activated the invoice tax, when system changes proforma to invoice, the system will automatically generate the tax invoice number for the invoice with the following conditions:</p><ul><li>The tax invoice number is taken from the range of tax invoice available numbers on the E-Faktur No page.</li><li>The system will use the tax invoice number sequentially from smallest to largest (Ascending order).</li><li>The period of the tax invoice number that was used must be the same as the current year(Year Period)</li></ul></td></tr><tr><td>     Transaction code</td><td><p>List of transaction code (will appear if customer activated Invoice Tax).</p><p>01: To Parties Who Are Not VAT Witholder</p><p>02: To the Treasurer's Witholder</p><p>03: To the Witholder except Treasurer's</p><p>04: DPP Other Values</p><p>06: Other submissions, including submission to foreign tourists in the context of VAT refunds</p><p>07: Submission of which VAT is not collected</p><p>08: Submission of VAT Exemption</p><p>09: Delivery of Assets (clause 16D of the VAT Law)</p></td></tr><tr><td>Header</td><td>Email header text</td></tr><tr><td>     Add Room</td><td>Choice of invoice type item type "room"</td></tr><tr><td>     Add Product</td><td>Choice of invoice type item type "product"</td></tr><tr><td>     Add Other</td><td>Choice of invoice types other than room &#x26; product</td></tr><tr><td>Generate Invoice to PDF</td><td>Information for generating invoices to PDF format</td></tr><tr><td>Notes</td><td>To add a note</td></tr><tr><td>Show notes on invoice PDF</td><td><ul><li>If <strong>checked,</strong> notes will appear on invoice document pdf file and on preview mode.</li><li>If <strong>unchecked,</strong> notes will not appear on the invoice document.</li></ul></td></tr><tr><td>Attachment</td><td>To attach a document</td></tr><tr><td>Button Option</td><td><ul><li>Click <strong>"Save Draft"</strong> to save the data temporarily.</li><li>Click <strong>"Save &#x26; Send"</strong> to save and send a new invoice.</li><li>Click <strong>"Preview"</strong> to preview the invoice before it is submitted.</li></ul></td></tr></tbody></table>

| <p><strong>Notes:</strong></p><ul><li>If the customer name is not yet available, then add new customer data by clicking <strong>"+Add New Customer"</strong> under the Customer Name field.</li><li>In the <strong>"Invoice No"</strong> field, if it is not filled in, it will be auto-generated (automatically filled with system numbering).</li><li>In the <strong>"Due Date"</strong> field, it cannot pass 1 day from the Invoce Date.</li><li>The <strong>"Add Room"</strong> feature is only available for Merchants of Hospitality type.</li></ul> |
| ----------------------------------------------------------------------------------------------------------------------------------------------------------------------------------------------------------------------------------------------------------------------------------------------------------------------------------------------------------------------------------------------------------------------------------------------------------------------------------------------------------------------------------------------------------- |

3. Input the invoice data as needed, then click **Save & Send**.

<figure><img src="/files/WEsT7LusaOz9bociW2y0" alt=""><figcaption><p>New single billing data</p></figcaption></figure>

5. Click **OK** on the success notification.

<figure><img src="/files/bonRz6uo8WruaH6aWDTa" alt="" width="280"><figcaption><p>Email Sent Notification</p></figcaption></figure>

6. The invoice information details have been successfully sent to the customer's email.

<figure><img src="/files/m9esHuIxgZahadYCIib6" alt=""><figcaption><p>Invoice Email</p></figcaption></figure>

6. The invoice has been successfully added to the Billing List.

<figure><img src="/files/k6qMeqfVY3jufV8BPfxM" alt=""><figcaption><p>Invoice List</p></figcaption></figure>

### &#x20;Mass Billing

Mass Billing feature is used to create invoices in bulk at one time.

#### Create New Mass Billing

1. Select the Mass Billing menu from the Faspay Billing Menu. Click “**Mass Billing**” button to create Mass Billing.

<figure><img src="/files/DO7oPmQwqGAsjm3MEVCc" alt=""><figcaption><p>Add Mass Billing</p></figcaption></figure>

2. Form Mass Billing will be displayed.

<figure><img src="/files/m2B2UMIW1MOt7A3Qnja3" alt=""><figcaption><p>Mass Billing Form</p></figcaption></figure>

3. In the "**To**" section, there are 2 fields, **Excel Template** and **Upload Excel**. Merchants can download the mass billing template in the Excel template field based on template types: **By group (s),** and **All Customers.**
4. If the merchant downloads the template type **By group(s)**, then click **Download,** the template will be downloaded based on the group that you choose. The downloaded template will contain selected customer group data and then the merchant will only provide information on the items to be billed. As example download template **By group(s) Open VA Generator**.

{% hint style="info" %}
In each excel template it contains guide on the first sheet.
{% endhint %}

<figure><img src="/files/Hx8NJnewzJR4IAOTU9oA" alt=""><figcaption><p>Excel Template By Group Option</p></figcaption></figure>

The Excel's file template that has been download by group(s):

<figure><img src="/files/jLcneMCEzJ5z1q2CpwIg" alt=""><figcaption><p>Excel template type by group(s)</p></figcaption></figure>

5. If the merchant downloads the template type "**All Customer**", and then the customer's data column on the template will be filled with all customer data available on the MP data.&#x20;

<figure><img src="/files/JPxFDpfg7ZFGhfUUNNxV" alt=""><figcaption><p>Excel template by all customer option </p></figcaption></figure>

The Excel file template by All customers:

<figure><img src="/files/rOPJlwelJH4fP2XDupQD" alt=""><figcaption><p>Excel Template Type By All Customers</p></figcaption></figure>

6. To upload the filled template file, click the "**Choose file**" button

<figure><img src="/files/wI1nKosGr8iGDXBWThus" alt=""><figcaption></figcaption></figure>

7. Then attach the Excel file that contains your mass billing data.

<figure><img src="/files/xi8785pAkOfqA0OUDsDb" alt=""><figcaption><p>To Section </p></figcaption></figure>

8. In the **Billing Details** section, fill in the fields marked with \* (mandatory).

<figure><img src="/files/yeV34TPQx6sGkzwBxIFP" alt=""><figcaption><p>Billing Details Section</p></figcaption></figure>

**Field Parameter Billing Details**

<table><thead><tr><th width="209">Field</th><th>Description</th></tr></thead><tbody><tr><td>Invoice No</td><td>Invoice number will be generated by Faspay system.</td></tr><tr><td>Invoice Subject</td><td>Filled with subject of the invoice to be sent to customers.</td></tr><tr><td>Invoice Language</td><td>Choose the language to be used on the invoice, available in English and Indonesian.</td></tr><tr><td>Invoice Type</td><td>For this invoice type only choose one:<br>- Once:  to create invoice for single billing once a used.<br>- Scheduled: to schedule the delivery of invoices to customers.<br>- Recurring: to create recurring invoices periodically.</td></tr><tr><td>Invoice Date</td><td>Click the "<strong>Calendar</strong>" icon to select the issue date of the invoice that will be sent to the customer.</td></tr><tr><td>Invoice Due Date</td><td>Click the "<strong>Calendar</strong>" icon to select the due date of the invoice</td></tr></tbody></table>

9. Then, in the Header section, fill in the header for the email, and Notes if there are any remarks you want to include in the invoices. In the Notes section, you can activate or deactivate it by checking "**Show notes on invoice PDF**". Then click the "**Save & Send**" button.

<figure><img src="/files/j0ASAIyRPFWrNq75XefC" alt=""><figcaption><p>Header &#x26; Notes Section</p></figcaption></figure>

**Notes:** Generate Static VA button is only used by merchant that use Static VA method, in details can be seen [here](https://docs.faspay.co.id/getting-started/faspay-billing-2.0/how-to-use/billings/static-va-generator).

10. A notification pop-up will appear confirming that the mass billing has been successfully created.

<figure><img src="/files/SKUKseMAVn65EjkAwyQd" alt="" width="282"><figcaption><p>Notification Pop-Up</p></figcaption></figure>

11. The Mass Billing that has been created will appear in the billing menu list.

<figure><img src="/files/KKFKTx8NfTWPdQBTIQaC" alt=""><figcaption><p>Billing Menu List</p></figcaption></figure>

12. The customer/user will receive a billing email containing the invoice information that has been created. The customer will be directed to pay the invoice by clicking "**Pay here"** in the email body, which will then redirect to the invoice payment page at [Faspay Xpress](/getting-started/faspay-xpress).

<figure><img src="/files/lkb0GAW98odgQJSed4sI" alt=""><figcaption><p>E-mail Invoice </p></figcaption></figure>

### Partial Payment

The Partial Payment feature allows users to make a partial payment of the total bill. This feature can be accessed through two methods, via Email Invoice or via the Merchant Page. Once users are redirected to the payment page, the payment process follows the same flow.

#### Opening The Payment Page

{% stepper %}
{% step %}
**Via Email Invoice**

1. Open the **invoice email** from Fapay Billing.

<figure><img src="/files/41Ijq9pItYndiXSd927N" alt=""><figcaption><p>E-mail Invoice</p></figcaption></figure>

2. Click **Pay Here**.

<figure><img src="/files/Xb3OKfUn2xA89etVrJMY" alt=""><figcaption><p>E-mail Invoice</p></figcaption></figure>

You will be redirected to the payment page.

<figure><img src="/files/5mOrlNjGPwewGJUPJF2L" alt="" width="261"><figcaption><p>Payment Page</p></figcaption></figure>

{% hint style="info" %}
If there is more than one invoice with Unpaid status, all unpaid invoices will be displayed on the payment page

<p align="center"><img src="/files/vUT9vSCo9ULFXhjOmTP4" alt="" data-size="original"></p>
{% endhint %}
{% endstep %}

{% step %}
**Via Merchant Page**

1. Log in to the Merchant Page : <https://faspay.co.id/merchantpage/auth/login>.
2. Access the **Faspay Billing → Billing → Billing List menu.**

<figure><img src="/files/3JmyDm5KrL67mP8NjcOm" alt=""><figcaption><p>Dashboard Billing List</p></figcaption></figure>

3. Click the **three-dot icon** in the **Actions** column.

<figure><img src="/files/2AmiStUgnNi4BCH2syxS" alt=""><figcaption><p>Dashboard Billing List</p></figcaption></figure>

4. Click Copy **Payment Link.**

<figure><img src="/files/JwbG19Z4PVhgZAfUQN16" alt=""><figcaption><p>Dashboard Billing List</p></figcaption></figure>

5. Open a browser and **paste the copied Payment Link.**

<figure><img src="/files/W8kqNx1jwsH8M3XngXJC" alt=""><figcaption><p>Browser</p></figcaption></figure>

6. The system will redirect the user to the payment page.

<figure><img src="/files/5mOrlNjGPwewGJUPJF2L" alt="" width="261"><figcaption><p>Payment Page</p></figcaption></figure>
{% endstep %}
{% endstepper %}

{% hint style="info" %}
If there is more than one invoice with Unpaid status, all unpaid invoices will be displayed on the payment page

<p align="center"><img src="/files/vUT9vSCo9ULFXhjOmTP4" alt="" data-size="original"></p>
{% endhint %}

#### Partial Payment Process

{% stepper %}
{% step %}
**Via Virtual Account**

1. Access the payment page.
2. Enter the **payment amount** in the **Payment Amount field.**

<figure><img src="/files/hau8eTvgaSBrwHsLDAVC" alt="" width="260"><figcaption><p>Payment Page</p></figcaption></figure>

3. Ensure the payment amount is correct, then click **Pay Now**.

<figure><img src="/files/BQW9FG68ijDiVhQm5mq4" alt="" width="257"><figcaption><p>Payment Page</p></figcaption></figure>

4. Select **Virtual Account** as the payment method, then click **Pay**.

<figure><img src="/files/bGcK1BMObILeSZY3lYlp" alt="" width="251"><figcaption><p>Payment Page</p></figcaption></figure>

5. Click **Yes** to proceed with the payment process.

<figure><img src="/files/X4KnNbPhdLKLoRCkQh27" alt=""><figcaption><p>Payment Page</p></figcaption></figure>

6. Click **Copy Virtual Account Number.**

<figure><img src="/files/Id52ym7vz2s3zRQ3RnIi" alt=""><figcaption><p>Payment Page</p></figcaption></figure>

7. Open the **Internet Banking** dashboard based on the selected payment method, then select the **Virtual Account payment** menu.

<figure><img src="/files/Xv14ycsCCTpLJHUxsw2K" alt=""><figcaption><p>Internet Banking Dashboard</p></figcaption></figure>

8. Enter the **copied Virtual Account Number**, then click **Process.**

<figure><img src="/files/DrI1GAW8WgBJACd8px4t" alt=""><figcaption><p>Internet Banking Dashboard</p></figcaption></figure>

9. The payment is successfully completed.

<figure><img src="/files/CBkifVbAc2u0xIbhwmd9" alt=""><figcaption><p>Internet Banking Dashboard</p></figcaption></figure>

After the partial payment via Virtual Account is completed, the invoice status in the **Billing List** will be updated from **Unpaid** to **Partially Paid.**

{% hint style="info" %}
**Notes :**&#x20;

* **An Invoice with an Unpaid status will be updated to Partially Paid.**
* **An Invoice with a Partially Paid Paid status will be updated to Paid.**
  {% endhint %}

Before :&#x20;

<figure><img src="/files/h1mDsZ8UQf4AJqrKS6BT" alt=""><figcaption><p>Dashboard Billing List</p></figcaption></figure>

After :&#x20;

<figure><img src="/files/0JLAr3cssD4g1SEZSuds" alt=""><figcaption><p>Dashboard Billing List</p></figcaption></figure>
{% endstep %}

{% step %}
**Via Credit Card**

{% hint style="warning" %}
Note: The sample invoice used for payment via Credit Card is different from the sample invoice used for payment via Virtual Account.
{% endhint %}

1. Access the payment page.
2. Ensure the payment amount is correct, then click **Pay Now.**

<figure><img src="/files/lcNre9fB23tgN27Umce7" alt="" width="301"><figcaption><p>Payment Page</p></figcaption></figure>

3. Select **Credit Card** as the payment method, then click **Pay** to proceed with the payment.

<figure><img src="/files/rLwFKaapriSe0s1f41Hm" alt="" width="264"><figcaption><p>Payment Page</p></figcaption></figure>

4. Click **Yes** to continue the payment process.

<figure><img src="/files/jb0KcTISgXqzBGkhcm4y" alt=""><figcaption><p>Payment Page</p></figcaption></figure>

5. Complete the **Credit Card** details, then click **Pay Now.**

<figure><img src="/files/i6remgzjEW4GDMCnBzuE" alt=""><figcaption><p>Payment Page</p></figcaption></figure>

6. Complete the **Authentication** process.

<figure><img src="/files/ASXWLtjZg1oUVAfchF16" alt=""><figcaption><p>Payment Page</p></figcaption></figure>

7. The payment is successfully completed.

<figure><img src="/files/UikTtIBodqw7oPWbITfI" alt=""><figcaption><p>Payment Page</p></figcaption></figure>

After the payment via Credit Card is completed, the invoice status in the **Billing List** will be updated from **Partially Paid** to **Paid.**

{% hint style="info" %}
**Notes :**&#x20;

* **An Invoice with an Unpaid status will be updated to Partially Paid.**
* **An Invoice with a Partially Paid Paid status will be updated to Paid.**
  {% endhint %}

Before :&#x20;

<figure><img src="/files/lebsuPGvGLSH3j7ujazu" alt=""><figcaption><p>Dashboard Billing List</p></figcaption></figure>

After :&#x20;

<figure><img src="/files/gkKQ50kAEJsTHea67jC6" alt=""><figcaption><p>Dashboard Billing List</p></figcaption></figure>
{% endstep %}
{% endstepper %}


# Detail Billing

## Guide

On the **Billing List** page, to see the details of the invoice created can be done in the following way:

1. Select the invoice by clicking the row on the invoice.

<figure><img src="/files/z5aSotFqp69Qmir4jM0r" alt=""><figcaption><p>Billing List Page</p></figcaption></figure>

2. View the details of the selected invoice.

<figure><img src="/files/PZfQuSEHAjbA1RC2HAuE" alt=""><figcaption><p>Billing Detail</p></figcaption></figure>

On the invoice detail page, you can take action according to the request of the customer. The steps that can be taken on invoices that have been made are as follows:

### **Edit Invoice**

An invoice edit can be done if the invoice status is "**Draft/Proforma**". This feature is used to make data changes from invoices that have been created. The following steps explain how to edit an invoice:

1. On the invoice detail page on the **Actions** button, click **Edit.**&#x20;

<figure><img src="/files/cVimtmxpwHmJjX9X7h3w" alt=""><figcaption><p> Billing Detail</p></figcaption></figure>

2. Do the change as needed. For example, the customer number will be changed, then click **"Save Draft"** butto&#x6E;**.**

<figure><img src="/files/ksufdmURkzUAU98TdS85" alt=""><figcaption><p>Save &#x26; Send Billing Detail</p></figcaption></figure>

3. On success notification, click **OK**.

<figure><img src="/files/jCDNccV3TAfclhaVilR0" alt="" width="293"><figcaption><p>Success Notification</p></figcaption></figure>

3. This is the invoices details after the data changes has been made.

<figure><img src="/files/9nchY24HvD2kJi7MbPk3" alt=""><figcaption><p>Billing Detail</p></figcaption></figure>

### **Duplicate Invoice**

This is a feature used to duplicate data from invoices that have been created. The following steps explain how to duplicate an invoice:

1. On the invoice detail page, click "**Action**" then select "**Duplicate**”.

<figure><img src="/files/j7MQ2tGRXyzP3otdGQB7" alt=""><figcaption><p>Duplicate Invoice</p></figcaption></figure>

2. Display a confirmation pop up for duplicate data, if agreed click "**Yes**" to continue.

<figure><img src="/files/xQGZW29Mp71OYSbNKvZe" alt="" width="364"><figcaption><p>Duplicate Invoice Notification</p></figcaption></figure>

3. Display a notification that data was successfully duplicated.

<figure><img src="/files/o8resx87lzZbnzdaezXA" alt="" width="338"><figcaption><p>Duplicated Success Notification</p></figcaption></figure>

4. This the detail of the invoice that successfully duplicated.

<figure><img src="/files/avWFxrNIfwYyKIs6Q2Qi" alt=""><figcaption><p>Invoice Details</p></figcaption></figure>

4. Invoices that are successfully duplicated also appear on the Billing List page.

<figure><img src="/files/G4wgC7Pib6JqOtqqyGvR" alt=""><figcaption><p>Billing List Page</p></figcaption></figure>

### **Delete Invoice**

Delete invoices can only be done for invoices that have the status "**Draft, Proforma,** and **Cancelled**". This feature is used to delete invoices that have been created. The following steps explain how to delete an invoice:

1. Select the invoice file on the Billing List page. In the Billing Detail, click "**Delete**" on the "**Actions"** button.

<figure><img src="/files/pBkSlwMlnJGHOKNUncNL" alt=""><figcaption><p>Delete Invoice</p></figcaption></figure>

2. A notification confirming message will be displayed, if you agree to continue the delete, then click "**Yes**”.

<figure><img src="/files/iZ9mP7qOr8VwbTzwqKkx" alt="" width="333"><figcaption><p>Notification delete</p></figcaption></figure>

3. On success notification, click "**OK**".

<figure><img src="/files/ovajks9T9ChYmfMGAHn2" alt="" width="336"><figcaption><p>Success Delete Notification</p></figcaption></figure>

4. So, the data now successfully deleted and didn’t appear on Billing List page.

<figure><img src="/files/yrHHrtKwzMlHzLPKAVLR" alt=""><figcaption><p>Billing List</p></figcaption></figure>

### **Cancel Invoice**

Cancel Invoice is done for invoice with the status "Unpaid, Partially Paid, Overdue, and Proforma". This feature is used to cancel invoice that have been created and sent to the Customer not to be included in the customer's bill. The following steps explain how to cancel an invoice:

1. Select the invoice file on the Billing List page, then display the invoice detail. Click the "**Actions**" button, then click “**Cancel**”.

<figure><img src="/files/LCUYxNIkcb4OrOQALwn8" alt=""><figcaption><p>Billing Detail</p></figcaption></figure>

2. Displaying a confirmation message to continue the Cancel process, click "**Yes**" to continue the cancelation.

<figure><img src="/files/YyyK5ZBsbYWmwbm01Eox" alt="" width="375"><figcaption><p>Cancel Confirmation</p></figcaption></figure>

3. It will display a notification that billing successfully canceled.

<figure><img src="/files/AaAMpZY3lrzIGCpbSFBo" alt="" width="329"><figcaption><p>Success Cancel Billing Notification</p></figcaption></figure>

4. The following is a display of invoice with a status of "Cancelled”.

<figure><img src="/files/Ln8syfPgrMrYEKt6TH6s" alt=""><figcaption><p>Cancelled Billing</p></figcaption></figure>

### **Save Draft**

Save Draft is a feature used to create invoice, if the input data still require confirmation/change then it can be saved temporarily (Save Draft). The following steps explain how to saving a temporary invoice (Save Draft):

1. Create a new invoice on the Single Billing Form by clicking “**+ Single Billing**”.

<figure><img src="/files/0eme3aQvDRAylgJ8ghwM" alt=""><figcaption><p>Billings</p></figcaption></figure>

2. Next, fill in the data according to the available fields and click **"Save Draft"** to save the data temporarily.

<figure><img src="/files/liYX98incxt8r4Ix63J0" alt=""><figcaption><p>Save Draft Billing</p></figcaption></figure>

2. Click "**OK**" on success notification.

<figure><img src="/files/nKM6wAbEeNZ5jDkv2gMD" alt="" width="347"><figcaption><p>Success Save Draft</p></figcaption></figure>

3. The saved invoice will become status a "**Draft**".

<figure><img src="/files/PpvpgvzbX5o9pJOULTiE" alt=""><figcaption><p>Draft Status</p></figcaption></figure>

### **Confirm & Send Invoice**

Confirm & Send Invoice can be done if the invoice status is "**Draft/Proforma**". This feature is used to confirm invoice data and send invoice to customer email.  The following steps explain how to confirming & sending an invoice:

1. On the invoice detail page, click "**Actions**" and select "**Confirm & Send**”.

<figure><img src="/files/JqOSFxqzZN0i5W33Robo" alt=""><figcaption><p>Confirm &#x26; Send Draft</p></figcaption></figure>

2. On confirmation notification pop up click "**Yes**" to continue the process.

<figure><img src="/files/fb4m24oTazIaFfl3Huni" alt="" width="337"><figcaption><p>Invoie Confirm Notification</p></figcaption></figure>

3. After successfully confirming & sending an invoice, on the success notification pop-up click the "**OK**" button.

<figure><img src="/files/GXjsqtYbxaw1xXcfUb6k" alt="" width="374"><figcaption><p>Success Notification</p></figcaption></figure>

4. After successfully confirming & sending, the invoice status will be changed to "**Unpaid**”.

<figure><img src="/files/p9tXtrhgSS51kYaso5ex" alt=""><figcaption><p>Unpaid Invoice</p></figcaption></figure>

5. So, the invoice has been successfully sent to the customer's email.

<figure><img src="/files/ermEu33ldDTrEakvmAGN" alt=""><figcaption><p>Email Invoice</p></figcaption></figure>

### **Preview Invoice**

Invoice preview is a feature used to view the result of an invoice created. The following steps explain how to preview an invoice:

1. On the invoice detail page, click "**Actions**" and select "**Preview**".

<figure><img src="/files/zA1dWhzbykMxIlceM6Mt" alt=""><figcaption><p>Invoice Preview Button</p></figcaption></figure>

2. This is the detail of the Invoice previews.

<figure><img src="/files/Hozt4IW0GP5o87Cm5Yu8" alt=""><figcaption><p>invoice Preview</p></figcaption></figure>

### **Print Invoice**

Print invoice is a feature used to print invoices that have been created. The following steps explain how to print an invoice:

1. &#x20;On the invoice detail page, click "**Actions**" and select "**Print**”.

<figure><img src="/files/XxUJeXBsLv1UwZHOJAJw" alt=""><figcaption><p>Invoice Print Button</p></figcaption></figure>

2. It will convert the invoice into a pdf file. This is the preview of the file.

<figure><img src="/files/DjM0Tc66eIBxqd96Rx0Q" alt=""><figcaption><p>Invoice Printed</p></figcaption></figure>

### **Resend Invoice**

Resend Invoices can only be done for invoices with the status "**Unpaid, Partially Paid**, and **Overdue**". This feature is used to resend invoices to customers via e-mail. The following steps explain how to resend the invoice to the customer e-mail:

1. On the invoice detail page, click "**Actions**" and select "**Resend**”.

<figure><img src="/files/VwUr29w4oFeZxisYm53S" alt=""><figcaption><p>Invoice Resend Button</p></figcaption></figure>

2. On the confirmation pop-up, click the "**Yes"** button to resend the invoice to the email address that has been registered.

<figure><img src="/files/0hIXASInhueOP6ybsvQE" alt="" width="375"><figcaption><p>Resend Confirm Notification</p></figcaption></figure>

3. On the success notification pop-up, click an "**OK**" button.

<figure><img src="/files/hGImnts0ZgqponL1VW5G" alt="" width="375"><figcaption><p>Success Resend Notification</p></figcaption></figure>

### **Manual Payment**

This feature is used to record offline payments that merchants receive from customers. So, the payment history will be recorded in Faspay Billing Systems. This feature is accessible from **Billings → Detail Invoice → Actions Menu → Manual Payment** and available to the invoice with Unpaid, Partially Paid, or Overdue status.

1. Open the details of the billings, for example, click the detail on the billings with **Unpaid status**.

<figure><img src="/files/KEztyVomH1m6KwLeK93C" alt=""><figcaption><p>Billing List </p></figcaption></figure>

2. Click the "**Actions"** button, then click **Manual Payment.**

<figure><img src="/files/kYv23g1TQ20etVbNRRBH" alt=""><figcaption><p>Billing Detail</p></figcaption></figure>

3. At the pop-up,  choose Payment Method and input Payment Amount. Click **Choose File** to Upload File, then click **Submit**.

* Example 1: Input **Payment Amount < Outstanding Amount**

<figure><img src="/files/8FATinnCZZMe3sJsppUX" alt="" width="563"><figcaption><p>Payment Amount &#x3C; Outstanding Amount</p></figcaption></figure>

* Example 2: Input **Payment Amount > Outstanding Amount**

<figure><img src="/files/Y3w3LVuj9fFHIHEBaJNZ" alt="" width="563"><figcaption><p>Payment Amount > Outstanding Amount</p></figcaption></figure>

**Note:**

* There will be information about the remaining Outstanding Amount if the input payment is less than the Outstanding Amount.
* If the input payment is greater than the Outstanding Amount, there will be overpayment information.

**Field Parameter Manual Payment Form**

<table><thead><tr><th width="233">Field</th><th>Description</th></tr></thead><tbody><tr><td>Invoice No</td><td>Invoice number</td></tr><tr><td>Outstanding amount</td><td>Outstanding amount pada invoice</td></tr><tr><td>Payment Date</td><td>Payment date</td></tr><tr><td>Payment Method</td><td><p>Payment method option:</p><ul><li>Bank transfer</li><li>Internet Banking</li><li>Write off</li><li>Others</li></ul><p> </p><p><strong>Notes:</strong></p><ul><li>If choose <strong>write off</strong> the channel name it will automatically <strong>Memo</strong> and can't be changes </li><li>If choose <strong>write off</strong> the payment amount can't greater than outstanding amount invoice</li></ul></td></tr><tr><td>Channel Name</td><td>Channel name</td></tr><tr><td>Transaction ID</td><td>Payment reference number</td></tr><tr><td>Payment Amount</td><td>Payment amount</td></tr><tr><td>Upload file</td><td><p>Payment receipt</p><p> </p><p><strong>Notes:</strong></p><ul><li>Accepted file formats include <strong>JPG, PNG, JPEG,</strong> and <strong>PDF,</strong> with a <strong>maximum</strong> upload limit of <strong>10 files</strong>, each with a <strong>size</strong> not exceeding <strong>5 MB</strong>.</li><li>File thas has been uploaded can’t be deleted</li></ul></td></tr></tbody></table>

4. On submit notification click, **Yes**

<figure><img src="/files/BGJVALX1DOM40S5uFwRh" alt="" width="375"><figcaption><p>Submit Notification</p></figcaption></figure>

4. Click **OK** on Success Notification

<figure><img src="/files/EHc8V0d1ujQmAuQz3oF0" alt="" width="336"><figcaption><p>Success Notification</p></figcaption></figure>

4. After submission success, the invoice status will be updated to **"Partial Paid"** or **"Paid"** and a record of the manual payment, including the user's information who made the payment, will be added to the system's payment history.

<figure><img src="/files/NKAsbJVTTf8hcnd9UpBt" alt=""><figcaption><p>Billing Detail</p></figcaption></figure>

5. The payment documents that successfully uploaded will available on **View Detail Invoice → Tab Documents** with the type of documents are Receipt.

<figure><img src="/files/eTMFqCEFge3weMxgRFBa" alt=""><figcaption><p>Documents Page</p></figcaption></figure>

### **Allocate Overpayment**

&#x20;The "Allocate Overpayment" is utilized to distribute excess payment to other invoices belonging to the same customer.

#### Manual Allocate Overpayment

1. Open the Billing menu, then choose the invoice by clicking the invoice number with **Paid** status.

<figure><img src="/files/71aRQnZGvWjYz8hYec17" alt=""><figcaption><p>Billing List</p></figcaption></figure>

2. It can be seen that there’s an overpayment on the invoice.

<figure><img src="/files/K1QZfqRqnv3NKSCgdnce" alt=""><figcaption><p>Billing Detail</p></figcaption></figure>

3. Click on the **Actions** button, and click **Allocate Overpayment**.

<figure><img src="/files/qMJAvdaleEfFdeyMGUi2" alt=""><figcaption><p>Allocate Overpayment</p></figcaption></figure>

4. It will show the **Allocation Payment** form, and the “Allocate From” will automatically be filled with a current invoice that has an overpayment. Input the nominal of Allocate Amount as needed, for example, the overpayment will be allocated into 2 invoices with the total amount of allocation can be seen on the form, then click the "**Submit"** button.

<figure><img src="/files/JZp6Y0xnaEYgFlNnA6xJ" alt=""><figcaption><p>Allocate Overpayment form</p></figcaption></figure>

**Field Parameter Allocate Overpayment Form**

<table><thead><tr><th width="233">Field</th><th>Description</th></tr></thead><tbody><tr><td>Available Amount</td><td>Available amount in accordance with the overpayment amount on the invoice</td></tr><tr><td>Allocate from</td><td>Payment source of fund</td></tr><tr><td>Allocate to</td><td><p>Invoice that will receive payment allocation. </p><p></p><p><strong>Notes:</strong> </p><p>Users can only allocate the overpayment to invoices belonging to the same customer.</p></td></tr><tr><td>Invoice No</td><td>Invoice number</td></tr><tr><td>Invoice Date</td><td>Invoice date</td></tr><tr><td>Due Date</td><td>Due date of the invoice</td></tr><tr><td>Outstanding amount</td><td>Outstanding amount on the invoice</td></tr><tr><td>Allocate Amount</td><td><p>The nominal payment amount that will be allocated to the invoice.</p><p><br><strong>Notes:</strong> <br>Allocation amount cannot be greater than the outstanding amount.</p></td></tr><tr><td>Total Allocation</td><td>Payment total allocation</td></tr></tbody></table>

5. On the notification, to validate click **Yes**.

<figure><img src="/files/8p7khP8kETcMAaefjS0c" alt="" width="312"><figcaption><p>Validation Notification</p></figcaption></figure>

6. On success notification, click **OK**

<figure><img src="/files/f9o3N5Rf9haRxDbgikgu" alt="" width="313"><figcaption><p>Success Notification</p></figcaption></figure>

7. After the submission success, at payment history will be recorded that there’s a subtraction on the overpayment, which means that the funds have been successfully allocated into another invoice, and the remaining overpayment outstanding amount will be shown.

<figure><img src="/files/Ap8BdL4xGOy1D8gseIMU" alt=""><figcaption><p>Billing Detail</p></figcaption></figure>

#### **Auto Allocate Overpayment**

Auto Allocate Overpayment is a feature available to Merchants who have requested&#x20;the activation of the Auto Allocate Overpayment feature through Faspay. Once the&#x20;feature has been activated, the system will automatically allocate any Overpayment&#x20;amount to the next invoice with an Outstanding Amount, eliminating the need for the&#x20;Merchant to perform the Allocate Overpayment process manually.

{% hint style="info" %}
Notes:

* If there are one or more previous invoices with an Outstanding Amount, the  \
  payment page will display all invoices that are still unpaid.
* The payment will be applied to the oldest outstanding invoice first.
* If there is any remaining payment amount after the prioritized invoice has been  \
  fully paid, the system will automatically allocate the remaining amount to the next  &#x20;invoice with an Outstanding Amount.
* If all invoices with an Outstanding Amount have been fully paid and there is still  \
  a remaining payment amount, the remaining balance will be recorded as an  \
  Overpayment and will be automatically allocated to the next invoice generated.
  {% endhint %}

The following are the steps to make a payment using the Auto Allocate Overpayment&#x20;feature:

1. From **Faspay Billing → Billings → Billing List**, click the three-dot icon on the invoice you want to pay.
2. Click **Copy Payment Link**.

<figure><img src="/files/HSoW0xEJjIGoJQSI02Ds" alt=""><figcaption></figcaption></figure>

3. Paste the **copied Payment Link** into your browser, then open the payment page.

<figure><img src="/files/WskJU1Cgh5wDrpkeEbeS" alt=""><figcaption></figcaption></figure>

4. Enter the payment amount in the **Payment Amount** field.

<figure><img src="/files/BMiserNFVrh0KG3DclV1" alt=""><figcaption></figcaption></figure>

5. Verify that the payment amount is correct, then click **Pay Now**.

<figure><img src="/files/KtgST3cS568nhC2rcbVB" alt=""><figcaption></figcaption></figure>

{% hint style="info" %}
**Note:** In this example, the payment amount exceeds the invoice amount to\
generate an Overpayment
{% endhint %}

6. Select the payment method you want to use.

<figure><img src="/files/8DLDN1mbt0bphgrGtiaW" alt=""><figcaption></figcaption></figure>

7. Click **Pay** to proceed with the payment.

<figure><img src="/files/2uDbzMsysa4Tn94cWTAS" alt=""><figcaption></figcaption></figure>

8. On the confirmation pop-up, click **Yes**.

<figure><img src="/files/K3t62HXU8iQjGEsGwZZY" alt=""><figcaption></figcaption></figure>

9. Open your **Internet Banking** application or website based on the selected   \
   payment method, then navigate to the **Virtual Account** payment menu.

<figure><img src="/files/B7i5azgHYuVskBLkzLve" alt=""><figcaption></figcaption></figure>

10. Enter the **Virtual Account Number**, then click Process to complete the    \
    payment.

<figure><img src="/files/hH9f1PI8NgrtAPIQxkGk" alt=""><figcaption></figcaption></figure>

11. Once the payment has been completed successfully, the system will display a    &#x20;payment success notification.

<figure><img src="/files/tJHFx7peisQ83yzyTwv1" alt=""><figcaption></figcaption></figure>

12. After the overpayment has been processed successfully, the invoice status on    &#x20;the **Billing List** page will change to **Paid**.

<figure><img src="/files/lDQn4l69D6i1DqP3e5DQ" alt=""><figcaption></figcaption></figure>

> **Auto Allocate Overpayment Result**

1. The invoice that received an overpayment will display the **Outstanding Amount** as the **Overpayment Amount**.&#x20;

<figure><img src="/files/5eH7M3HtlIWFUmqO2PHB" alt=""><figcaption></figcaption></figure>

{% hint style="info" %}
**Note:** The Overpayment amount will be **automatically allocated** to the **next invoice with an Outstanding Amount**.&#x20;
{% endhint %}

2. The destination invoice will automatically be updated to either **Partially Paid** or **Paid**, depending on the allocated overpayment amount.

<figure><img src="/files/Xfys4C6VgYKRuJnH1ys3" alt=""><figcaption></figcaption></figure>

{% hint style="info" %}
**Note:** On the Billing **Detail page**, the allocation history can be viewed in the **Payment History** section with the **Allocate from Invoice** remark, which indicates the source invoice of the overpayment.
{% endhint %}

### **Extend Due Date Invoice**

Extend due date invoices can only be done for invoices that have the status of "**Unpaid, Partially Paid**, and **Overdue**". This feature is used to change or extend the due date. The following steps explain how to change the due date of an invoice:

1. On the invoice detail page, click "**Actions**" and select "**Extend Due Date**”.

<figure><img src="/files/9hgXPEYJR7mA90rUaTWH" alt=""><figcaption><p>Extend Due Date</p></figcaption></figure>

2. On the confirmation pop-up to make the due date change, click "**Yes**" to continue the process.

<figure><img src="/files/bvbhVhfOj8NfNAg5FxQx" alt="" width="290"><figcaption><p>Extend Due Date Confirm Notification</p></figcaption></figure>

3. Reset the due date of the invoice, click **"Apply"** then click **“Save and Send”** to save the change.

<figure><img src="/files/hEymlAhj5l1Ici0TcnBZ" alt=""><figcaption><p>Apply Due Date</p></figcaption></figure>

4. Click **“OK”** on the success notification.

<figure><img src="/files/Ku0PpMJdKrCQVz6ICuzX" alt="" width="289"><figcaption><p>Success Notification</p></figcaption></figure>

5. So, the due date has been successfully changed, and the new invoice has been sent to the customer email.

<figure><img src="/files/RMrrNW2RHQ1OsUtLzQ2c" alt=""><figcaption><p>Invoice Email</p></figcaption></figure>

### **Mark as Paid**

This feature is used to manually mark that the invoice has been paid off. This feature is only done for invoices that have the status of "**Unpaid, Partially Paid,** and **Overdue**".&#x20;

1. On the invoice detail page, click "**Actions**" and select "**Mark as Paid**”.

<figure><img src="/files/F6RUIxgIrlDtx0kCqwiG" alt=""><figcaption><p>Mark as Paid Button</p></figcaption></figure>

2. On confirmation message to continue the mark as paid on the invoice. Click **"Yes"** to approve.

<figure><img src="/files/8ugJjOj70a8msQvOhYMn" alt="" width="364"><figcaption><p>Confirm Notification</p></figcaption></figure>

3. Click **“OK”** on the success notification.

<figure><img src="/files/Ew6MNjepI8Zhzlon2z9F" alt="" width="375"><figcaption><p>Success Notification</p></figcaption></figure>

4. So, the invoice is successfully changed from "Unpaid" to "Paid" status.

<figure><img src="/files/30TdTpV7HTgSgH50p5Yh" alt=""><figcaption><p>Paid Status</p></figcaption></figure>

### **Send Proforma Invoice**

Send Proforma Invoice can only be used if the merchant activates the Proforma Invoice setting. This feature can be done on invoices that have the status "**Draft/Proforma**". The following steps explain how to send proforma:

1. On the invoice detail page, click "**Actions**" and select "**Send Proforma**".

<figure><img src="/files/6Cbu3WnAeExsDWQbmjsc" alt=""><figcaption><p>Send Proforma Button</p></figcaption></figure>

2. The pop-up notification will show the expired date setting of the invoice. Click "**Yes, Submit**" to continue the process.

<figure><img src="/files/CCiD6Htc8KAsI8JuaWWr" alt="" width="375"><figcaption><p>Submit  Notification</p></figcaption></figure>

3. Click **"OK"** on the success notification.

<figure><img src="/files/vEoLCwXgwh4iOzD2sSn9" alt="" width="346"><figcaption><p>Success Notification</p></figcaption></figure>

4. So, the proforma has been successfully sent to the customer's email.

<figure><img src="/files/VUxLiaPMaF4sHPQ3KPI1" alt=""><figcaption><p>Invoice Email</p></figcaption></figure>


# Upload Document

Document Upload is a feature available on the Billing List menu and is used to store supporting documents related to invoices made. The following are the steps to upload a document:

## Guide

1. On the Billing List Menu page, select one of the invoices and click the three dots in the actions column to open the options. Next, click "**Upload Document**".

<figure><img src="/files/PEaVkY0eQi5Ro1l0MJXL" alt=""><figcaption></figcaption></figure>

1. The pop-up "**Upload Documents**" form will be displayed. Drop the file and fill in the required fields related to the document to be uploaded.

<figure><img src="/files/Aa1oIpTiLrr2PtJd0QMG" alt="" width="375"><figcaption><p>Upload Documents Form</p></figcaption></figure>

**Field Parameter Upload Documents Form**

| Field                                              | Description                                                                               |
| -------------------------------------------------- | ----------------------------------------------------------------------------------------- |
| Document Type                                      | Types of document uploaded                                                                |
| <p>WHT No\*</p><p>(Withholding Tax Number)</p>     | Withholding Tax Number                                                                    |
| <p>WHT Amount\*</p><p>(Withholding Tax Amount)</p> | Total Withholding Tax                                                                     |
| <p>WHT Date\*</p><p>(Withholding Tax Date)</p>     | Withholding Tax Date                                                                      |
| Description                                        | Description of uploaded document                                                          |
| Deduct Amount Due                                  | Option, whether the WHT entered directly reduces the number of invoices to be paid or not |

{% hint style="info" %}
**Notes:**

1. Document Type:
   * Withholding Tax (this radio button will appear if, the check in the billing setting withholding tax is available).&#x20;
   * The "WHT No", "WHT Amount", "**WHT Date**", and "**Deduct Amount**" fields are available if the user selects the **Withholding Tax** document type.
   * Deduct amount due:
     1. If Yes, then you will cut the outstanding amount on the invoice.
     2. If No, do not deduct the outstanding amount in the invoice, only the attachment in the supporting document/ as an archive.

2. Format Document:
   * JPG, PNG, JPEG, and PDF format only.
   * Maximum size 2MB.

3. Invoices with all statuses can be uploaded documents.
   {% endhint %}

4. The following is an example of uploading a document.

### **Withholding Tax**

* Input the uploaded document data and click "**Submit**”.
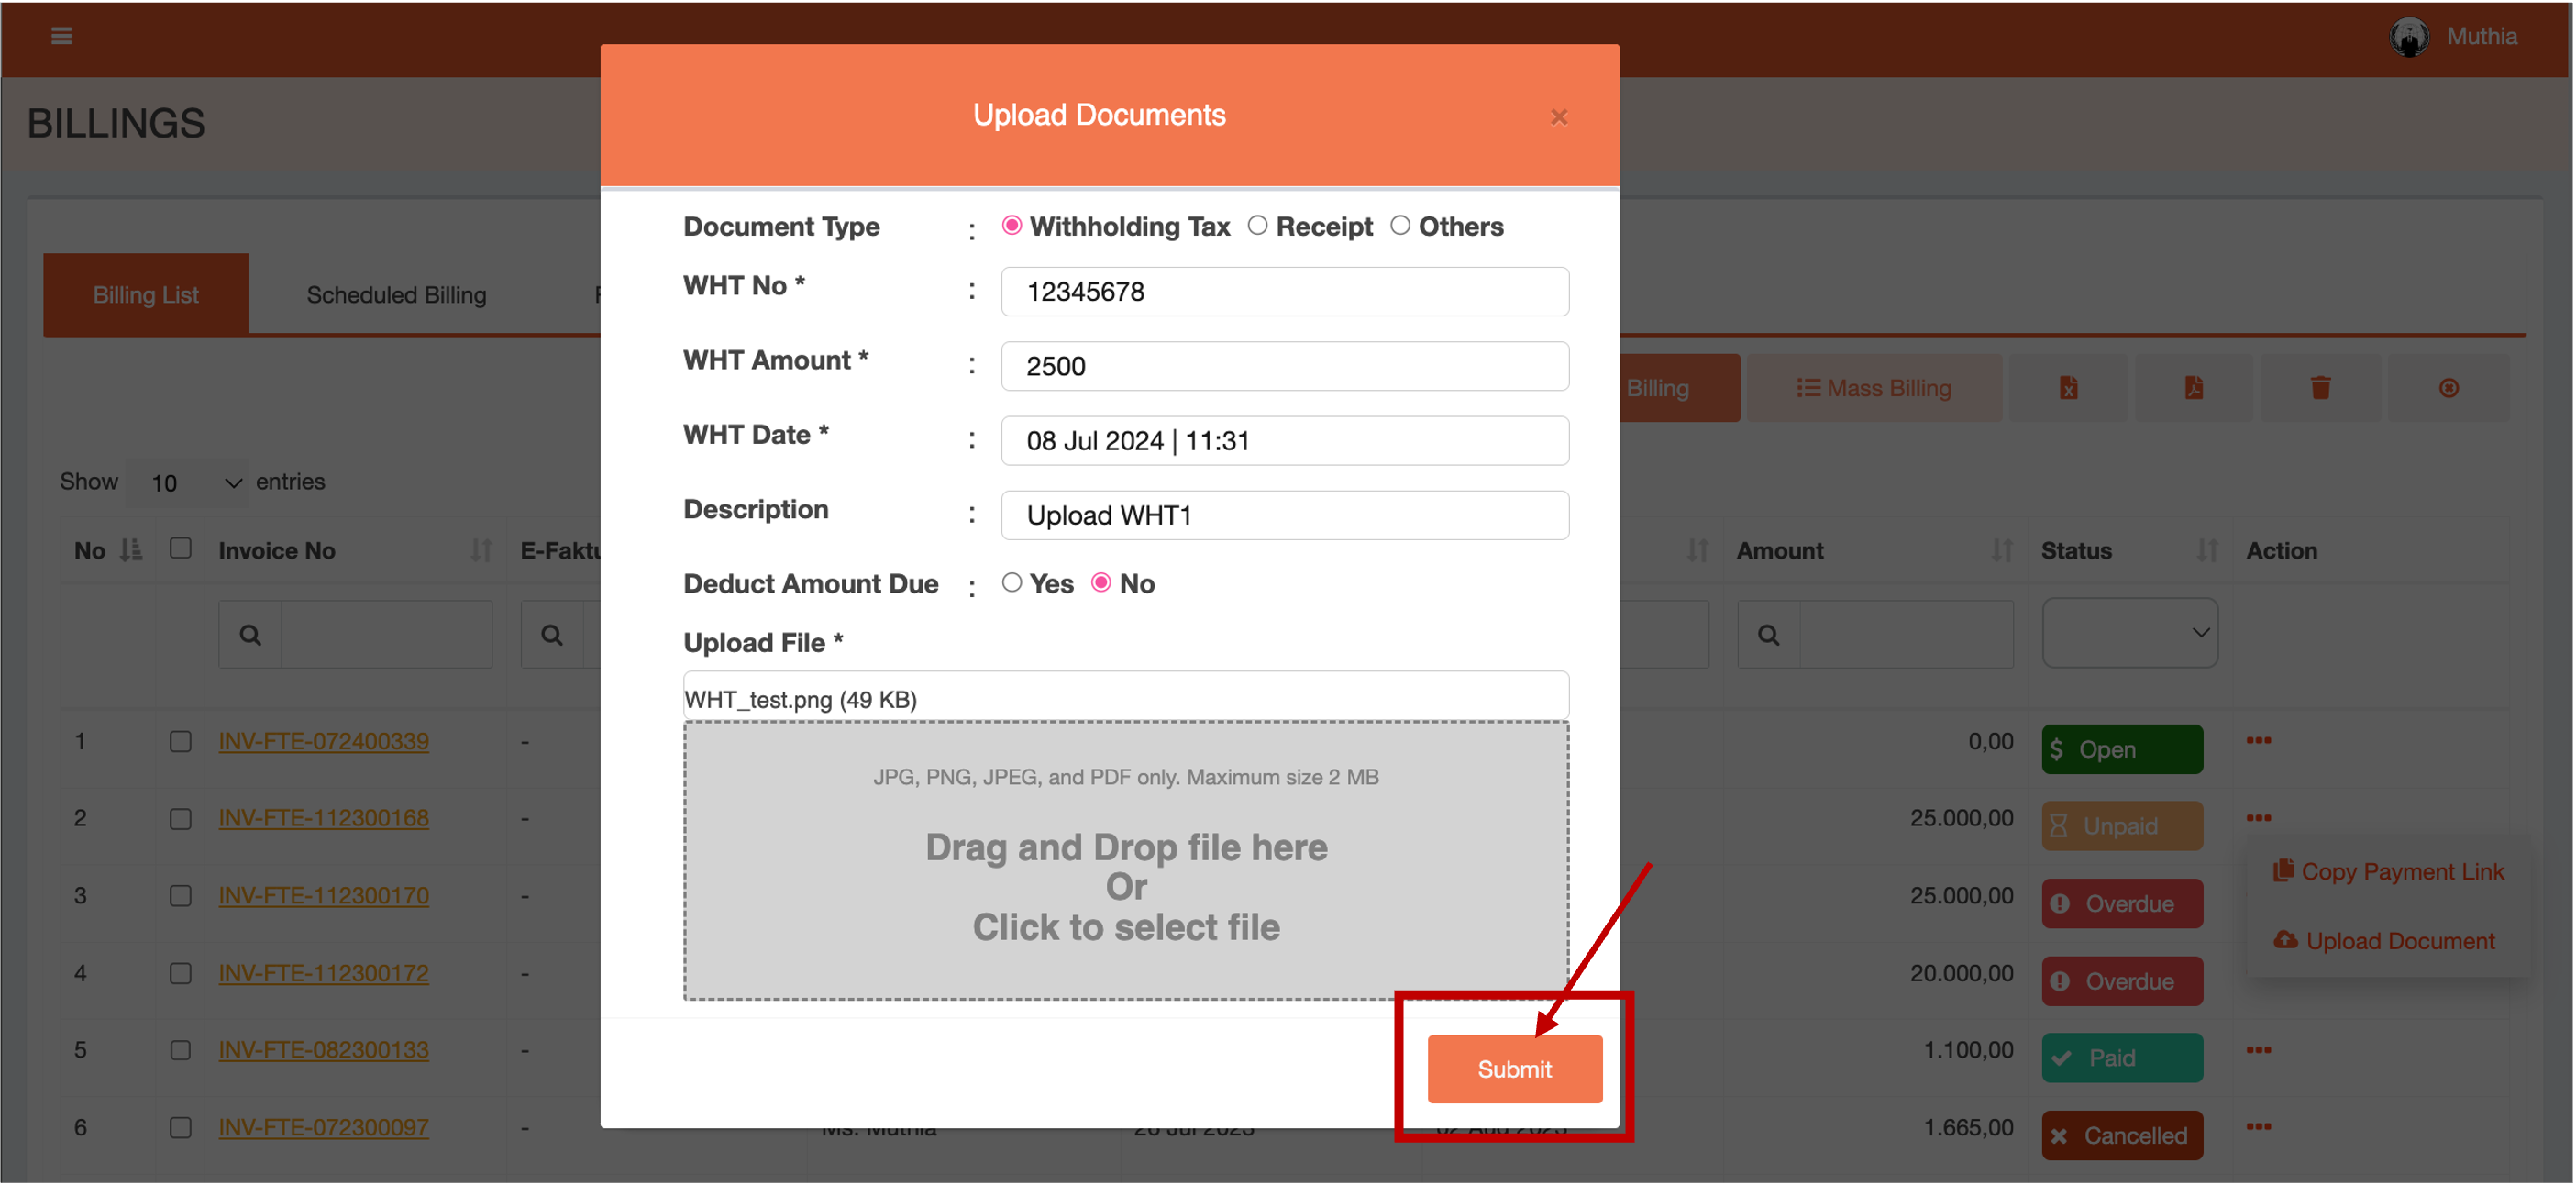
<figure><img src="/files/I8o3TmEUIiz4CFsjuVeK" alt=""><figcaption><p>Upload Documents</p></figcaption></figure>

* Next, it will display a Success Uploads billing document notification message that, clicks "**OK**" button to continue the process.

<figure><img src="/files/9b9UXBIc8bN2C5gsWysQ" alt=""><figcaption><p>Success Notification Message</p></figcaption></figure>

* Next, click the Invoice number on the Billing List Page to see the result of the document that was successfully uploaded.

<figure><img src="/files/MmZX8MEphBCN0XxTFfN1" alt=""><figcaption><p>Documents Page </p></figcaption></figure>

| Button                                      | Description               |
| ------------------------------------------- | ------------------------- |
| ![](/files/SG3L0sS7H6hF1pvCTlKC)  (View)    | To view a document        |
| ![](/files/LOPQnUbohB4wyWPuJzIb) (Download) | To download document data |
| ![](/files/2JztyAqlaLr99cjSQctN)  (Delete)  | To delete a document      |

### **Receipt & Others**

* Input the uploaded document data and click the **"Submit”** button.

<figure><img src="/files/WwkZA10x8EFfIaR7kRt2" alt=""><figcaption><p>Receipt Documents</p></figcaption></figure>

<figure><img src="/files/zWWRsYXq6IBHae0z1a5m" alt=""><figcaption><p>Others Documents</p></figcaption></figure>

* Next, it will display a Success Uploads billing document notification message that, clicks "**OK**" button to continue the process.

<figure><img src="/files/R5ohqDWrkumFZfFhl2XR" alt=""><figcaption><p>Success Notification Messages</p></figcaption></figure>

* Next, click the Invoice number on the Billing List Page to see the result of the document that was successfully uploaded.

<figure><img src="/files/XCVe0ZGXjSt92qQNiMM5" alt=""><figcaption><p>Documents Page</p></figcaption></figure>

| Button                                      | Description               |
| ------------------------------------------- | ------------------------- |
| ![](/files/KnNxYCIPcKFuJdqgoBSC) (View)     | To view a document        |
| ![](/files/UYZO9bEcwbPr5fRVgZ5D) (Download) | To download document data |
| ![](/files/i4TzJFH0Lgt0DIUWbdbW) (Delete)   | To delete a document      |

## How To Payment

In making payment on Faspay Billing, several steps must be considered, as follows:

1. Merchants will receive an invoice that must be paid via email notification. Here's the email that was received by Merchant, click "**Pay Here**".

<figure><img src="/files/0qGJfxwKMakiGCGZUVSp" alt=""><figcaption><p>Email Notification</p></figcaption></figure>

2. Next, it will show Bill Summary, input the Payment Amount, then click **Pay Now.**&#x20;

<figure><img src="/files/qDe2H0FObzRRKHLxVB41" alt="" width="375"><figcaption><p>Billing Summary</p></figcaption></figure>

3. Select a payment method, then click the **Pay** button.

<figure><img src="/files/Cx8AnCThHL29wjB6tCuU" alt="" width="375"><figcaption><p>Choose Payment Method</p></figcaption></figure>

3. Users can also see order summary detail by clicking dropdown button at Order Summary

<figure><img src="/files/3Ae2CiAuhph1z4LOO8S0" alt=""><figcaption><p>Order Summary</p></figcaption></figure>

3. The following is an example of payment via Permata VA. Click "**Yes**" to continue the process.

<figure><img src="/files/UqKXi6t2bYpefLGB43zD" alt="" width="272"><figcaption><p>Confirm Payment</p></figcaption></figure>

5. Next, display the invoice detail page. Copy the virtual account number to make payment on each payment instrument.

<figure><img src="/files/q8wQxVSOoPWByNde6o5U" alt="" width="333"><figcaption><p>Invoice Detail Page</p></figcaption></figure>

6. If the payment is successful, a notification will be received on the registered email.

<figure><img src="/files/vdikd9PSBA6JciVW7ALy" alt=""><figcaption><p>Email Notification</p></figcaption></figure>

&#x20;


# Scheduled Billing

Scheduled Billing is one type of invoice from single billing. Scheduled Billing is used to schedule the delivery of invoices to customers.

## **Create New Scheduled Billing**

1. Select the Scheduled Billing menu on the Faspay Billing menu, and the Scheduled Billing menu page will be displayed. Click "**+ Scheduled Billing**" to add new invoice data.

<figure><img src="/files/q32ZeMAG58CJHQQRmLbg" alt=""><figcaption><p><strong>Create Scheduled Billing</strong></p></figcaption></figure>

2. Next, will displayed Single Billing form.

<figure><img src="/files/LULF5IkadZM1GRGi14GI" alt=""><figcaption><p>New Scheduled Billing form</p></figcaption></figure>

**Field Parameter Single Billing form**

<table><thead><tr><th width="258">Field</th><th>Description</th></tr></thead><tbody><tr><td>To</td><td>Customer data</td></tr><tr><td>    Customer Name</td><td>Customer name (registered)</td></tr><tr><td>    Add New Customer</td><td>Add new customer data</td></tr><tr><td>Billing Details</td><td>Complete billing data</td></tr><tr><td>    Invoice No</td><td>Invoice number (auto generate)</td></tr><tr><td>    Invoice Subject</td><td>Invoice subject</td></tr><tr><td>    Invoice Language</td><td>Language used on the invoice</td></tr><tr><td>    Invoice Type</td><td>Invoice type (choose as needed)</td></tr><tr><td>    Invoice Date</td><td>Date the invoice was created</td></tr><tr><td>    Due Date</td><td>Payment limit/due invoice created</td></tr><tr><td>    Invoice Tax</td><td><p>Will appear if customer enable E-Faktur module.</p><p>If you activated the invoice tax, when system changes proforma to invoice, the system will automatically generate the tax invoice number for the invoice with the following conditions:</p><ul><li>The tax invoice number is taken from the range of tax invoice available numbers on the E-Faktur No page.</li><li>The system will use the tax invoice number sequentially from smallest to largest (Ascending order).</li><li>The period of the tax invoice number that was used must be the same as the current year(Year Period)</li></ul></td></tr><tr><td>     Transaction code</td><td><p>List of transaction code (will appear if customer activated Invoice Tax).</p><p>01: To Parties Who Are Not VAT Witholder</p><p>02: To the Treasurer's Witholder</p><p>03: To the Witholder except Treasurer's</p><p>04: DPP Other Values</p><p>06: Other submissions, including submission to foreign tourists in the context of VAT refunds</p><p>07: Submission of which VAT is not collected</p><p>08: Submission of VAT Exemption</p><p>09: Delivery of Assets (clause 16D of the VAT Law)</p></td></tr><tr><td>Header</td><td>Email header text</td></tr><tr><td>     Add Room</td><td>Choice of invoice type item type "room"</td></tr><tr><td>     Add Product</td><td>Choice of invoice type item type "product"</td></tr><tr><td>     Add Other</td><td>Choice of invoice types other than room &#x26; product</td></tr><tr><td>Generate Invoice to PDF</td><td>Information for generating invoices to PDF format</td></tr><tr><td>Notes</td><td>To add a note</td></tr><tr><td>Attachment</td><td>To attach a document</td></tr><tr><td>Button Option</td><td><ul><li>Click <strong>"Save Draft"</strong> to save the data temporarily.</li><li>Click <strong>"Save &#x26; Send"</strong> to save and send a new invoice.</li><li>Click <strong>"Preview"</strong> to preview the invoice before it is submitted.</li></ul></td></tr></tbody></table>

| <p><strong>Notes:</strong></p><ul><li>If the customer name is not yet available, then add new customer data by clicking <strong>"+Add New Customer"</strong> under the Customer Name field.</li><li>In the <strong>"Invoice No"</strong> field, if it is not filled in, it will be auto-generated (automatically filled with system numbering).</li><li>In the <strong>"Due Date"</strong> field, it cannot pass 1 day from the Invoce Date.</li><li>The <strong>"Add Room"</strong> feature is only available for Merchants of Hospitality type.</li></ul> |
| ----------------------------------------------------------------------------------------------------------------------------------------------------------------------------------------------------------------------------------------------------------------------------------------------------------------------------------------------------------------------------------------------------------------------------------------------------------------------------------------------------------------------------------------------------------- |

3. Input the Scheduled Billing data, then click **Save & Send.**

   **Notes:** Ensure that the invoice type is scheduled.

<figure><img src="/files/gIng8RWjbMfbSPYWOevE" alt=""><figcaption><p>inputting new Scheduled Billing data</p></figcaption></figure>

4. If the data is successfully submitted, it will display a success notification as follows, click **OK**. The invoice will be sent to customer's email as scheduled.

<figure><img src="/files/s4YXEK6fMwKmMFpkV4jq" alt="" width="308"><figcaption><p>Success Notification</p></figcaption></figure>

5. The Scheduled Billing will appear in the Scheduled Billing list.

<figure><img src="/files/QKQ85Vksp09Mw9cJpiqy" alt=""><figcaption><p>Scheduled Billing</p></figcaption></figure>

## **Search Invoice**

1. On the Scheduled Billing page to search data, it can be done by inputting the invoice data keyword in the search field.

<figure><img src="/files/gXO4d6upJUy2aKck8cQM" alt=""><figcaption><p>Scheduled Billing Search</p></figcaption></figure>

2. The search results like the following will be displayed.

<figure><img src="/files/1RU5kbORR9jPHZHxKH4s" alt=""><figcaption><p>Search Invoice Result</p></figcaption></figure>

&#x20;


# Recurring Billing

Recurring Billing is one of type invoice from single billing. Recurring billing is used to create recurring invoices periodically. According to the recurring period that has been set when creating recurring billing. The invoice date is not displayed but is replaced by setting the due date, start date, and end date.

## **Create New Recurring Billing**

1. Select the Recurring Billing menu on the Faspay Billing menu, click “+ **Recurring Billing**” to add new invoice data.

<figure><img src="/files/C4uMt8lTqHLhKLKCGOJT" alt=""><figcaption><p>Create New Recurring Billing</p></figcaption></figure>

2. Next, Single Billing form will displayed. Input the data as needed. Then click **Save & Send**.

   **Notes :** Ensure that the invoice type is recurring

<figure><img src="/files/UcliYY0I9odEwHUng92I" alt=""><figcaption><p>New Recurring Billing form </p></figcaption></figure>

**Field Parameter Single Billing form**

<table><thead><tr><th width="258">Field</th><th>Description</th></tr></thead><tbody><tr><td>To</td><td>Customer data</td></tr><tr><td>    Customer Name</td><td>Customer name (registered)</td></tr><tr><td>    Add New Customer</td><td>Add new customer data</td></tr><tr><td>Billing Details</td><td>Complete billing data</td></tr><tr><td>    Invoice No</td><td>Invoice number (auto generate)</td></tr><tr><td>    Invoice Subject</td><td>Invoice subject</td></tr><tr><td>    Invoice Language</td><td>Language used on the invoice</td></tr><tr><td>    Invoice Type</td><td>Invoice type (choose as needed)</td></tr><tr><td>    Invoice Date</td><td>Date the invoice was created</td></tr><tr><td>    Due Date</td><td>Payment limit/due invoice created</td></tr><tr><td>    Invoice Tax</td><td><p>Will appear if customer enable E-Faktur module.</p><p>If you activated the invoice tax, when system changes proforma to invoice, the system will automatically generate the tax invoice number for the invoice with the following conditions:</p><ul><li>The tax invoice number is taken from the range of tax invoice available numbers on the E-Faktur No page.</li><li>The system will use the tax invoice number sequentially from smallest to largest (Ascending order).</li><li>The period of the tax invoice number that was used must be the same as the current year(Year Period)</li></ul></td></tr><tr><td>     Transaction code</td><td><p>List of transaction code (will appear if customer activated Invoice Tax).</p><p>01: To Parties Who Are Not VAT Witholder</p><p>02: To the Treasurer's Witholder</p><p>03: To the Witholder except Treasurer's</p><p>04: DPP Other Values</p><p>06: Other submissions, including submission to foreign tourists in the context of VAT refunds</p><p>07: Submission of which VAT is not collected</p><p>08: Submission of VAT Exemption</p><p>09: Delivery of Assets (clause 16D of the VAT Law)</p></td></tr><tr><td>Header</td><td>Email header text</td></tr><tr><td>     Add Room</td><td>Choice of invoice type item type "room"</td></tr><tr><td>     Add Product</td><td>Choice of invoice type item type "product"</td></tr><tr><td>     Add Other</td><td>Choice of invoice types other than room &#x26; product</td></tr><tr><td>Generate Invoice to PDF</td><td>Information for generating invoices to PDF format</td></tr><tr><td>Notes</td><td>To add a note</td></tr><tr><td>Attachment</td><td>To attach a document</td></tr><tr><td>Button Option</td><td><ul><li>Click <strong>"Save Draft"</strong> to save the data temporarily.</li><li>Click <strong>"Save &#x26; Send"</strong> to save and send a new invoice.</li><li>Click <strong>"Preview"</strong> to preview the invoice before it is submitted.</li></ul></td></tr></tbody></table>

| <p><strong>Notes:</strong></p><ul><li>If the customer name is not yet available, then add new customer data by clicking <strong>"+Add New Customer"</strong> under the Customer Name field.</li><li>In the <strong>"Invoice No"</strong> field, if it is not filled in, it will be auto-generated (automatically filled with system numbering).</li><li>In the <strong>"Due Date"</strong> field, it cannot pass 1 day from the Invoce Date.</li><li>The <strong>"Add Room"</strong> feature is only available for Merchants of Hospitality type.</li></ul> |
| ----------------------------------------------------------------------------------------------------------------------------------------------------------------------------------------------------------------------------------------------------------------------------------------------------------------------------------------------------------------------------------------------------------------------------------------------------------------------------------------------------------------------------------------------------------- |

3. Click **OK**, on success notification.

<figure><img src="/files/ns5YHKbICs8pkTEaedRO" alt="" width="306"><figcaption><p>Success Notification</p></figcaption></figure>

4. The following is an email notification received by the customer.

<figure><img src="/files/eClPEsPFzKIgoKWrxrNH" alt=""><figcaption><p>Email Invoice</p></figcaption></figure>

4. If the recurring invoice has been sent to the customer according to the schedule of the period, the invoice will appear in the Recurring Billing list.

<figure><img src="/files/lO0J7t8rVP93gNEz8CyC" alt=""><figcaption><p>Billing List page</p></figcaption></figure>

&#x20;


# Static VA Generator

Static VA Generator helps merchant generate static VA numbers for their customers en masse at one time.&#x20;


# Static VA Close Generator

Here’s the guide to generate Static VA Close on Mass Billing menu.

1. At [Billings](/getting-started/faspay-billing-2.0/how-to-use/billings) menu click **Mass Billing**.

<figure><img src="/files/4JuIPu4W3y5aSLXWFAVO" alt="" width="563"><figcaption></figcaption></figure>

2. Shows Mass Billing page.

<figure><img src="/files/m22YtwW3UcYMokg3Yucv" alt=""><figcaption></figcaption></figure>

#### Field Parameter Mass Billing

<table><thead><tr><th width="317">Field</th><th>Descriptions</th></tr></thead><tbody><tr><td><strong>To</strong></td><td>Billed customer</td></tr><tr><td>        Excel Template</td><td><p>Billing excel template, this excel contains data of customer bills. The template can be downloaded by group, or by all customers.</p><p></p><p>Excel file template details <a href="/pages/gfvzNY6PacoJr7WDkXq3"><strong>here</strong></a><strong>.</strong></p></td></tr><tr><td>      Upload Excel</td><td><p>Field to upload the billing data in excel files</p><p></p><p><strong>Notes:</strong></p><p>Allowed Extension : XLS, XLSX</p><p>Maximum Upload : 1 file, Maximum Size : 2 MB</p></td></tr><tr><td><strong>Billing Details</strong></td><td>Details of billings</td></tr><tr><td>      Invoice No</td><td>Invoice number (auto generate)</td></tr><tr><td>      Invoice Subject</td><td>Invoice subject</td></tr><tr><td>      Invoice Language</td><td>Language used on the invoice (English/Indonesian)</td></tr><tr><td>     Invoice Type</td><td><p>The type of invoice, including:</p><ul><li><strong>Once :</strong> One time invoice</li><li><strong>Scheduled :</strong> Scheduled invoice</li><li><strong>Recurring :</strong> Recurring invoice in certain period of time.</li></ul></td></tr><tr><td>    Invoice Date</td><td>Date the invoice was created</td></tr><tr><td>    Due Date</td><td>Payment limit/due invoice created</td></tr><tr><td><strong>Header</strong></td><td>Invoice header</td></tr><tr><td><strong>Notes</strong></td><td>Invoice notes</td></tr><tr><td>     Shows notes on invoice PDF</td><td>If checklist the notes will shows on your PDF file.</td></tr></tbody></table>

3. Download excel template, [**here's the guide**](/getting-started/faspay-billing-2.0/how-to-use/billings/static-va-generator/excel-file-template)**.**
4. Click **Choose File,** then upload the excel file that has been filled with data of the customer bill items.

<figure><img src="/files/2JpyMnXevfW1aOejCeKi" alt=""><figcaption></figcaption></figure>

5. Fill the billing details as needed.

<figure><img src="/files/GGp5XmqQeuKs5BlQH8RE" alt=""><figcaption></figcaption></figure>

6. Then click **Generate Static VA**.

<figure><img src="/files/ntWOwoAGeIsOIPVMWjWP" alt="" width="306"><figcaption></figcaption></figure>

7. Choose bank then click **Generate VA**.

<figure><img src="/files/pph7oDp0nTSMLsW3pvjS" alt="" width="420"><figcaption></figcaption></figure>

{% hint style="info" %}
**Notes:** Bank list is according to the merchant channels
{% endhint %}

8. Next, ensure that you select bank according to what you need, then click **Yes, Generate**.

<figure><img src="/files/FWlRKmCdi0ipx37rN9JG" alt="" width="279"><figcaption></figcaption></figure>

9. Show Success notification, your static VA successfully generated.

<figure><img src="/files/gmBObwHzNvV5bm5Fv2eE" alt="" width="258"><figcaption></figcaption></figure>

10. &#x20;You can save the excel file by clicking Save, it contains static VA that successfully generated.

<figure><img src="/files/iabYIvpGZVTbqrKCWvxC" alt="" width="563"><figcaption></figcaption></figure>

{% hint style="info" %}
**Notes:** You can choose whether or not to save the excel file. In case you didn’t save the excel file you can access the VA that has been generated on [**static VA list**](/getting-started/faspay-billing-2.0/how-to-use/billings/static-va-generator/static-va-list).
{% endhint %}

11. This shows the list of static VA on excel file. As merchant, you can copy and send the Static VA to customers for bill payment. The system also automatically creates mass invoices without sending them to customer's email, it’s enabling effective payment tracking.

<figure><img src="/files/ObODICwA8NIPt0n5jKBx" alt=""><figcaption></figcaption></figure>


# Static VA Open Generator

For merchant that use Static VA Open, generate VA can be done by following this step:

1. On [Billings](https://docs.faspay.co.id/getting-started/faspay-billing-2.0/how-to-use/billings) menu click **Static VA List.**

<figure><img src="/files/6Xg83EwRbIDN9T98zrqe" alt="" width="563"><figcaption></figcaption></figure>

2. Then click **Generate Static VA.**

<figure><img src="/files/zKS66p9NGv8DaMTTd6sZ" alt="" width="263"><figcaption></figcaption></figure>

3. Choose customer, then click **Select Bank.**

<figure><img src="/files/GD1eOiaIUh8sUb1oU4da" alt=""><figcaption></figcaption></figure>

{% hint style="info" %}
**Notes:** When generate VA you can also choose multiple group/customers in one time.
{% endhint %}

4. Choose bank, then click **Generate VA.**

<figure><img src="/files/BDde3CU7RVuZWUMmWltP" alt=""><figcaption></figcaption></figure>

5. Ensure that you select bank according what you need, then click **Yes, Generate.**

<figure><img src="/files/QVdwDKf3aMmnXvmYIneT" alt="" width="281"><figcaption></figcaption></figure>

6. Click **Save** to downloading the excel file, that contains VA numbers.

<figure><img src="/files/8Mz9PE7Gg1hhdK3fxtFj" alt=""><figcaption></figcaption></figure>

{% hint style="info" %}
**Notes:** You can choose whether or not to save the excel file. In case you didn’t save the excel file you can access the VA that has been generated on [**Static VA List**](/getting-started/faspay-billing-2.0/how-to-use/billings/static-va-generator/static-va-list).
{% endhint %}

7. This show the list of static VA that successfully generated, on the excel file.&#x20;

<figure><img src="/files/0o8spzPE1G2ednzZjUkG" alt=""><figcaption></figcaption></figure>

{% hint style="info" %}
As merchant, you can copy and send the Static VA to customers for payment. The system also automatically creates mass invoices without sending them to customer's email, enabling effective payment tracking. Static VA Open will always available/open for payment until it deactivated.&#x20;

**Notes:** For Static VA Open if the invoice has been canceled the VA that used will automatically deactived.
{% endhint %}


# Static VA List

Static VA List contains VA that has been successfully generated.

1. On [Billings](https://docs.faspay.co.id/getting-started/faspay-billing-2.0/how-to-use/billings), click **Static VA List.**

<figure><img src="/files/UGfnB0djpb0GDXRqachh" alt="" width="563"><figcaption></figcaption></figure>

2. Here’s the list of Static VA that has been generated.

<figure><img src="/files/M11smScdMSq1jvAF4weA" alt=""><figcaption></figcaption></figure>

#### Field Parameters Static VA List

<table><thead><tr><th width="239">Field</th><th>Description</th></tr></thead><tbody><tr><td>Date Generated</td><td>Date the VA is generated</td></tr><tr><td>Va Number</td><td>The number of VA</td></tr><tr><td>Customer Name</td><td>Customer name</td></tr><tr><td>Customer Group</td><td>Group of customer</td></tr><tr><td>Bank</td><td>Bank name</td></tr><tr><td>Status</td><td>VA status (Active/Inactive)</td></tr><tr><td>Action</td><td>Action button to see the details of VA and payment history</td></tr></tbody></table>

## Search VA

You can search the data of Static VA, by these parameters:

* Date Generated
* VA Number
* Customer Name
* Customer Group
* Bank
* Status

As example, this the results when you search the data by **Customer Name.**

<figure><img src="/files/ry2CLJDhoLJGrXZU8Gox" alt=""><figcaption></figcaption></figure>

## Export VA List

You can export all of VA lists that exist, or you can export it on certain dates.

1. Choose the date range, then click **Apply.**

<figure><img src="/files/ttObqdVNtK0QGxgYBXom" alt="" width="435"><figcaption></figcaption></figure>

2. Shows VA list based on the range date chosen, then click print icon button.

<figure><img src="/files/O5TxDPTXKAam5j1bty3X" alt=""><figcaption></figcaption></figure>

3. Shows Success notification.

<figure><img src="/files/gmBObwHzNvV5bm5Fv2eE" alt="" width="258"><figcaption></figcaption></figure>

4. The Static VA Lists successfully downloaded in excel file.

<figure><img src="/files/l4oHLuTYhgPfJRBZSuU2" alt="" width="251"><figcaption></figcaption></figure>

5. Here’s the details of billing list that has been downloaded.

<figure><img src="/files/cTu0al5wpGAMMGDgdOKc" alt=""><figcaption></figcaption></figure>


# Payment History

1. On Static VA List, click action button on the VA that you want to see in details.

<figure><img src="/files/JBUfF9CJ3Bxf2hOeoUUZ" alt=""><figcaption></figcaption></figure>

2. It will shows the detail of VA Payment History.

<figure><img src="/files/vvoKRxJrpsY9yDGUYJbN" alt=""><figcaption></figcaption></figure>

#### Field Parameters Payment History

<table><thead><tr><th width="305">Field</th><th>Description</th></tr></thead><tbody><tr><td>VA Number</td><td>The number of VA</td></tr><tr><td>Customer Name</td><td>Customer name</td></tr><tr><td>Bank</td><td>Bank name</td></tr><tr><td>Outstanding Amount(Rp)</td><td><p>Total outstanding amount for unpaid invoice</p><p>Notes: only use for Static VA Close</p></td></tr><tr><td>Status</td><td><p>VA Status</p><ul><li>Yes : Active VA</li><li>No : Inactive VA</li></ul></td></tr><tr><td>Payment Date</td><td>Date of the payment</td></tr><tr><td>Transaction ID</td><td>ID number of transaction</td></tr><tr><td>Invoice ID</td><td>ID number of invoice</td></tr><tr><td>Payment Amount</td><td>Payment amount</td></tr><tr><td>Description</td><td>Payment description</td></tr><tr><td>Action</td><td>Action button to print payment receipt.</td></tr></tbody></table>

## Search Payment History

You can search the data of payment history, by these parameters:

* Payment Date
* Transaction ID
* Invoice ID
* Payment Amount
* Description

As example, this the results when you search the data by **Transaction ID**.

<figure><img src="/files/1xqQ3xH66EnFjJLtWiUw" alt=""><figcaption></figcaption></figure>

## Download Payment Receipt

1. Click on action button to download the payment receipt.

<figure><img src="/files/quuvhxubLraeoyioVIht" alt=""><figcaption></figcaption></figure>

2. The pdf file will be downloaded.

<figure><img src="/files/389kh3RnDmUM5iuTyx2s" alt="" width="359"><figcaption></figcaption></figure>

3. Here’s the details of payment receipt. You can share it to your customer.

<figure><img src="/files/zBH6dglNRd1xSK6EHCc3" alt=""><figcaption></figcaption></figure>

## Deactive VA

Merchant can deactivate the VA number. If the VA number is deactivated, customers will not be able to make payments or inquiries using it.

1. On active VA at Payment History page click switch button on Status.

<figure><img src="/files/G4no2p7Ogti8OK7Uytzy" alt="" width="563"><figcaption></figcaption></figure>

2. Click **Yes, Deactive.**

<figure><img src="/files/5vP4POgdoARiUclKMjJp" alt="" width="280"><figcaption></figcaption></figure>

3. The VA has been successfully deactive.

<figure><img src="/files/0x9vlJJZpLmSWUVBDuNb" alt="" width="279"><figcaption></figcaption></figure>

## Activate VA

Merchant can activate the VA number, so customers will be able to make payments or inquiries using it.

1. On inactive VA at Payment History page click switch button on Status.

<figure><img src="/files/1HJ50kWqCl0XV0YBpcVc" alt="" width="563"><figcaption></figcaption></figure>

2. Then click **Yes, Activate.**

<figure><img src="/files/7tYKKXJ36LXxIKTXLTWY" alt="" width="279"><figcaption></figcaption></figure>

3. The VA has been successfully activated.

<figure><img src="/files/1wnm25WAHT7Hoh9KDQBY" alt="" width="279"><figcaption></figcaption></figure>


# Excel File Template

Here's a guide to get your excel template. You can download the excel template in 2 ways including By group(s), and All customers.&#x20;

1. Click dropdown button on excel template, as example will be downloaded excel template By group(s).

<figure><img src="/files/E7hciWLw7uiAVlsxErqf" alt=""><figcaption></figcaption></figure>

2. Checklist the group as needed.

<figure><img src="/files/gX7R5vtnvGOxhYUeuB39" alt=""><figcaption></figcaption></figure>

3. Then click **Download.**

<figure><img src="/files/eeps15DUENHCybeG9yK2" alt=""><figcaption></figcaption></figure>

4. The excel template has been successfully downloaded. First sheet contains instructions about how to fill out the template correctly, while the second sheet is the field that needs to be filled with customer billing data. Here’s the sample of excel template.

<figure><img src="/files/G1XQd65Tu10TwO5WRljx" alt=""><figcaption></figcaption></figure>

<figure><img src="/files/H9Gq4oCsfjMCj11PYJzN" alt=""><figcaption></figcaption></figure>


# Customers

Customer is a menu used to manage customer and customer group master data, which will later be used when creating billing/invoices. It is accessible on **Faspay Billing → Customers.**

<figure><img src="/files/MzsCptpFZ3LNKW9LInSK" alt=""><figcaption><p>Customer on Faspay Billing New</p></figcaption></figure>

That contains 2 tabs menu as follows:

<figure><img src="/files/CiyYLXdTQeXGf6TvdDHQ" alt=""><figcaption><p>Tabs Customers</p></figcaption></figure>

&#x20;


# Customer List

This is a guide to manage the Customer List data on the Customers page.

## **Create New Customer**

* **Using Customers Page**

1. On the **Customer List** page click the **+Create** butto&#x6E;**.**

<figure><img src="/files/ICwmqu03lkbEcOv6ERQE" alt=""><figcaption></figcaption></figure>

2. Fill in the customer data on the **Add New Customer** form as needed.

You may input a phone code from any country as necessary when providing your customer number, for instance, you can input an Indonesian customer phone number by choosing the Indonesia phone code following contact no.

<figure><img src="/files/kbQZsG4XPOUyBanBO1gU" alt=""><figcaption><p>Add New Customer Form</p></figcaption></figure>

After all the necessary fields have been filled, click **Save**

<figure><img src="/files/2paUQIRcACjVGNLdXMw5" alt=""><figcaption><p>Add New Customer Form</p></figcaption></figure>

**Field Parameters Add New Customer**

<table><thead><tr><th width="234">Field</th><th>Description</th></tr></thead><tbody><tr><td>Customer Name</td><td>Customer name <strong>(must be filled)</strong></td></tr><tr><td>Customer Email</td><td>Customer email <strong>(must be filled)</strong></td></tr><tr><td>Group</td><td>Group of customer</td></tr><tr><td>Additional Info</td><td>Additional information of the customer</td></tr><tr><td>NPWP Owner Name</td><td><p>NPWP owner name <strong>(must be filled)</strong><br></p><p><strong>Notes:</strong></p><ul><li>NPWP can be used only for merchant who enable e-faktur module on Faspay Billings</li></ul></td></tr><tr><td>Transaction Code</td><td><p>Default transaction code for customer</p><p></p><p><strong>List Transaction Code</strong> </p><p>01: To Parties other than the VAT Collector</p><p>02: To the Treasury VAT Collector</p><p>03: To VAT Collectors other than the Treasury</p><p>04: Other Value of Taxable Sales</p><p>06: Other Deliveries, including deliveries to foreign tourists for VAT refund</p><p>07: Deliveries with VAT Exempted</p><p>08: Deliveries with VAT Exempt</p><p>09: Asset Deliveries (Article 16D VAT Law)</p><p> </p><p><strong>Notes:</strong></p><ul><li>Transaction  code can be used only for merchant who enable e-faktur module on Faspay Billings</li></ul></td></tr><tr><td>Taxable Company</td><td>If Taxable Company is checked it will marked as taxable customers and will automatically enable the invoice tax when creating an invoice</td></tr><tr><td>Phone</td><td><p>Customer phone number</p><p> </p><p><strong>Notes:</strong></p><p>Format Phone No:</p><p>(Phone code) – (contact no). Ex: (+62) – (8123456789)</p></td></tr><tr><td>Address</td><td>Customer address <strong>(must be filled)</strong></td></tr><tr><td>VA Static Number</td><td><p>Customer Virtual Account (VA) number <strong>(must be filled)</strong></p><p> </p><p><strong>Notes:</strong></p><ul><li>VA number must be filled in 10 digit numbers</li><li>If click the Auto Generate VA feature it will automatically generate VA from the system</li><li>VA Static Number can be used only for merchant who use VA Static payment</li></ul></td></tr><tr><td>NPWP</td><td><p>Customer NPWP numbers <strong>(must be filled)</strong></p><p> </p><p><strong>Notes:</strong></p><ul><li>NPWP can be used only for merchant who enable e-faktur module on Faspay Billings</li></ul></td></tr><tr><td>NPWP Address</td><td><p>Customer NPWP address <strong>(must be filled)</strong></p><p> </p><p><strong>Notes:</strong></p><ul><li><strong>Same as customer address</strong> : If checked it will automatically filled with address according with customer address</li></ul></td></tr></tbody></table>

3. On success notification click **OK**

<figure><img src="/files/PrLUQjWMVTGFS1uuer2C" alt="" width="281"><figcaption><p>Success Notification</p></figcaption></figure>

4. So, the customer data has been successfully saved.

<figure><img src="/files/ChPcf2D2uyN7pgg2BrQO" alt=""><figcaption><p>Customer List Page</p></figcaption></figure>

* **Using Billings Page**

1. On **Faspay Billings/Billings**, on the **Billings List** page, click **+Single Billing**

<figure><img src="/files/7pgbRQjirup4xcrFpSSD" alt=""><figcaption><p>Billing List Page</p></figcaption></figure>

2. On the **Single Billing** page click **+Add New Customer**

<figure><img src="/files/qXKEQ0pV8XLiHrFP1yLu" alt=""><figcaption><p>Single Billing Page</p></figcaption></figure>

3. Fill in the customer data on the **Add New Customer** form as needed.

You may input a phone code from any country as necessary when providing your customer number, for instance, you can input an Indonesian customer phone number by choosing the Indonesia phone code following with contact number.

<figure><img src="/files/kTLTXJy8fADRpxtqDxR3" alt=""><figcaption><p>Add New Customer Form</p></figcaption></figure>

For transaction code as an example, it will use transaction code 3

<figure><img src="/files/ggUzAEj81DWoU21f7wMr" alt=""><figcaption><p>Add New Customer Form</p></figcaption></figure>

If all the necessary data has been filled, click **Submit**

<figure><img src="/files/v731kJn6tIaEwaqJA7c9" alt=""><figcaption><p>Add New Customer Form</p></figcaption></figure>

4. Click **OK**, on the success notification

<figure><img src="/files/PrLUQjWMVTGFS1uuer2C" alt="" width="281"><figcaption><p>Success Notification</p></figcaption></figure>

5. So, the customer data has been successfully saved.

<figure><img src="/files/wyk8XIPk5gsCZhpXcqon" alt=""><figcaption><p>Customer List Page</p></figcaption></figure>

### **Search & Sort List Data Customer**

On the customer list page, users can search and filter data as needed. Example of searching from the filter "**Customer Name**”. So, it will display the data searched based on the submitted data filter.&#x20;

<figure><img src="/files/pYlPLDNd1vlI9LnQlE1z" alt=""><figcaption></figcaption></figure>

### **Edit Data Customer**

1. On **Faspay Billings/Customers**, on the **Customer List** page click the selected Customer Name.

<figure><img src="/files/pLq9gKcnAlG7NFyiyKMY" alt=""><figcaption></figcaption></figure>

2. On the Customer detail page click the "**Edit"** butto&#x6E;**.**

<figure><img src="/files/f9MbInqbPIuOCZ8eoOLJ" alt=""><figcaption></figcaption></figure>

2. Make any necessary changes, such as updating customer phone numbers from Indonesian to Icelandic formats.

<figure><img src="/files/f4kVIUDwCG85f1KblCi7" alt=""><figcaption><p>Edit Customer Page</p></figcaption></figure>

3. After the changes have been finished, click **the "Save"** butto&#x6E;**.**

<figure><img src="/files/hVJcsXd03p12dXVEL7Hk" alt=""><figcaption><p>Edit Customer Page</p></figcaption></figure>

4. Click **OK** on the success notification

<figure><img src="/files/PcAJ7ul1oOgmVeFvLhYf" alt="" width="282"><figcaption><p>Success Notification</p></figcaption></figure>

5. So, the customer data has been successfully changed

<figure><img src="/files/TTh6gYR9lXnkvqmJpJyF" alt=""><figcaption><p>Customers List Page</p></figcaption></figure>

## **Delete Data Customer**

1. On the customer list page, click the selected customer and then click "**Delete**" button.&#x20;

<figure><img src="/files/QR98yBXcWleZ1KvY5Mqo" alt=""><figcaption><p>Customers List Page</p></figcaption></figure>

2. A confirmation message will be displayed, to continue click "**Yes**”.

<figure><img src="/files/Nr4OXTaSnxUPdvbTFcQv" alt="" width="371"><figcaption><p>Confirm Delete Data</p></figcaption></figure>

3. The data is successfully deleted and will not be available on the customer list page.

<figure><img src="/files/EaZmiGcVRiEvhsDfPRB0" alt=""><figcaption><p>Customers List Page</p></figcaption></figure>

## Import Customer

For the feature 'Import' merchants can import customers or bulk-create customers with the template provided by Faspay.&#x20;

1. Click the button “**Import”** in the **Customers menu**.

<figure><img src="/files/zhgAyHGrrQRCiJKXfU2N" alt=""><figcaption><p>Customer List Page</p></figcaption></figure>

{% hint style="info" %}
Merchants can download an Excel template to fill in customer data in bulk. There are 2 types template depending on whether the E-Faktur Module or inactihve, details E-Faktur [here](/getting-started/faspay-billing-2.0/how-to-use/e-faktur).
{% endhint %}

2. Then click **Download.**

<figure><img src="/files/seRMux7olUvEx1x7Yd4i" alt="" width="346"><figcaption><p>Import Customer Pop-Up</p></figcaption></figure>

The Excel template with E-Faktur:

<figure><img src="/files/t6tyXKvhbmuf9qJJhSLk" alt=""><figcaption><p>Excel Template with E-Faktur</p></figcaption></figure>

The Excel template with non E-Faktur:

<figure><img src="/files/0k14KZGiCz8UT7mkCWo0" alt=""><figcaption><p>Excel Template with non E-Faktur</p></figcaption></figure>

3. To upload the filled template file, click "**Choose file**" To attach the Excel file, click “**Submit**”.

<figure><img src="/files/2NkmrU5iK3qOWwlfYeF0" alt="" width="375"><figcaption><p>Import Customer Pop-Up</p></figcaption></figure>

<figure><img src="/files/Ko0egPIbalK39b4CqL5E" alt="" width="317"><figcaption><p>Success Notification</p></figcaption></figure>

4. The results of importing customers will appear in the Customer List submenu.

<figure><img src="/files/0buvP6YRPzpMYDOB3RpG" alt=""><figcaption><p>Customers List Page</p></figcaption></figure>


# Customer Group

## Guide

This is how to manage the Customer Group on the Customers page.

### **Create a New Customer Group**

1. Select the customer menu on the "**Faspay Billing**" menu, then display the Customer menu page. Click "**Customer Group**" to display the customer group page, and click "**+Create**" to add a new customer group.

<figure><img src="/files/CZ8Ph7XfZPTyOwvntdFJ" alt=""><figcaption><p>Customer Group Page</p></figcaption></figure>

2. On the Add new group form, input data, then click "**Save**" to save the data.

<figure><img src="/files/xZLHSNJoQVDzTRo7bGfT" alt="" width="323"><figcaption><p>Save Customer Group</p></figcaption></figure>

3. The data that has been successfully added will be displayed on the customer group list page.

<figure><img src="/files/SEUIksncwABK1y1ONauf" alt=""><figcaption><p>Customer Group Page</p></figcaption></figure>

### **Search & Sort List Data Customer Group**

1. On the customer group list page, users can search and filter data as needed by "**Group Name**” or by "**Description**" using the search form.

<figure><img src="/files/G1PGzya5Vi4wkXOhpFVH" alt=""><figcaption><p>Search Form</p></figcaption></figure>

2. This is an example of displaying data based on the "**Group Name**" filter.

<figure><img src="/files/8tmm2hLE6PzcR249RywV" alt=""><figcaption><p>Search Result</p></figcaption></figure>

### **Delete Customer Group Data**

1. Checklist the data on the customer group list page, then click "**Delete**”.

<figure><img src="/files/dB8RZBoUD9Lf0U8tDS94" alt=""><figcaption><p>Delete Customer Group</p></figcaption></figure>

2. A confirmation message notification will be displayed, to continue click "**Yes**”.

<figure><img src="/files/BrcZl5VYNkTwte0Zrwid" alt="" width="314"><figcaption><p>Delete Data Confirm</p></figcaption></figure>

3. The data that was successfully deleted will not be available on the customer group list page.

<figure><img src="/files/gZXS5xYk4rsiWcMBWX1y" alt=""><figcaption><p>Data Successfully Deleted</p></figcaption></figure>

&#x20;


# Reports

The reports menu in Faspay Billing 2.0 provides various reports that help monitor, analyze, and manage financial transactions and billing.

There are 6 sub-menus in the Reports menu on the Merchant Page of the Faspay Billing 2.0 feature:

<table data-view="cards"><thead><tr><th></th><th></th><th></th><th data-hidden data-card-target data-type="content-ref"></th></tr></thead><tbody><tr><td>Invoice Issued</td><td></td><td></td><td><a href="/pages/L3RU9QiQIsYPZMCVPhfP">/pages/L3RU9QiQIsYPZMCVPhfP</a></td></tr><tr><td>Payment History</td><td></td><td></td><td><a href="/pages/pAdFZdDkKdMVT1hDwKbO">/pages/pAdFZdDkKdMVT1hDwKbO</a></td></tr><tr><td>Summary Outstanding</td><td></td><td></td><td><a href="/pages/OKThDzdAfgTeLYIFS8bu">/pages/OKThDzdAfgTeLYIFS8bu</a></td></tr><tr><td>Detail Outstanding</td><td></td><td></td><td><a href="/pages/wPCOinyj8xcn671V1uAT">/pages/wPCOinyj8xcn671V1uAT</a></td></tr><tr><td>Invoice Aging</td><td></td><td></td><td><a href="/pages/hoXveIzh7r63ln21EjSO">/pages/hoXveIzh7r63ln21EjSO</a></td></tr><tr><td>Invoice Paid </td><td></td><td></td><td><a href="/pages/NoNzyX7duQv6wOj1hqso">/pages/NoNzyX7duQv6wOj1hqso</a></td></tr></tbody></table>

The following are the steps to view a report in the Reports menu in Faspay Billing 2.0:

1. After successfully logging in to the Merchant Page, select **'Faspay Billing New'** -> **'Reports'** in the navigation menu on the left.

<figure><img src="/files/4UYgrqhgSQhAW5bu7QFk" alt=""><figcaption><p>Menu Reports Faspay Billing 2.0</p></figcaption></figure>

2. Then the Reports page will appear, displaying 6 sub-menus for each type of report.

<figure><img src="/files/S9pzfrSqfFpBKUvYTElV" alt=""><figcaption><p>Sub Menu Reports Faspau Billing 2.0</p></figcaption></figure>


# Invoice Issued

The invoice-issued report is one of the report categories in the Reports menu of Faspay Billing. This report contains detailed information about all invoices sent to customers within a certain period.&#x20;

## Invoice Issued Sub Menu

Here are the steps for users using the Invoice Issued Report menu.

1. On the Reports page, select the **"Invoice Issued"** card menu.

<figure><img src="/files/qX1yQnbPjEmgiZojWeYk" alt=""><figcaption><p>Invoice Issued Menu </p></figcaption></figure>

2. The Invoice Issued Report page will appear with several data search filter options:&#x20;

* By Invoice Period.&#x20;
* By Customer Name.&#x20;
* By Invoice Status.
* By Customer name and Invoice status.&#x20;
* By Invoice No.&#x20;

{% hint style="info" %}
Notes: **By Invoice Period cannot be empty for every filter option.**&#x20;
{% endhint %}

<figure><img src="/files/zc1ny4zquVdYACBCAIne" alt=""><figcaption><p>Invoice Issued Report</p></figcaption></figure>

<table><thead><tr><th width="75">No</th><th width="165">Column</th><th>Description</th></tr></thead><tbody><tr><td>1</td><td>No</td><td>Number of the displayed report data.</td></tr><tr><td>2</td><td>Invoice No</td><td>Invoice number</td></tr><tr><td>3</td><td>Customer</td><td>Customer name</td></tr><tr><td>4</td><td>Invoice Date</td><td>The date on which an invoice is issued.</td></tr><tr><td>5</td><td>SubTotal</td><td>Payment amount before tax.</td></tr><tr><td>6</td><td>Tax</td><td>Contains information related to the tax applied to an invoice.</td></tr><tr><td>7</td><td>Total After Tax</td><td>Total payment amount after tax calculation.</td></tr><tr><td>8</td><td>Additional Fee</td><td>Contains information related to the additional fee.</td></tr><tr><td>9</td><td>Grand Total</td><td>Final total amount including tax and additional fee.</td></tr><tr><td>10</td><td>Paid</td><td>Amount already paid by the customer.</td></tr><tr><td>11</td><td>Outstanding Amount</td><td>Amount unpaid by the customer.</td></tr><tr><td>12</td><td>Status</td><td><p>Information about the status of an invoice:</p><p>-       Unpaid -> The invoice or bill has not been paid yet</p><p>-       Paid -> The invoice already paid</p><p>-       Overdue -> The invoice has passed the payment deadline</p><p>-       Partial Paid -> tagihan baru dibayarkan sebagian</p></td></tr></tbody></table>

### Filter By Invoice Period

If you want to view report details based on invoice period:

1. Select the date in the invoice period field. Choose the date range of the invoices you want to display.
2. Click the **"Apply"** button.&#x20;
3. Then, click the **"Show"** button.

<figure><img src="/files/jOwBh6hkNGt0sPgHQwlN" alt=""><figcaption><p>By Invoice Period</p></figcaption></figure>

4. The system will display the data based on the selected invoice period range.

<figure><img src="/files/fDhhWSYTvsZS2qAVDmxK" alt=""><figcaption><p>Invoice Issued Report Result</p></figcaption></figure>

### Filter By Customer

If you want to view report details based on the customer name:

1. Select the date in the invoice period field (Mandatory). Choose the date range of the invoices you want to display. Once done, click the **"Apply"** button.
2. In the **"Customer"** field, click on the dropdown menu and select the customer name you want to display.
3. Click the **"Show"** button to display the data.

<figure><img src="/files/zP193bNNwMggnGNKJkpz" alt=""><figcaption><p>Filter By Customer</p></figcaption></figure>

4. The system will display the data based on the selected **invoice period range** and **customer name.**

<figure><img src="/files/2CYzLqUKf77IZdGfTVvs" alt=""><figcaption><p>Result By Customer Name</p></figcaption></figure>

### Filter By Status

If you want to view report details based on the invoice status:

1. Select the date in the invoice period field (Mandatory). Choose the date range of the invoices you want to display. Once done, click the **"Apply"** button.
2. In the **"Status"** field, please click on the dropdown menu and select the **status** option you want to display.
3. Click the **"Show"** button to display the data.

<figure><img src="/files/Dnn5UUWtS5wJnrD7qCQc" alt=""><figcaption><p>Filter By Status</p></figcaption></figure>

4. The system will display the data based on the selected **invoice period range** and **status.**

<figure><img src="/files/OTWVdjhCzFXgVKPr6jln" alt=""><figcaption></figcaption></figure>

### Filter By Customer and Status

If you want to view report details based on the customer name and invoice status:

1. Select the date in the invoice period field (Mandatory). Choose the date range of the invoices you want to display. Once done, click the **"Apply"** button.
2. In the **"Customer"** field, click on the dropdown menu and select the customer you want to display.
3. In the **"Status"** field, please click on the dropdown menu and select the status option you want to display.
4. Click the **"Show"** button to display the data.

<figure><img src="/files/t8iwKGAzTtXnrIBU5oQQ" alt=""><figcaption></figcaption></figure>

5. The system will display the data based on the selected **invoice period range, customer name,** and **invoice status.**

<figure><img src="/files/q1sRPsVHrpG7PsjS5FZ3" alt=""><figcaption></figcaption></figure>

### Filter By Invoice No

If you want to view report details based on Invoice Number:

1. Select the date in the invoice period field (Mandatory). Choose the date range of the invoices you want to display. Once done, click the **"Apply"** button.
2. In the **"Invoice No"** field, input the invoice number you want to display.
3. Then click **"Show"** to display the data.

<figure><img src="/files/xw2FZb2NB91bMFz1r2YK" alt=""><figcaption><p>Filter By Invoice No</p></figcaption></figure>

4. The system will display the data based on the selected invoice period range and the invoice number searched.

<figure><img src="/files/oPnrFAMp7mIjkOjq2B6n" alt=""><figcaption><p>Result By Invoice Number</p></figcaption></figure>


# Payment History

Payment History in the Faspay Billing 2.0 reports submenu is a feature that analyzes invoice transactions over time.

## Payment History Sub Menu

Here are the steps to view the report from the payment history in Faspay Billing 2.0:

1. After successfully logging in and selecting the menu **'Faspay Billing New'** -> **'Reports'** -> click on the **'Payment History'** card menu.

<figure><img src="/files/KJSlJsgF84A6IZ3X8wcn" alt=""><figcaption><p>Payment History Sub Menu</p></figcaption></figure>

2. Then, the payment history report page will appear. There are several categories of fields to display payment history data, including:
   1. Payment Date
   2. Calendar
   3. Payment Method
   4. Channel Name

{% hint style="info" %}
Notes: **The payment date field column must not be empty for every filter option.**&#x20;
{% endhint %}

<figure><img src="/files/tJLgijrIHkSjYc2zfzSq" alt=""><figcaption><p>Payment History Report Page</p></figcaption></figure>

<table><thead><tr><th width="94">No</th><th width="177">Field Name</th><th>Description</th></tr></thead><tbody><tr><td>1</td><td>No</td><td>Number of the displayed report data.</td></tr><tr><td>2</td><td>Invoice No</td><td>Invoice number.</td></tr><tr><td>3</td><td>Customer</td><td>Customer name.</td></tr><tr><td>4</td><td>Due Date</td><td>Payment due date.</td></tr><tr><td>5</td><td>Payment Method</td><td>Payment method used by customer. </td></tr><tr><td>6</td><td>Channel Name</td><td>Channel name used.</td></tr><tr><td>7</td><td>Transaction ID</td><td>A unique identifier is assigned to each financial transaction that can be used to track and verify the specific transaction. </td></tr><tr><td>8</td><td>Payment Date</td><td>The payment date made by the customer.</td></tr><tr><td>9</td><td>Input By</td><td>information about the user who input the invoice.</td></tr><tr><td>10</td><td>Remarks</td><td>Notes regarding the payment.</td></tr><tr><td>11</td><td>Payment Amount</td><td>Information on the amount of payment that must be made.</td></tr></tbody></table>

### Filter by Payment Date

If you want to view the report details based only on the payment date:&#x20;

1. Select the date in the payment date field.
2. Click the **"Apply"** button.&#x20;
3. Then, click the **"Show"** button.

<figure><img src="/files/AYLQvmKXjeWTJphD9jFz" alt=""><figcaption><p>Select Payment Date</p></figcaption></figure>

4. Then, the payment history data based on the selected payment dates will be displayed.

<figure><img src="/files/cCBcnxePr1PwLyQu3S4H" alt=""><figcaption></figcaption></figure>

### Filter by Customer

If you want to view the report details based only on the customer name:

1. Select the date in the payment date field. Choose the date range of the payments you want to display. Once done, please click the **"Apply"** button.
2. Then select the Customer field and choose the customer name you want to display.
3. Click the **"Show"** button to display the set data.

<figure><img src="/files/skjub2N5o33fRAWWB4QS" alt=""><figcaption><p>Filter By Customer Name</p></figcaption></figure>

4. Then, the payment history data based on the customer name will be displayed.

<figure><img src="/files/zdpH6jc8iLf8PzHBf5XK" alt=""><figcaption><p>Result Filter by Customer Name</p></figcaption></figure>

### Filter by Payment Method

If you want to view the report details based only on the payment method:

1. Select the date in the Payment Date field. Choose the date range of payments you want to display. Once done, please click the "**Apply**" button.
2. Then select the Payment Method field, and choose the payment method you want to display.
3. Click the "**Show**" button to display the data that has been set.

<figure><img src="/files/FRc3xjLQD6xHdPW65Lmb" alt=""><figcaption><p>Filter by Payment Method</p></figcaption></figure>

4. Then, the payment history data based on the payment method will be displayed.

<figure><img src="/files/xgX857SfBso2QxpqoTEn" alt=""><figcaption><p>Result Filter by Payment Method</p></figcaption></figure>

### Filter by Channel Name

If you want to view the report details based only on the channel name:

1. Select the date in the Payment Date field. Choose the date range of payments you want to display. Once done, please click the **"Apply"** button.
2. Then select the Channel Name field and choose the channel name you want to display.
3. Click the **"Show"** button to display the data that has been set.

<figure><img src="/files/lzkPth6EXYWsIG7Za7sm" alt=""><figcaption><p>Filter by Channel Name</p></figcaption></figure>

4. &#x20;Then, the payment history data based on the channel name will be displayed.

<figure><img src="/files/Xe1CVHJDq1mZbKBv6ZWq" alt=""><figcaption><p>Result Filter by Channel Name</p></figcaption></figure>


# Summary Outstanding

The Payment History in the Reports submenu of Faspay Billing 2.0 is a feature for summary reports that show the outstanding balance from a number of transactions or debts that have not been settled. Here are the steps:

## Summary Outstanding Sub Menu

1. After successfully logging in, select the "**Faspay Billing New**" menu -> "**Reports**" -> select the "**Summary Outstanding**" card menu.

<figure><img src="/files/81fshvmmdGU6DrnfwMNj" alt=""><figcaption><p>Summary Outstanding Sub Menu</p></figcaption></figure>

2. The Summary Outstanding Report page will appear. There are 2 category options when viewing data in the summary outstanding report.&#x20;
   1. **As Of**: Shows all outstanding invoice balances from the beginning until the specified "as of" date.&#x20;
   2. **Customer**

{% hint style="info" %}
Notes: The **"As Of"** field must not be empty.
{% endhint %}

<figure><img src="/files/FHBr6jrWsLA2BrMpbJsk" alt=""><figcaption><p>Summary Outstanding Reports.</p></figcaption></figure>

<table><thead><tr><th width="67">No</th><th width="191">Field Name</th><th>Description</th></tr></thead><tbody><tr><td>1</td><td>No</td><td>Number of the displayed report data.</td></tr><tr><td>2</td><td>Customer</td><td>Customer name.</td></tr><tr><td>3</td><td>Number of invoice</td><td>The number of current outstanding invoice per customer</td></tr><tr><td>4</td><td>Total Invoice</td><td>The total amount of bills to be paid</td></tr><tr><td>5</td><td>Total Paid</td><td>The total amount of bills that have been paid</td></tr><tr><td>6</td><td>Total Outstanding</td><td>The total amount of debt owed by the customer</td></tr></tbody></table>

### Filter By As Of

If you want to view the details of all reports up to the "**As Of**" date:

1. Select the date in the "**As Of**" field.
2. Choose the "**As Of**" date.
3. Once done, click the "**Show**" button.

<figure><img src="/files/ukPySOLuDCLvk8GFwhIV" alt=""><figcaption><p>Filter by As Of</p></figcaption></figure>

4. This will display the report data based on the selected "**As Of**" date.

<figure><img src="/files/h57AKyoOizQFV0fNi31N" alt=""><figcaption><p>Result filter by As Of</p></figcaption></figure>

### Filter By Customer

If you want to view the details of the summary outstanding report based on the customer name:

1. Select the date in the "**As Of**" field. Choose the "**As Of**" date.
2. Select the customer name in the "**Customer**" field.
3. Once done, click the "**Show**" button.

<figure><img src="/files/BIIFitV5jNGg00nHS140" alt=""><figcaption><p>Filter by Customer Name</p></figcaption></figure>

5. This will display the report based on the customer's name.

<figure><img src="/files/f5WKSe52er0rKDYusvrg" alt=""><figcaption><p>Result Filter by Customer Name</p></figcaption></figure>


# Detail Outstanding

The **Outstanding Detail** in the Reports submenu of Faspay Billing 2.0 is a feature that shows detailed information about all invoices that have not been paid by the customer. Here are the steps to use the Outstanding Detail report submenu:

## Detail Outstanding Sub Menu

1. After successfully logging in, select the "**Faspay Billing New**" menu -> "**Reports**" -> select the "**Detail Outstanding**" card menu.

<figure><img src="/files/uDdUqY0r2Cva5KQbBf2V" alt=""><figcaption><p>Detail Outstanding Sub Menu</p></figcaption></figure>

2. The Detail Outstanding Report page will appear. There are 2 category options when viewing data in the Detail outstanding report.&#x20;
   1. **As Of**: Shows all outstanding invoice balances from the beginning until the specified "as of" date.&#x20;
   2. **Customer**

{% hint style="info" %}
Notes: The **"As Of"** field must not be empty.
{% endhint %}

<figure><img src="/files/aVe5dlmQMKfVKLZZIPXY" alt=""><figcaption><p>Detail Outstanding Report</p></figcaption></figure>

<table><thead><tr><th width="80">No</th><th width="217">Field Name</th><th>Description</th></tr></thead><tbody><tr><td>1</td><td>No</td><td>Number of the displayed report data.</td></tr><tr><td>2</td><td>Invoice No</td><td>Invoice number.</td></tr><tr><td>3</td><td>Invoice Date</td><td>Information about the invoice issuance date.</td></tr><tr><td>4</td><td>Customer ID</td><td>Customer ID.</td></tr><tr><td>5</td><td>Customer</td><td>Customer name.</td></tr><tr><td>6</td><td>Status</td><td>Information about the status of the invoice.</td></tr><tr><td>7</td><td>Subtotal</td><td>Information about the total amount paid, but excludes additions such as tax, fees, or other services.</td></tr><tr><td>8</td><td>Tax</td><td>Information related to taxes applied to an invoice.</td></tr><tr><td>9</td><td>Total After Tax</td><td>Information about the subtotal that has been taxed.</td></tr><tr><td>10</td><td>Additional Fee</td><td>Information related to additional fees.</td></tr><tr><td>11</td><td>Grand Total</td><td>The final total amount including tax and additional fees.</td></tr><tr><td>12</td><td>Paid Amount</td><td>The amount that has been paid by the customer.</td></tr><tr><td>13</td><td>Outstanding Amount</td><td>The amount of payment that the customer still owes for invoices that have been issued but have not yet been paid.</td></tr><tr><td>14</td><td>WHT Amount</td><td>Information about withholding tax.</td></tr><tr><td>15</td><td>WHT No</td><td>Information about the Withholding Tax No., which refers to the reference or identification number related to tax withholding.</td></tr><tr><td>16</td><td>Deduct invoice</td><td>The invoice deduction amount for withholding tax.</td></tr><tr><td>17</td><td>WHT Upload Date</td><td>Information about the date the withholding tax was uploaded.</td></tr><tr><td>18</td><td>Last Payment Date</td><td>Information about the last date the payment was made by the customer.</td></tr></tbody></table>

### &#x20;Filter By As Of

If you want to view the details of all reports up to the "**As Of**" date:

1. Select the date in the "**As Of**" field.
2. Choose the "**As Of**" date.
3. Once done, click the "**Show**" button.

<figure><img src="/files/f2LeVJRG3ZtgXmG3Pkj5" alt=""><figcaption><p>Filter by As Of</p></figcaption></figure>

4. This will display the outstanding detail report based on the "**As Of**" date.

<figure><img src="/files/Rv0MvdQeZFWUopJRv1Ce" alt=""><figcaption><p>Result Filter by As Of</p></figcaption></figure>

### Filter By Customer

If you want to view the summary outstanding report details based on the customer name:

1. Select the date in the "**As Of**" field.
2. Select the customer name in the "**Customer**" field.
3. Once done, click the "**Show**" button.

<figure><img src="/files/dV6UK9R0GkT8wbD91Zv1" alt=""><figcaption><p>Filter By Customer Name.</p></figcaption></figure>

4. This will display the outstanding detail report based on the customer's name.

<figure><img src="/files/lWbRhMeY6LMsNSMAJZwU" alt=""><figcaption><p>Result Filter by Customer Name</p></figcaption></figure>


# Invoice Aging Report

The **Invoice Aging Report** in the Reports submenu of Faspay Billing 2.0 is a feature that groups invoices based on their age or the time elapsed since the issue date until now. This feature is used to identify and analyze the age of receivables that have not been paid by customers. Here are the steps to use the Invoice Aging Report feature:

## Invoice Aging Report Sub Menu

1. After successfully logging in, select the "**Faspay Billing New**" menu -> "**Reports**" -> select the "**Invoice Aging**" card menu.

<figure><img src="/files/Cqg6k1n5LdaG3qckgt0w" alt=""><figcaption><p>Invoice Aging Sub Menu</p></figcaption></figure>

2. The Detail Outstanding Report page will appear. There are 2 category options when viewing data in the Detail outstanding report.&#x20;
   1. **As Of**: Shows all outstanding invoice balances from the beginning until the specified "as of" date.&#x20;
   2. **Customer**

{% hint style="info" %}
Notes: The **"As Of"** field must not be empty.
{% endhint %}

<figure><img src="/files/3DNodgMtMcmGPvmLQtS1" alt=""><figcaption><p>Detail Outstanding Reports</p></figcaption></figure>

<table><thead><tr><th width="82">No</th><th width="186">Field Name</th><th>Description</th></tr></thead><tbody><tr><td>1</td><td>No</td><td>Number of the displayed report data.</td></tr><tr><td>2</td><td>Invoice No</td><td>Invoice number</td></tr><tr><td>3</td><td>Customer</td><td>Customer name</td></tr><tr><td>4</td><td>Invoice Date</td><td>Information about the invoice issuance date.</td></tr><tr><td>5</td><td>Due Date</td><td>The due date of the invoice that must be paid.</td></tr><tr><td>6</td><td>Days Overdue</td><td>Shows how many days the invoice payment has been delayed past the due date.</td></tr><tr><td>7</td><td>Total Outstanding</td><td>Information on the total amount of payments that are still unpaid by the customer at the time the report is generated.</td></tr><tr><td>8</td><td>Current</td><td>Refers to invoices that are not yet due, meaning the payment for those invoices has not yet passed the specified due date.</td></tr><tr><td>9</td><td>1-30 Days</td><td>Invoices that are overdue by 1 to 30 days.</td></tr><tr><td>10</td><td>31-60 days</td><td>Invoices that are overdue by 31 to 60 days.</td></tr><tr><td>11</td><td>61-90 days</td><td>Invoices that are overdue by 61 to 90 days.</td></tr><tr><td>12</td><td>91 – 120 days</td><td>Invoices that are overdue by 91 to 120 days.</td></tr><tr><td>13</td><td>>120 days</td><td>Invoices that are overdue more than 120 days.</td></tr><tr><td>14</td><td>Total</td><td>Refers to the total amount of unpaid invoices by customers, covering all invoice age categories, both those that are not yet due and those that are overdue.</td></tr></tbody></table>

### &#x20;Filter By As Of

If you want to view the details of all reports up to the "**As Of**" date:

1. Select the date in the "**As Of**" field.
2. Choose the "**As Of**" date.
3. Once done, click the "**Show**" button.

<figure><img src="/files/0KBUnFCqGY6XaZUddLtM" alt=""><figcaption><p>Filter by As Of</p></figcaption></figure>

4. This will display the invoice aging report based on the "**As Of**" date.

<figure><img src="/files/pEAm3WnpCwyXqUEp0Qvi" alt=""><figcaption><p>Rsult Filter by As Of</p></figcaption></figure>

### Filter By Customer

If you want to view the summary outstanding report details based on the customer name:

1. Select the date in the "**As Of**" field.
2. Select the customer name in the "**Customer**" field.
3. Once done, click the "**Show**" button.&#x20;

<figure><img src="/files/Z83NFrCtwgpoukOni9A3" alt=""><figcaption><p>Filter by Customer Name</p></figcaption></figure>

4. This will display the invoice aging report based on the customer name.

<figure><img src="/files/TFVbRS9mAtc00JXhjiqE" alt=""><figcaption><p>Result Filter by Customer Name</p></figcaption></figure>


# Invoice Paid Report

The **Invoice Paid Report** in the Reports submenu of Faspay Billing 2.0 is a feature used to record and analyze invoices that have been fully paid by customers over a specific period. Here are the steps to use the Invoice Paid Report feature:

## Invoice Paid Report Sub Menu

1. After successfully logging in, select the "**Faspay Billing New**" menu -> "**Reports**" -> select the "**Invoice Paid**" card menu.

<figure><img src="/files/rorpJzyUf3vnLM06G7WS" alt=""><figcaption><p>Invoice Paid Sub Menu</p></figcaption></figure>

2. The Invoice Paid Report page will appear. There are 2 category options when viewing data in the detailed outstanding report.&#x20;
   1. **Invoice Period**
   2. **Customer**.

{% hint style="info" %}
Notes: Invoice Period cannot be empty
{% endhint %}

<figure><img src="/files/gTzTPrfQgml630tdT28F" alt=""><figcaption><p>Invoice Paid Report</p></figcaption></figure>

<table><thead><tr><th width="91">No</th><th width="155">Column Name</th><th>Description</th></tr></thead><tbody><tr><td>1</td><td>No</td><td>Number of the displayed report data.</td></tr><tr><td>2</td><td>Invoice No</td><td>Invoice number</td></tr><tr><td>3</td><td>Customer</td><td>Customer name</td></tr><tr><td>4</td><td>Invoice Date</td><td>Information about the invoice issuance date.</td></tr><tr><td>5</td><td>Subtotal</td><td>Information about the total amount paid, but excludes additions such as tax, fees, or other services.</td></tr><tr><td>6</td><td>Tax</td><td>Information related to taxes applied to an invoice.</td></tr><tr><td>7</td><td>Total After Tax</td><td>Information about the subtotal that has been taxed.</td></tr><tr><td>8</td><td>Additional Fee</td><td>Information related to additional fees.</td></tr><tr><td>9</td><td>Grand Total</td><td>The final total amount including tax and additional fees.</td></tr><tr><td>10</td><td>Payment Date</td><td>The payment date made by the customer.</td></tr><tr><td>11</td><td>Transaction ID</td><td>Transaction ID</td></tr><tr><td>12</td><td>Payment Method</td><td>Payment method used by customer. </td></tr><tr><td>13</td><td>Payment Channel</td><td>Channel name used by customer.</td></tr><tr><td>14</td><td>Payment Amount</td><td>The amount of payments made by the customer.</td></tr></tbody></table>

### Filter By Invoice Period

If you want to see the report details based on the invoice period:

1. Select the date in the invoice period field. Choose the date range of the invoices you want to display.&#x20;
2. Once done, please click the **"Apply"** button&#x20;
3. Click the **"Show"** button.

<figure><img src="/files/IwfCKBxIScUejduEcrwn" alt=""><figcaption><p>Filter by Invoice Period</p></figcaption></figure>

4. This will display the invoice paid report based on the selected invoice period.

<figure><img src="/files/1KrmrzBjbp5Iug0DiMu6" alt=""><figcaption><p>Result Filter by Invoice Period</p></figcaption></figure>

### Filter By Customer

If you want to see the invoice paid report details based on the customer name:

1. Select the date in the Invoice Period field. Click the **"Apply"** button.
2. Choose the customer name in the Customer field.
3. Once done, click the **"Show"** button.

<figure><img src="/files/oOU3Yw0CKUB8hURGtLwy" alt=""><figcaption><p>Filter by Customer Name</p></figcaption></figure>

4. This will display the invoice paid report based on the customer's name.

<figure><img src="/files/oSvbJhgOzCgQvbFsa3JP" alt=""><figcaption><p>Result Filter by Customer Name</p></figcaption></figure>


# Export Report

There is an export feature for each type of report, which allows the reports in the Reports menu system in Faspay Billing New to be downloaded in either Excel or PDF format as needed.&#x20;

Here are the steps if a user wants to export a file to an Excel or PDF format file:

## Excel Format

1. On the Reports submenu page, at the bottom right corner, you will see PDF and Excel icons. Click the Excel icon to download the report in XLS format.

<figure><img src="/files/2fKmzuOKZrmNBAIGdIGn" alt=""><figcaption><p>Excel Icon</p></figcaption></figure>

2. The file will then be downloaded in XLSX format.

<figure><img src="/files/aus5ybcwZHXpWkWakyJ5" alt=""><figcaption><p>Downloaded File</p></figcaption></figure>

3. Below is an example of a report successfully downloaded in XLSX format.

<figure><img src="/files/rCAzZwlExUV1xU7N1LVH" alt=""><figcaption><p>File Report XLSX Format</p></figcaption></figure>

## PDF Format

1. If the user wants the report in PDF format, just like downloading the Excel format, select the PDF format icon on the Reports submenu page.

<figure><img src="/files/fjaP4H7ZLesGPbqGYYJz" alt=""><figcaption><p>PDF Icon</p></figcaption></figure>

2. The file will then be downloaded in PDF format.&#x20;

<figure><img src="/files/wV2UYTccmy3j5MNia6iA" alt=""><figcaption><p>Downloaded File</p></figcaption></figure>

3. Below is an example of a report successfully downloaded in PDF format.

<figure><img src="/files/k2QGgVdL2y1OKb8uTerG" alt=""><figcaption><p>File Report PDF Format</p></figcaption></figure>


# Items

Items is a menu used to manage Product and Room master data, which will later be used when creating Billing/Invoices.

### On this menu contain sub-menu such as:

<table data-view="cards"><thead><tr><th></th><th></th><th></th><th data-hidden data-card-target data-type="content-ref"></th></tr></thead><tbody><tr><td></td><td>Product Catalogs</td><td></td><td><a href="/pages/hnlhOWDblP7iS8GsvQ1B">/pages/hnlhOWDblP7iS8GsvQ1B</a></td></tr><tr><td></td><td>Rooms</td><td></td><td><a href="/pages/XooPhgqGMbOFCqAaCqea">/pages/XooPhgqGMbOFCqAaCqea</a></td></tr><tr><td></td><td>Product Category</td><td></td><td><a href="/pages/PLiGqTJhDg0QuoZEF53b">/pages/PLiGqTJhDg0QuoZEF53b</a></td></tr><tr><td>UoM (Unit of Measurement)</td><td></td><td></td><td><a href="/pages/OatHrILtE2G2bQQSBCyl">/pages/OatHrILtE2G2bQQSBCyl</a></td></tr></tbody></table>


# Product Catalogs

Product Catalogs is a menu used to manage master data from Rooms, Product Categories, and UoM, which will later be used when creating Billing/Invoice.

## Create New Product Catalogs

1. Select the "**Items**" on the "**Faspay Billing**" menu, and click "**Product Catalogs**" to display the Product Catalogs menu page.

<figure><img src="/files/K9h1mOUDQp3FERjmyBl0" alt=""><figcaption><p>Product Catalogs Page</p></figcaption></figure>

2. On the Product Catalogs menu, click the "**+Create**" button to add a new product.

<figure><img src="/files/WecF5YX95sW92uecY8Eg" alt=""><figcaption><p>Product Catalogs Page</p></figcaption></figure>

3. The "**Add New Product**" page will be displayed.&#x20;

<figure><img src="/files/qVYiJ5rXpehgYYh77n2w" alt=""><figcaption><p>Add New Product Page</p></figcaption></figure>

* Input new product data, in the "**Product Code (SKU)**" field if it is not filled in, it will be auto-generated directly from the system.
* In the "**Stock**" field, if it is not filled, it will be included in the "unlimited stock" category of the product.
* In the "**Tax Include in price**" checklist, if it is checked, there is no need to fill in the price of the product including tax in the Tax column.

4. This is an example of inputting new product data. Click "**Save**" to save the data.

<figure><img src="/files/oJGPoUeO7UwMuRm4SOoa" alt=""><figcaption><p>Save New Product</p></figcaption></figure>

5. The new **Product Catalog** data details have been successfully created.

<figure><img src="/files/w3PiJ4RIGpoY7HqeuLBz" alt=""><figcaption><p>Product Catalog Detail</p></figcaption></figure>

## **Edit Data Product Catalog**

1. Select the product data that will be changed to the "**Product Catalog**" menu page. Then, display the product catalog data detail and click the "**Edit"** button.

<figure><img src="/files/PxGU3XuSNBSgp1KfTNLA" alt=""><figcaption><p>Edit Product</p></figcaption></figure>

2. Display the "**Edit Product Catalog**" page and make an edit to the data that needs to change. Click "**Save**" to save the change.

(for example, the product name and sale price field will be changed)

<figure><img src="/files/8ic6lTgsi6tMhAZW4GOM" alt=""><figcaption><p>Save the Edit Product</p></figcaption></figure>

{% hint style="info" %}
All fields on the "Edit Product Catalog" page can be changed.
{% endhint %}

3. A Success notification message will be displayed, that the product catalog data will be saved,  click the "**OK**" button to continue.

<figure><img src="/files/iBANj620oQBdioTpKlKe" alt=""><figcaption><p>Success Notification</p></figcaption></figure>

4. The following is a detail of the product catalog data that was successfully changed.

<figure><img src="/files/1v2PlKP5jmFsnoBsVaAB" alt=""><figcaption><p>Successfully Changed the Data</p></figcaption></figure>

## **Delete Product Catalog**

1. Select the product catalog data to delete.

<figure><img src="/files/U5aK8vcZzpFsnS7PLkrG" alt=""><figcaption><p>Select Product</p></figcaption></figure>

2. The product data detail will be displayed. Click the "**Delete"** button.

<figure><img src="/files/GJfg2KQe6XXZYhBMGOKz" alt=""><figcaption><p>Delete Product</p></figcaption></figure>

3. A confirmation message will be displayed, click "**Yes**" to continue the process.

<figure><img src="/files/7UCIuZ92rDtkxm7WQMQy" alt="" width="420"><figcaption><p>Confirm Delete Product Data Notification</p></figcaption></figure>

4. A notification message will be displayed, click "**OK**" to continue.

## **Search & Sort List Data Product Catalogs**

1. On the "**Product Catalogs**" menu page, there is a search data column based on **Code, Product Name, Category, and Price**. The following is an example of searching data based on the "**Product Name**” column.

<figure><img src="/files/4v1Y3d347C4ge65xnljv" alt=""><figcaption><p>Search Product Catalogs</p></figcaption></figure>

2. Product catalog data can be sorted by **No, Code, Product Name, Category**, and **Price** column. The following is an example of sorting list data based on the order of product names.

<figure><img src="/files/aMVGyg5IHFLXqVsOHH3W" alt=""><figcaption><p>Sort List Data</p></figcaption></figure>

&#x20;


# Rooms

Rooms is a menu used to manage master data from rooms. This menu is only available for merchant with hospitality type.

## **Create New Rooms**

1. Select the "**Items**" menu on the "**Faspay Billing**" menu, then display the Items menu page. Click "**Rooms**" to display the Rooms menu page. Click "**+Create**" to add New Rooms on the Rooms menu page.

<figure><img src="/files/YtE4T0KM80J08qjbwCz1" alt=""><figcaption><p>Create New Rooms</p></figcaption></figure>

2. Then, display the "**Add New Rooms**" page and input new data. The new data entered is Room Name, Price Per Room, and Description.

<figure><img src="/files/vDDqeV4wpRe8pqscKXu6" alt=""><figcaption><p>Add New Room Page</p></figcaption></figure>

3. The following is an example of New Rooms data input. Click "**Save**" to save the data.

<figure><img src="/files/PmT41gkMPz5vHfAvLK1y" alt=""><figcaption><p>Save Add New Room</p></figcaption></figure>

4. Display a notification message that New Rooms data was successfully added. Click "**OK**" to continue.

## **Edit Data Rooms**

1. Select the Rooms data that you want to make changes to the Rooms menu page. Next, display the details of the Rooms data and click "**Edit**”.

<figure><img src="/files/bJLav9aVqy0FNOweUgCt" alt=""><figcaption><p>Edit Data Room</p></figcaption></figure>

2. The following is an example of editing rooms data. Input the change data and click "**Save**" to save the change data.

<figure><img src="/files/VLpzVLbNw4qw8tGQjwio" alt=""><figcaption><p>Save Data Room</p></figcaption></figure>

3. Display a notification message that the data was successfully changed. Click "**OK**" to continue.

<figure><img src="/files/VlD07ifQrvKPqJw9SmQL" alt="" width="347"><figcaption><p>Success Edit Room Data Notification</p></figcaption></figure>

## **Delete Data Rooms**

1. Select the room data to be deleted on the Rooms menu page. Click "**Delete**" to delete data.

<figure><img src="/files/HNB9KWdNBjkHp9Gqp8my" alt=""><figcaption><p>Delete Room Data</p></figcaption></figure>

2. Next, display a confirmation message regarding data deletion and click "**Yes**" to continue the deletion process.

<figure><img src="/files/kBez8wbgpdtfOaaZL6zS" alt="" width="425"><figcaption><p>Delete Room Data Confirmation</p></figcaption></figure>

3. Display a notification message that the data was successfully deleted. Click "**OK**" to continue.

## **Search & Sort List Data Rooms**

1. Search data can be done in the **Id, Room Name, Room Price, and Description** columns. The following is an example of search data by Room Name.

<figure><img src="/files/vl6sjAzqUIL9alcvSSyy" alt=""><figcaption><p>Search Room Data by Room Name</p></figcaption></figure>

2. On the Rooms menu page, there is also a data display setting feature, "**Sort List Data**". Sorting list data can be done by clicking the sort list icon in the **Id, Room Name, and Room Price** columns. The following is an example of sorting a list of data based on the order of the Room Name.

<figure><img src="/files/vEW3ANxR7pwCvcuxkWbH" alt=""><figcaption><p>Sort Result by Room Name</p></figcaption></figure>

&#x20;


# Product Category

Product category is a menu used to manage the master data of the product category that will be used to create the product master data.

## **Create Product Category**

1. Select the **Faspay Billing New -> Items -> Product Category** to display the Product Category menu page. Click "**Create**" to add a new product category on the Product Category menu page.

<figure><img src="/files/RZPjCSMIwKe2bMzA9ihn" alt=""><figcaption><p>Create Category</p></figcaption></figure>

2. Then, display the "**Add New Product Category**" page and input new data.

<figure><img src="/files/mG8C2w0panBocxnD8q4u" alt=""><figcaption><p>Add New Product Category</p></figcaption></figure>

3. The following is an example of inputting new product category data. Click the "**Save**" button to save the data.

<figure><img src="/files/7CWDWwXUp1MDrBleAdaH" alt=""><figcaption><p>Save New Product Category</p></figcaption></figure>

4. Display a notification message that the record was successfully added. Click "**OK**" to continue.

<figure><img src="/files/SYjYhfA6WbvUFvIVOeNx" alt=""><figcaption><p>Success Submit Data Notification</p></figcaption></figure>

## **Edit Data Product Category**

1. Select the product data to be changed on the Product Category menu page. Then, display the detailed product category data and click "**Edit**" to make a change.

<figure><img src="/files/fEmPgNtMUtQjYw5M20cM" alt=""><figcaption><p><strong>Edit Data Product Category</strong></p></figcaption></figure>

2. Display the "**Edit Category**" page and input change data. Click "**Save**" to save the data change.

<figure><img src="/files/yXLQHYQ84C1l68zbGVkX" alt=""><figcaption><p>Save Data that has been Edited</p></figcaption></figure>

3. Next, it will display a notification message that the data was successfully changed. Click "**OK**" to continue.

## **Delete Data Product Category**

1. a Select the product data to be changed on the Product Category menu page. Then, display the product category data detail and click "**Delete**" to make a change.

<figure><img src="/files/Z0Kpf06wfwpJ49ttFxcD" alt=""><figcaption><p>Delete Product Category</p></figcaption></figure>

2. Display a confirmation message regarding data deletion. Click "**Yes**" to proceed with data deletion.

<figure><img src="/files/D7dg7W3VNU9HMF925eul" alt="" width="407"><figcaption><p>Confirm Delete Data</p></figcaption></figure>

3. Next, it will display a notification message that the data was successfully deleted. Click "**OK**" to continue.

## **Search & Sort List Data Product Category**

1. Search data can be done in the **Name, Total Product**, and **Description** fields. The following is an example of search data by Name.

<figure><img src="/files/Bm3AQ944l6DOiSTtWQ8t" alt=""><figcaption><p>Search Data Product Category</p></figcaption></figure>

1. On the Product Category menu page, there is also a data display setting feature, namely "Sort List Data". Sorting list data can be done by clicking the sort icon in the **No, Name, Total Product**, and **Description** columns. The following is an example of sorting a list of data in order of Name.

<figure><img src="/files/s1LJSdnBbFUFGSnDEt5E" alt=""><figcaption><p>Product Catalogs Sort List Result by Name</p></figcaption></figure>

&#x20;


# UoM (Unit of Measurement)

UoM is a menu used to manage the master data of the product unit that will be used when creating the product master data.

## **Create New UoM**

1. Select the "**Items**" menu on the "**Faspay Billing**" menu, then display the Items menu page. Click "**UoM**" to display the Unit of Measurement menu page. Click "**+Create**" to add New UoM on the UoM menu page.

<figure><img src="/files/dlIbi0mpCFPP6MBx6z72" alt=""><figcaption><p>UoM Page</p></figcaption></figure>

2. Then, it will display "**Add New Unit of Measurement**" form to input new data. The new data entered is **UoM Name, Quantity**, and **Description**.

<figure><img src="/files/Tdqn1ydVGaNHRzB5hNMR" alt="" width="394"><figcaption><p><strong>Add New Unit of Measurement Form</strong></p></figcaption></figure>

3. The following is an example of a new UoM data input. Click "**Save**" to save the data.

<figure><img src="/files/2pmwAMJ72IzfmtgOVXMT" alt="" width="435"><figcaption><p><strong>Inputting Data at Add New Unit of Measurement Form</strong></p></figcaption></figure>

4. Next, it will display a notification message that the data was successfully added. Click "**OK**" to continue.

## **Delete Data UoM**

1. Select the UoM data to be deleted by checking the UoM menu page. Then, click "**Delete**" on the right corner of the UoM menu page.

<figure><img src="/files/E8OC0o47PEcBR2gBHBzP" alt=""><figcaption><p><strong>Delete UoM</strong></p></figcaption></figure>

2. Next, it will display a confirmation message regarding data deletion. Click "**Yes**" to continue the data deletion process.

<figure><img src="/files/nXI4roAy4lwbAATmERcH" alt="" width="389"><figcaption><p>Confirm Delete Data</p></figcaption></figure>

3. A notification message will be displayed that the data was successfully deleted. Click "**OK**" to continue.

## **Search & Sort List Data UoM**

1. On the UoM menu page, there is a search data feature. Search data can be done in the Unit of Measure, Quantity, and Description columns. The following is an example of search data by Unit of Measure.

<figure><img src="/files/7XCArbreCqQRxBt4NW4c" alt=""><figcaption><p>Search UoM Data</p></figcaption></figure>

2. &#x20;Data can be sorted by **No, Unit of Measure**, and **Quantity** columns. The following is an example of sorting a list of data in order of Unit of Measure.

<figure><img src="/files/d1A1SbZIPpSRfjmemYtO" alt=""><figcaption><p>Sort List Results</p></figcaption></figure>

&#x20;


# E-Faktur

## **Introduction**

E-Faktur is a feature that can be used by users to easily manage tax invoice numbers, and tax invoice files or send tax invoice files to merchants from Faspay Billing.

## How to Use

### Enabling Faspay Billing E-Faktur

To use E-Faktur user needs to ensure that has been enabling E-Faktur module that is accessible from Merchant Page Settings. This is a step-by-step to enabling the E-Faktur module:

1. On Merchant Page click **Settings.**
2. Then click **Faspay Billing Settings** $$^{NEW}$$.
3. Next, it will show the **Billing Settings** Page, on the **Features** tab to ensure that the **E-Faktur Module** is already checked.
4. After that click **Save.**

<figure><img src="/files/vb8aqUkk3kACEMmSxW7L" alt=""><figcaption><p><strong>Faspay Billing Settings</strong> <span class="math">^{NEW}</span>Page</p></figcaption></figure>

5. Click **OK** on the notification pop-up. So, the E-Faktur module is enabled now.

Faspay Billing E-Faktur is now accessible on **Faspay Billing → E-Faktur**. This E-Faktur page contains 3 tabs menu, such as:

1. **E-Faktur No**: this menu is used to manage tax invoice serial numbers that will be used when the user needs to generate tax invoice numbers.
2. **Export CSV**: this menu is used to export E-Faktur CSV files.
3. **E-Faktur Files**: this menu is used to upload an E-Faktur file into a system or send an E-Faktur file to the customer by email.

<figure><img src="/files/V3lqWW34EfCfDAPf7oRe" alt=""><figcaption><p>E-Faktur Page</p></figcaption></figure>


# E-Faktur Range Number

To record tax invoice serial number that has been obtained from e-Nofa (e-faktur apps by Indonesian Directorate General of Taxation) user can use **E-Faktur No** tabs menu. This page also show data table that contains the serial number of E-Faktur, accessible on **Faspay Billing → E-Faktur → E-Faktur No**.

<figure><img src="/files/iDO3HTa6Yn8THBEuLESQ" alt=""><figcaption><p>E-Faktur No page</p></figcaption></figure>

**Field Parameter E-Faktur Data Table**

<table><thead><tr><th width="218">Field Name</th><th>Description</th></tr></thead><tbody><tr><td>Year Period</td><td>Year period of tax invoice serial number</td></tr><tr><td>Start Number</td><td>Start of tax invoice serial number</td></tr><tr><td>End Number</td><td>End of tax invoice serial number</td></tr><tr><td>Total Number</td><td>Amount total of tax invoice serial number</td></tr><tr><td>Available Number </td><td>Amount of tax invoice number that still available</td></tr></tbody></table>

## Add E-Faktur Range Number

User can add new tax invoice/E-Faktur serial number into a list at the table data on E-Faktur page, by following the steps:

1. Click **+Tax** **Number** button.

<figure><img src="/files/FkShzC2mzs6kar52Wd0a" alt=""><figcaption><p>+Tax Number</p></figcaption></figure>

2. Then it will show **Add New Tax Number** form.

<figure><img src="/files/HOcwIvda5IlFpOS4QYrj" alt="" width="563"><figcaption><p>Add New Tax Number form</p></figcaption></figure>

**Field Parameter Add New Tax Number Form**

<table><thead><tr><th width="223">Field</th><th>Description</th></tr></thead><tbody><tr><td>Year Period</td><td>Period year list</td></tr><tr><td>Start Number</td><td><p>Start of tax invoice serial number </p><p>Filled by number only</p><p>Format: 000-22.12345678</p></td></tr><tr><td>End Number</td><td><p>End of tax invoice serial number </p><p>Filled by number only</p><p>Format: 000-22.12345678</p></td></tr></tbody></table>

3. Fill out the Add New Tax Number form then click **Save**.

<figure><img src="/files/iid18yjbxO0q9LLWNAK1" alt="" width="563"><figcaption><p>Input Add New Tax Number form</p></figcaption></figure>

4. Click **OK** on the success notification.

<figure><img src="/files/XczgD9llKpQD0iyt1xjn" alt="" width="375"><figcaption><p>Success Notification Add New Tax Number</p></figcaption></figure>

5. Data was successfully saved and added to the list on table data. For the Total Number and Available Number columns, it will automate filled, by the range of Start and End tax invoice numbers.

<figure><img src="/files/coaFJLkaUb6Li7h1SAiv" alt=""><figcaption><p>E-Faktur Page</p></figcaption></figure>

## Edit E-Faktur Range Number

This edit form is used when a user needs to change the tax invoice serial number that has been saved before. User can edit tax invoice serial numbers on **E-Faktur No** Page.

1. Click **edit** button on **action** column at the data table.

<figure><img src="/files/jvhRGDtNvLaaI1DT9PfL" alt=""><figcaption><p>Edit E-Faktur Number</p></figcaption></figure>

2. It will show **Edit Tax Number** form. For example, in this form, the End Number will be changed from 000-22.12346035 to 000-22.12346037. Then click **Save.**

<figure><img src="/files/ZR9HeeaTxQ0uhNHdxVGu" alt="" width="563"><figcaption><p>Edit Tax Number form</p></figcaption></figure>

**Field Parameter Edit Tax Number Form**

<table><thead><tr><th width="163">Field Name</th><th>Description</th></tr></thead><tbody><tr><td>Start Number</td><td>Start of tax invoice serial number that has been filled before</td></tr><tr><td>End Number</td><td>End of tax invoice serial number that has been filled before</td></tr><tr><td><p>Current Tax</p><p>Number</p></td><td><p>Available tax invoice number for next invoice</p><p> </p><p>Example:</p><p>Range of tax invoice serial number 00022.12345001 up to 000-22.12345010 and 4 tax numbers has been used in sequence until tax number 000-22.12345004. So, current tax number will be 000-22.12345005.</p></td></tr></tbody></table>

3. Click **OK** on success notification.

<figure><img src="/files/NeRAQfDNjYpClA1l963W" alt="" width="375"><figcaption><p>Edit Tax Number Success Notification</p></figcaption></figure>

4. So, in the table data, it can be seen that the Last Number was successfully updated.

<figure><img src="/files/54vtP7HipygBzdVvnZYq" alt=""><figcaption><p>Last Number update on E-Faktur No data</p></figcaption></figure>

## Delete E-Faktur Range Number

User can delete the tax invoice serial number that has been saved before on **E-Faktur No** page, by following the steps:

1. Click **delete** button on **action** column in the table data. For example, data number 1 on the list will be deleted.&#x20;

<figure><img src="/files/bTnYgJAHRdQBeXYrAmKq" alt=""><figcaption><p>Delete button at the E-Faktur table data </p></figcaption></figure>
2. At notification pop-up to validate that data will be deleted, click **Yes**.

<figure><img src="/files/7x9z5cKzVzei2Au49CcM" alt="" width="375"><figcaption><p>Validate delete data notification</p></figcaption></figure>

3. Next on success notification, click **OK**.

<figure><img src="/files/TDI2KF8JdSkPfSQ4xNeC" alt="" width="375"><figcaption><p>Success delete data notification</p></figcaption></figure>

4. So, on the list of the table data it can be seen that the data successfully deleted.

<figure><img src="/files/KtGKlYfUluOhlBZuvF4N" alt=""><figcaption><p>E-Faktur data table</p></figcaption></figure>


# Generate E-Faktur Number

## Guide

User can generate E-Faktur number manually by **Generate E-Faktur No** from **Faspay Billing → E-Faktu**r menu or from **Faspay Billing → Billings** menu.

Note: if the invoice already has an E-Faktur number, user cannot generate an E-Faktur number again.

## Automate Generate E-Faktur Number

1. Access on **Faspay Billing → Billings → Billing List → + Single Billing**

<figure><img src="/files/EkCQMD7sXBDpwhDfzomT" alt=""><figcaption><p>Add billing</p></figcaption></figure>

2. Create single billing and ensure **Invoice Tax** is activated, then click **Save & Send**.

<figure><img src="/files/d8PjKms4y0VmO7VRLl25" alt=""><figcaption><p>Create Single Billing</p></figcaption></figure>

**Field Parameter Single Billing form**

<table><thead><tr><th width="258">Field</th><th>Description</th></tr></thead><tbody><tr><td>To</td><td>Customer data</td></tr><tr><td>    Customer Name</td><td>Customer name (registered)</td></tr><tr><td>    Add New Customer</td><td>Add new customer data</td></tr><tr><td>Billing Details</td><td>Complete billing data</td></tr><tr><td>    Invoice No</td><td>Invoice number (auto generate)</td></tr><tr><td>    Invoice Subject</td><td>Invoice subject</td></tr><tr><td>    Invoice Language</td><td>Language used on the invoice</td></tr><tr><td>    Invoice Type</td><td>Invoice type (choose as needed)</td></tr><tr><td>    Invoice Date</td><td>Date the invoice was created</td></tr><tr><td>    Due Date</td><td>Payment limit/due invoice created</td></tr><tr><td>    Invoice Tax</td><td><p>Will appear if customer enable E-Faktur module.</p><p>If you activated the invoice tax, when system changes proforma to invoice, the system will automatically generate the tax invoice number for the invoice with the following conditions:</p><ul><li>The tax invoice number is taken from the range of tax invoice available numbers on the E-Faktur No page.</li><li>The system will use the tax invoice number sequentially from smallest to largest (Ascending order).</li><li>The period of the tax invoice number that was used must be the same as the current year(Year Period)</li></ul></td></tr><tr><td>     Transaction code</td><td><p>List of transaction code (will appear if customer activated Invoice Tax).</p><p>01: To Parties Who Are Not VAT Witholder</p><p>02: To the Treasurer's Witholder</p><p>03: To the Witholder except Treasurer's</p><p>04: DPP Other Values</p><p>06: Other submissions, including submission to foreign tourists in the context of VAT refunds</p><p>07: Submission of which VAT is not collected</p><p>08: Submission of VAT Exemption</p><p>09: Delivery of Assets (clause 16D of the VAT Law)</p></td></tr><tr><td>Header</td><td>Email header text</td></tr><tr><td>     Add Room</td><td>Choice of invoice type item type "room"</td></tr><tr><td>     Add Product</td><td>Choice of invoice type item type "product"</td></tr><tr><td>     Add Other</td><td>Choice of invoice types other than room &#x26; product</td></tr><tr><td>Generate Invoice to PDF</td><td>Information for generating invoices to PDF format</td></tr><tr><td>Notes</td><td>To add a note</td></tr><tr><td>Show notes on invoice PDF</td><td><ul><li> If <strong>checked</strong>, notes will appear on invoice document pdf file and on preview mode.</li><li>If <strong>unchecked</strong>, notes will not appear on the invoice document.</li></ul></td></tr><tr><td>Attachment</td><td>To attach a document</td></tr><tr><td>Button Option</td><td><ul><li>Click <strong>"Save Draft"</strong> to save the data temporarily.</li><li>Click <strong>"Save &#x26; Send"</strong> to save and send a new invoice.</li><li>Click <strong>"Preview"</strong> to preview the invoice before it is submitted.</li></ul></td></tr></tbody></table>

| <p><strong>Notes:</strong></p><ul><li>If the customer name is not yet available, then add new customer data by clicking <strong>"+Add New Customer"</strong> under the Customer Name field.</li><li>In the <strong>"Invoice No"</strong> field, if it is not filled in, it will be auto-generated (automatically filled with system numbering).</li><li>In the <strong>"Due Date"</strong> field, it cannot pass 1 day from the Invoce Date.</li><li>The <strong>"Add Room"</strong> feature is only available for Merchants of Hospitality type.</li></ul> |
| ----------------------------------------------------------------------------------------------------------------------------------------------------------------------------------------------------------------------------------------------------------------------------------------------------------------------------------------------------------------------------------------------------------------------------------------------------------------------------------------------------------------------------------------------------------- |

3. Click **OK** on success notification.

<figure><img src="/files/5RJM25iN8qAiZx6BbAOq" alt="" width="291"><figcaption><p>Success notification</p></figcaption></figure>

4. On Billing List, it can be seen that E-Faktur number has been successfully generated.

<figure><img src="/files/vTD2H1wunaC6oye7U5iH" alt=""><figcaption><p>Billing List page</p></figcaption></figure>

## Manually Generate E-Faktur Number

**Generate using E-Faktur → Export CSV**

1. Click on the menu tabs **Export CSV** on **Faspay Billing → E-Faktur,** then **checklist the data** that you want to generate the E-Faktur number. The data that can be selected is data **with E-Faktur No(Not Set)**, after that click **Generate E-Faktur No** button.

<figure><img src="/files/oL5IOtU9b3xVcIx18MMm" alt=""><figcaption><p>Generate E-Faktur No on Export CSV page</p></figcaption></figure>

2. There will be a success notification. So, E-Faktur Number is succesfully generated, click **OK.**

<figure><img src="/files/Lk9wUAIvqZeALhO2GmBe" alt="" width="260"><figcaption><p>Success Notification</p></figcaption></figure>

3. It can be seen at the invoice data table E-Faktur No is succesfully added.

<figure><img src="/files/41ZrBKJVWpZSAeO7RzLO" alt=""><figcaption><p>Invoice data list</p></figcaption></figure>

## **Generate E-Faktur using Billings Menu**

1. Click on **Faspay Billing → Billings**

<figure><img src="/files/T2n6s2qjMhaREktoFH5a" alt="" width="302"><figcaption><p>Billings menu</p></figcaption></figure>

2. So it will show Billing List, then click the Invoice number at the Invoice No column to see the detail.

<figure><img src="/files/PNcBKLB9VCaVArJpmMlH" alt=""><figcaption><p>Billing List</p></figcaption></figure>

3. Then click **Actions → Generate E-Faktur No**

<figure><img src="/files/TsAFF3SeUlVCzpI7fE8t" alt=""><figcaption><p>Billing Detail page</p></figcaption></figure>

4. Then on the notification, to validate that E-Faktur number will be generated, click **Yes.**

<figure><img src="/files/0QYJ7TkSEMvt83NYKvGK" alt="" width="375"><figcaption><p>Validate generate E-Faktur number</p></figcaption></figure>

5. On success notification, click **OK.**&#x20;

<figure><img src="/files/0vGeMwlJKyMTbkDyULq4" alt="" width="375"><figcaption><p>Success Notification</p></figcaption></figure>

6. After E-Faktur number is succesfully generated, the E-Faktur No now can be seen on **BILLING DETAILS.**

<figure><img src="/files/vPeRhM5OCNhO6I8BJ8b4" alt="" width="563"><figcaption><p>E-Faktur No on Billing Details</p></figcaption></figure>


# Cancelation E-Faktur Number

This cancelation E-Faktur No is used to restore E-Faktur number. So, the E-Faktur number will available again and can be used for another invoice.

## Guide

To cancel E-Faktur No it's accessible from  **Faspay Billing → Billings → View Detail Billing → Actions → Cancel E-Faktur No**.

Option of **Cancel E-Faktur No** on **Actions** button only available if an invoice has criteria, such as:

* Invoice status = canceled
* Invoice tax is active
* The e-Faktur file hasn't been uploaded yet

1. Check the number availability on the **E-Faktur No** page.

<figure><img src="/files/wv4kVzMILc2BPM1s3n9H" alt=""><figcaption><p>E-Faktur Number Page</p></figcaption></figure>

2. At the E-Faktur Files page ensure that the invoice with invoice number I**NV-FPY-032300400** hasn't been uploaded yet. It can be seen when searching the invoice by the number so it will show blank data.

<figure><img src="/files/Wd0Kdb7XB5zdZFBxzXeM" alt=""><figcaption><p>E-Faktur Files</p></figcaption></figure>

3. On the **Faspay Billing → Billings**, choose invoice with number **INV-FPY-032300400** and **E-Faktur No 000-22.12345619,** the data that will be canceled.

<figure><img src="/files/q7GhC3mSgFghn3jfDeoh" alt=""><figcaption><p>Billing List</p></figcaption></figure>

4. Then on **Billing Detail,** you can cancel the invoice by clicking the **Actions** dropdown button and clicking **Cancel.**

<figure><img src="/files/vRUNLE5YnrMokiDbJxun" alt=""><figcaption><p>Invoice Cancellation</p></figcaption></figure>

4. Click **Yes** to confirm cancelation.

<figure><img src="/files/gk8Uatxgp6WbWW0CTwX3" alt="" width="375"><figcaption><p>Confirm Invoice Cancelation</p></figcaption></figure>

6. Click **OK,** on the success notification.

<figure><img src="/files/3IOdpuyiB9DMN0UxTQAo" alt="" width="375"><figcaption><p>Success notification</p></figcaption></figure>

7. Next on the **Billing Detail** page click **Actions → Cancel E-Faktur No.**

<figure><img src="/files/OP5S4k9qkMDh0TeW06aH" alt=""><figcaption><p>Cancel E-Faktur No</p></figcaption></figure>

8. Click **Yes** to confirm E-Faktur cancelation.

<figure><img src="/files/R1dLP96JXsa8zzw2w1sE" alt="" width="375"><figcaption><p>Confirm E-Faktur No cancelation</p></figcaption></figure>

9. Click **OK** on the success notification.

<figure><img src="/files/zPFygXrMch3ud0EqQqVA" alt="" width="375"><figcaption><p>Success notification</p></figcaption></figure>

So on the **Billing List**, the E-Faktur number is now successfully canceled.

<figure><img src="/files/FoQC059ZTdxSvxlmOPV9" alt=""><figcaption><p>E-Faktur No canceled</p></figcaption></figure>


# Export CSV

Guide

Click on the **Export CSV** tab menu, to show the Export CSV page.

<figure><img src="/files/GhAAQ93uhBZvZINTTq5G" alt=""><figcaption><p>E-Faktur Page</p></figcaption></figure>

Before exporting the invoice data to a CSV format file, the user needs to show the list of invoice data on the **Export CSV** page, as follows:

1. Click the **calendar** button.
2. Choose the period, as an example will be shown data in September 2023.
3. Then, click **Show**.

<figure><img src="/files/J46wqOvHCR7hgwE4noqH" alt=""><figcaption><p>Choose Periode of the Time</p></figcaption></figure>

4. So, the list of invoice data in September 2023 successfully showed.

<figure><img src="/files/yNmkK2gvf5TuK4qamb4g" alt=""><figcaption><p>List Invoice Data</p></figcaption></figure>

**Field Parameter Invoice Data**

<table><thead><tr><th width="247">Field Name</th><th>Description</th></tr></thead><tbody><tr><td>E-Faktur No</td><td>Invoice E-Faktur Number</td></tr><tr><td>Invoice No</td><td>Invoice number</td></tr><tr><td>Due Date</td><td>Invoice due date</td></tr><tr><td>Customer Name</td><td>Invoice customer name</td></tr><tr><td>NPWP Name</td><td>NPWP customer name</td></tr><tr><td>NPWP</td><td>NPWP customer number</td></tr><tr><td>Invoice Status</td><td>Invoice status: unpaid, partially paid, paid, overdue.</td></tr><tr><td>Export Status</td><td>Export Status:<br>1. Exported : Indicates that the CSV document has been exported<br>2. Not Exported : Indicates that the CSV document has not exported yet</td></tr></tbody></table>

## Export Invoice Data to CSV File

Data that can be seen before and having tax invoice/E-Faktur numbers can be exported into CSV file, by following steps:

1. Checklist on the list of data that you want to export, then click **Export CSV.**

<figure><img src="/files/rQ5JrXcqge9L9HTOsVs2" alt=""><figcaption><p>Choose Data to Export in CSV</p></figcaption></figure>

2. The CSV files have been successfully exported, click **OK** on the success notification.

<figure><img src="/files/3615K6V3aW3GXHWVP2ai" alt=""><figcaption><p>Success Notification</p></figcaption></figure>

3. The Export Status has been changed to **Exported**.

<figure><img src="/files/3g8gF7aRbkpNTTD7jSxt" alt=""><figcaption><p>Export Status on E-Faktur Page</p></figcaption></figure>

This is what the CSV file looks like.

<figure><img src="/files/Mxt4iJdB4wzJC50ldsvp" alt=""><figcaption><p>Invoice CSV file</p></figcaption></figure>

**Field Parameter CSV File**

<table><thead><tr><th width="288">Field Name</th><th>Description</th></tr></thead><tbody><tr><td>KD_JENIS_TRANSAKSI</td><td><p>Transaction Code </p><p>01: To Parties Who Are Not VAT Witholder</p><p>02: To the Treasurer's Witholder</p><p>03: To the Witholder except Treasurer's</p><p>04: DPP Other Values</p><p>06: Other submissions, including submission to foreign tourists in the context of VAT refunds</p><p>07: Submission of which VAT is not collected</p><p>08: Submission of VAT Exemption</p><p>09: Delivery of Assets (clause 16D of the VAT Law) </p></td></tr><tr><td>FP_PENGGANTI</td><td>Replacement status of tax invoice, if there replacement FP_PENGGANTI = 1, vice versa FP_PENGGANTI = 0</td></tr><tr><td>NOMOR_FAKTUR</td><td>Tax invoice serial number</td></tr><tr><td>MASA_PAJAK</td><td>Reporting tax period = month of invoice period</td></tr><tr><td>TAHUN_PAJAK</td><td>Year tax period = year of invoice period</td></tr><tr><td>TANGGAL_FAKTUR</td><td>Invoice date</td></tr><tr><td>NPWP</td><td>NPWP customer number</td></tr><tr><td>NAMA</td><td>NPWP Customer name</td></tr><tr><td>ALAMAT</td><td>NPWP customer address</td></tr><tr><td>JUMLAH_DPP</td><td>Subtotal before tax</td></tr><tr><td>JUMLAH_PPN</td><td>Total tax</td></tr><tr><td>JUMLAH_PPNBM</td><td>Amount of PPNBM tax(if nothing filed by 0)</td></tr><tr><td>ID_KETERANGAN_TAMBAHAN</td><td>Additional information (optional)</td></tr><tr><td>FG_UANG_MUKA</td><td><p>Filled by 0, if normal payment (without down payment/terms/repayment) </p><p>Filled by 1, if there is a down payment or terms </p><p>Filled by 2, if settlement</p></td></tr><tr><td>UANG_MUKA_DPP</td><td>Amount of down payment before tax(if nothing filled by 0)</td></tr><tr><td>UANG_MUKA_PPN</td><td>VAT down payment amount(if nothing filled by 0)</td></tr><tr><td>UANG_MUKA_PPNBM</td><td>Amount of PPNBM down payment(if nothing filed by 0)</td></tr><tr><td>REFERENSI</td><td>Invoice number</td></tr></tbody></table>

On the **Export CSV** page, the user can also **Generate an E-Faktur No** on the invoice data that doesn't have an E-Faktur number.


# E-Faktur Files

## **Guide**

**E-Faktur Files** is used to upload E-Faktur file into system or send E-Faktur file to the customer email. User can also see the history of file that has been uploaded before. This menu accessible on  **Faspay Billing → E-Faktur → E-Faktur Files**. As default this menu will show blank table data.

<figure><img src="/files/9BaRW50Tx2rHJP8Cvh6u" alt=""><figcaption><p>E-Faktur Files page</p></figcaption></figure>

## **Show E-Faktur File**

User can show the E-Faktur files that has been succesfully uploaded, by following steps:

1. Choose the period of times(based on month and year) from the data that will be shown by setting the Start Date and End Date, then click **Show**.

<figure><img src="/files/KEOTv7wfZGH3ntFY8QeA" alt=""><figcaption><p>Choose period of times</p></figcaption></figure>

2. Then it will show data table of E-Faktur files.

<figure><img src="/files/9rIvBHbR0O2YQipIHmPH" alt=""><figcaption><p>E-Faktur files data table</p></figcaption></figure>

Field Parameter of E-Faktur Files Data Table

<table><thead><tr><th width="202">Field Name</th><th>Description</th></tr></thead><tbody><tr><td>E-Faktur No</td><td>E-faktur number at invoice</td></tr><tr><td>Invoice No</td><td>Invoice number</td></tr><tr><td>Customer Name</td><td>Invoice Customer Name</td></tr><tr><td>Email Status</td><td><p>Invoice delivery information status</p><p><strong>Ready to Send</strong>: file that has been uploaded but it' not send yet</p><p><strong>Sent</strong>: file has been sent into the customer email</p><p><strong>Failed</strong>: file is failed to sent into customer email. On the failed status will be there information status about the reason file is failed to send, such as invalid email address, email address not found, The E-Faktur file not found, etc.</p><p> </p></td></tr><tr><td>E-Faktur Status</td><td><p><strong>Normal</strong>: indicates that E-Faktur file is normal and has never been replace. </p><p><strong>Replacement</strong>: indicates that E-Faktur file has been replace with new one.</p></td></tr></tbody></table>

## **Upload E-Faktur File**

1. Click **Upload E-Faktur** button on **E-Faktur Files** page.

<figure><img src="/files/9sruLS0Y3jekYKnvkJEi" alt=""><figcaption><p>Upload E-Faktur</p></figcaption></figure>

2. Next it will show **Upload E-Faktur Files** form, then click **Choose File**.                                 &#x20;

   **Notes:**

   * File that can be uploaded is file with .Zip format and only contain PDF file.
   * PDF file must be named with format as follow:

     **NPWPmerchant-NoFakturPajak-NPWPCustomer-NomordariEfakturApp.pdf**

     Example:&#x20;

     022732101075000-0110072225610008-026015362054000-20221103160012.pdf

<figure><img src="/files/iekdie8DQ85Pa1nVQPUr" alt="" width="375"><figcaption><p>Upload File form</p></figcaption></figure>

3. After the file has been chosen, click **Upload**.&#x20;

<figure><img src="/files/ildWuFH3h4YTaOcWBJwe" alt="" width="375"><figcaption><p>Upload E-Faktur file</p></figcaption></figure>

This is an example of pdf file that has been uploaded before changed into zip, it can be seen that it's named as format.

<figure><img src="/files/vv7zi2OeIcXdSP0wJynd" alt=""><figcaption><p>pdf file name</p></figcaption></figure>

4. Click **OK** on success notification.

<figure><img src="/files/Ez2JBWiW96MgldkbKDCL" alt="" width="248"><figcaption><p>Success Notification</p></figcaption></figure>

5. So, E-Faktur file is successfully uploaded.

<figure><img src="/files/btX2RMTtq4KaQBnVAN2f" alt=""><figcaption><p>E-Faktur file uploaded</p></figcaption></figure>

## **Send E-Faktur File by Email**

User can send E-Faktur file that show on the table data. As example E-Faktur file with Ready to Sent status will be sent to the customer email.

1. **Checklist data** → click **Send Email**.

<figure><img src="/files/33pJq3k37FToQV13h8Ns" alt=""><figcaption><p>Send E-Faktur file by email</p></figcaption></figure>

2. Then will show success notification, click **OK**.

<figure><img src="/files/6zaCX6Xay95QH8WyErJN" alt="" width="375"><figcaption><p>Success notification</p></figcaption></figure>

3. E-Faktur file now successfully sent to the customer email, and the email status will changed from Ready to Send to Sent.&#x20;

<figure><img src="/files/zViJzr6xiJky22xWx602" alt=""><figcaption><p>E-Faktur Files</p></figcaption></figure>

This is how the email look likes.

<figure><img src="/files/BMHjDuIcLcfWwTVZilOC" alt=""><figcaption><p>E-Faktur customer email</p></figcaption></figure>

**Note :** For email it's available in 2 versions, Indonesian and English language, it depends on the language that used in the invoice.&#x20;

## **Download E-Faktur File**

This feature can be used by user to download E-Faktur files that has been uploaded before. At the data table choose the E-Faktur file that you want to download by **checklist the data** → click **Download.**

<figure><img src="/files/sVIke1kVPI0xLExUDDnS" alt=""><figcaption><p>Download E-Faktur File</p></figcaption></figure>

This is how E-Faktur file looks likes that have been successfully downloaded.

<figure><img src="/files/GorgeHBsJdO5MTQLTEDO" alt="" width="315"><figcaption><p>E-Faktur file</p></figcaption></figure>

## **Replacement E-Faktur File**

This feature is used when user needs to change the E-Faktur file that has been uploaded before with the new one.&#x20;

1. Click **Replace** button on action column at the data that want to be replaced.

<figure><img src="/files/hSrmAM9D9pbQ7iRRU9mS" alt=""><figcaption><p>Replace E-Faktur file</p></figcaption></figure>

2. Then it will show notification pop up to inform that the file E-Faktur file will be replaced, then click **Yes, Replace** to confirm.

<figure><img src="/files/tXtulH5AorWC9jlcte4x" alt="" width="563"><figcaption><p>Replace E-Faktur notification</p></figcaption></figure>

3. On success notification, click **OK.**

<figure><img src="/files/ewePXB6wFqwl4h41f2FD" alt="" width="563"><figcaption><p>Success notification</p></figcaption></figure>

4. So, it can be seen that the data with invoice number **INV-FPY-032300316** is no longer exist in the table data.

<figure><img src="/files/P7e4m4i3h891xmvgMn9Z" alt=""><figcaption><p>E-Faktur Files</p></figcaption></figure>

5. Next, to update the invoice it can be access on menu **Faspay Billing → Billings.**  So, it will show **Billing List** page.

<figure><img src="/files/mRD7MLaeP2Z90Cgp7CcI" alt=""><figcaption><p>Billing List page</p></figcaption></figure>

6. To edit the invoice data, input the invoice number into search form at the **Invoice No** column, so it will show the invoice data that has been replaced before, then **click on invoice number** to see the details.

<figure><img src="/files/J84IhnXMuNowQb5CHVeV" alt=""><figcaption><p>Biling List</p></figcaption></figure>

7. On Billing Detail page, at the **Actions** button click **Edit** option.

<figure><img src="/files/af1qJOipePoChWkgmToa" alt=""><figcaption><p>Billing Detail</p></figcaption></figure>

8. Make changes as needed. Information that can be changed such as transaction code, header, invoice item, notes dan attachment. For example, here the Transaction Code will be changed.

<figure><img src="/files/ItwTrjXNHVUzj3GIFHfR" alt="" width="521"><figcaption><p>Transaction code changes</p></figcaption></figure>

9. Then, click **Save and Close**.

<figure><img src="/files/ngEBsLvSY4wqxha3hKGJ" alt="" width="563"><figcaption><p>Save Changes</p></figcaption></figure>

10. Click **OK** on success notification.

<figure><img src="/files/wYISb9ybwD3gFVckPSmE" alt="" width="335"><figcaption><p>Success Notification</p></figcaption></figure>

11. So, invoice data now is succesfully updated and downloadable from **Faspay Billings → E-Faktur → Export CSV,** you can choose the list of data that you want to export in CSV file.

<figure><img src="/files/M3rleW3QZmLnCdTk6YJF" alt=""><figcaption><p>Download CSV file</p></figcaption></figure>

12. It can be seen the difference of the CSV file before and after updated.

<figure><img src="/files/MEty10wJBYCPdcx83eOt" alt=""><figcaption><p>CSV file</p></figcaption></figure>

13. Next, ensure to update the E-Faktur file by upload again the file from **Faspay Billing → E-Faktur → E-Faktur Files,** then click [**Upload E-Faktur**](#upload-e-faktur-file)**.**

<figure><img src="/files/baZpais0iqekYoi5RR3W" alt=""><figcaption><p>Upload E-Faktur file</p></figcaption></figure>

14. So, it can be seen on the data table, at the **E-Faktur Status** column it changed from Normal to **Replacement**. Also, the **Invoice No** has been added with **R01.** To resend the latest E-Faktur file click **Send Email.**

<figure><img src="/files/dxhkf251KzbmnUVPUbFA" alt=""><figcaption><p>Replacement Status</p></figcaption></figure>

15. This is how the email looks like that sucessfully sent to merchant.

<figure><img src="/files/V7ETy7qUXwqN5lI3h8Hr" alt=""><figcaption><p>E-Faktur email</p></figcaption></figure>


# Setting Threshold E-Faktur

User can set the threshold limit of E-Faktur numbers from **E-Faktur No** page. If the available number of tax invoice in current year is less than or equal to the threshold limit that has been setting before, system will send an email notification to the email address that listed on the Billings Settings page, accessible from **Settings → Faspay Billing Settings** $$^{NEW}$$.&#x20;

<figure><img src="/files/w9WIHsXWIWPhHXz45QKi" alt="" width="563"><figcaption><p>Billing Settings page</p></figcaption></figure>

1. Click **Setting Threshold** button on **E-Faktur No** page.

<figure><img src="/files/rIsXF7gGvu4hLsyz2XJC" alt=""><figcaption><p>Setting Threshold</p></figcaption></figure>

2. Next, it will show **Setting Threshold E-Faktur Available Number** form. As example the threshold limit will be changed from 30 to 4, if active slide button is turned on it will send email notification that has been listed and vice versa, then click **Save.**

<figure><img src="/files/fPTIz7FfmC1VVRg9I6ds" alt="" width="563"><figcaption><p>Setting Threshold E-Faktur Available Number form</p></figcaption></figure>

**Field Parameter Setting Threshold E-Faktur Available Number Form**&#x20;

<table><thead><tr><th width="202">Field Name</th><th>Description</th></tr></thead><tbody><tr><td>Threshold Limit</td><td><p>Used to setting the threshold limit of available number. </p><p>Filled by number only.</p></td></tr><tr><td>Active</td><td><p>Used to turn on or turn off the threshold limit settings of available number.</p><p> </p><p>If <strong>No</strong> system will not activated threshold limit of available number and user will not get an email notification.</p><p> </p><p>If <strong>Yes</strong> system will activated threshold limit of available number and user will get an email notification at the email address that has been listed on the Billing Settings.</p></td></tr></tbody></table>

3. On success notification pop up, click **OK.**

<figure><img src="/files/EVHSAuSA9t5wNmRdsb0f" alt="" width="232"><figcaption><p>Success set threshold notification pop up</p></figcaption></figure>

## Email Notification Threshold

This email notification will received by user when the amount of tax invoice available number is less than or equal to threshold limit number. As example the threshold limit is set to 4.

<figure><img src="/files/bvzEZiChf9il7J0dMSdr" alt="" width="563"><figcaption><p>Threshold limit</p></figcaption></figure>

It can be seen at E-Faktur No page, at table data the Available Number is 5.

<figure><img src="/files/nBzs6kAhjoBUN725S9ew" alt=""><figcaption><p>Available Number=5</p></figcaption></figure>

Then the E-Faktur number succesfully generated from available E-Faktur number.

<figure><img src="/files/lRVAi2H9qBtVxTaDTWPQ" alt=""><figcaption><p>Generated of E-Faktur number</p></figcaption></figure>

So, the available number changed to 4.

<figure><img src="/files/CAY6dOkcIaod46ekpngl" alt=""><figcaption><p>Available number changed</p></figcaption></figure>

Last, an email notification succesfully sent to inform user that the tax invoice available number is reached threshold limit.

<figure><img src="/files/i92ewjIewlu05sHyLWif" alt=""><figcaption><p>Email notification threshold limit</p></figcaption></figure>


# QR Business Profile

QR Business Profile help merchant share their business profile easily just using a QR code. Through QR Business Profile, their customers can easily make payments, see their product items, pay bills, and access their social media account by simply clicking the link provided on their Business Profile.

<figure><img src="/files/tQHKbyRUZxaqjsHS5gol" alt="" width="563"><figcaption></figcaption></figure>


# Create Business Profile

You can create your business profile by Merchant Page.

1. On [Merchant Page](https://faspay.co.id/merchantpage/auth/login), click **Faspay Billing.**
2. Click **Business Profile.**

<figure><img src="/files/OJ6gqEQJXgfinc6Ti9te" alt="" width="167"><figcaption></figcaption></figure>

3. On **Business Profile List** page, click **Create Profile.**

<figure><img src="/files/3ENKGQqj6ANxYML204jE" alt=""><figcaption></figcaption></figure>

4. It will show **Create Business Profile** page.

<figure><img src="/files/zvKBRuwUEjTmM6nv5ERe" alt=""><figcaption></figcaption></figure>

## Add Profile Information

At Profile tab, merchant can add general profile information such as: name and bio profile.&#x20;

{% hint style="info" %}
Company name can’t be changed, as default, it will be in accordance with the profile credential. If you need to change your logos it can be seen [**here**](/merchant-page-reference/settings-profile), and if you need to change your company name you can contact our internal team.
{% endhint %}

1. Click **Profile** tab.

<figure><img src="/files/KcbgwlOWqfeiIMVN17VT" alt="" width="308"><figcaption></figcaption></figure>

2. Input Business Profile Name and Business Profile Bio(optional).

<figure><img src="/files/8i1NZMJWHoYvaxPkSfI2" alt="" width="563"><figcaption></figcaption></figure>

## Add Links

You can add multiple custom links or recommendation links to your business profile for your customers.

1. Click **Links** tab to add links on your business profile.

<figure><img src="/files/F8fihMMGvmEdqWjAhGNH" alt="" width="292"><figcaption></figcaption></figure>

### Add Custom Links

Custom links can be used by merchant to add the link apart from recommendation links from Faspay.

1. Input Link URL and Link Name, then click **Add to Profile**.

<figure><img src="/files/hxKzNDgU3K8CGpBGXs1e" alt="" width="563"><figcaption></figcaption></figure>

2. Custom link (in example: company website) has been successfully added, and show on **My Links** section.

<figure><img src="/files/gzv5I7xZQCjvNFfuFz5E" alt="" width="563"><figcaption></figcaption></figure>

### **Add Product Catalog Link**

Product Catalog Link is used for merchant show their product list to the customers.

1. Click **Product Catalog** on the Recommendation section.

<figure><img src="/files/uAtOeqEQl7de3SDm0o2w" alt="" width="252"><figcaption></figcaption></figure>

2. Product Catalog link will automatically made by system in accordance with Product Catalog on the Faspay Billing/Items.

<figure><img src="/files/ilPF83uCSjzTrelEpsDg" alt="" width="563"><figcaption></figcaption></figure>

### Add Billing Link

Billing link is used for merchant made a billing payment to the certain customer.

1. Click **Billing** on recommendation section.

<figure><img src="/files/gEp9pqN2MIl6wkiCiKcn" alt="" width="170"><figcaption></figcaption></figure>

2. Input the name of customer that you are searching for.
3. Select the customer name from the list.

<figure><img src="/files/9UCd9Hoq8zi8VnmwctfB" alt="" width="563"><figcaption></figcaption></figure>

4. Click **Select.**

<figure><img src="/files/E1aJStWMGZiPXaIlgXGI" alt="" width="563"><figcaption></figcaption></figure>

### Add Payment Link

Payment Link is used by merchant as media transfer from customer, such as donation, tip, etc. It’s enabling customer to fill data such as transfer nominal, transfer description, recipient's email of transfer receipt, and customer phone numbers.

1. Click **Payment** on recommendation section.

<figure><img src="/files/45HTgmrL8Hsp8dBWTWCS" alt="" width="155"><figcaption></figcaption></figure>

2. Payment link automatically made by systems, show on My Links section.

<figure><img src="/files/xrC69U6Pcv1JG9AfnfIR" alt="" width="563"><figcaption></figcaption></figure>

{% hint style="info" %}
The link that has been added to My Links section will not be displayed on Recommendation section.
{% endhint %}

### Setting Links

#### **Show link on Business Profile**

Click the **switch button** to show the link on your Business Profile and vice versa.

<figure><img src="/files/L4Zj6Jz4qipgoecQQGFg" alt=""><figcaption></figcaption></figure>

#### Change Order of the Links

**Press the link, hold down** and **drag** the link to the order that you want.

<figure><img src="/files/sbpyiQK4j4Ie5EiYBmx7" alt=""><figcaption></figcaption></figure>

#### Rename Link

1. Click **edit icon** on link that you want to rename.

<figure><img src="/files/tGfVyaQSM7nUzeX1EW0u" alt="" width="563"><figcaption></figcaption></figure>

2. Rename the link as needed, then **Enter** to save the new link name.

<figure><img src="/files/8A6LlinXf01RCeLXMOpH" alt="" width="563"><figcaption></figcaption></figure>

3. The new link name has been successfully saved.

<figure><img src="/files/lKKclG4aPyl9hjU7JhY6" alt="" width="563"><figcaption></figcaption></figure>

#### Delete link

1. Click **delete icon** on the link that you want to delete.

<figure><img src="/files/oGApkl661PltlslvGDHl" alt="" width="563"><figcaption></figcaption></figure>

2. Click **Yes, delete**, to confirm deletion.

<figure><img src="/files/Bkjr06KwpaaigW7wcSgp" alt="" width="375"><figcaption></figcaption></figure>

## Add Social Accounts

Merchant can add their social accounts to their Business Profile.

1. Click **Social Icons** tab.

<figure><img src="/files/frO6E6HimXzD5t01SPJ1" alt="" width="339"><figcaption></figcaption></figure>

2. Click **social media icon** that you want to add on your business profile from Icon List section.

<figure><img src="/files/SfYEvFyAZiEC0mUIOmsl" alt="" width="563"><figcaption><p>Social Icons tab Page</p></figcaption></figure>

3. Input the information of social media account, then click **Add**.

<figure><img src="/files/SSKFLb6lNEmpMXTv2AOJ" alt="" width="375"><figcaption></figcaption></figure>

4. The social media account has been successfully added, show on My Icons section.

<figure><img src="/files/sgR5KKFoRvSMcnnKg0xu" alt="" width="563"><figcaption></figcaption></figure>

{% hint style="info" %}
You can add **maximum 4 media social icons** on your Business Profile.
{% endhint %}

## Save Business Profile

1. Click **Save All Change to save** all the information that has been added to Business Profile.

<figure><img src="/files/T19Og6huQ2eNQCfSiFnW" alt="" width="563"><figcaption></figcaption></figure>

2. Business Profile successfully saved.

<figure><img src="/files/kL9LsTPKWo20SqABXEkp" alt="" width="374"><figcaption></figcaption></figure>

## Share Profile from Profile Page

1. Click **Share.**

<figure><img src="/files/1ZPcoqCJlc8OnJ8E8I9v" alt="" width="563"><figcaption></figcaption></figure>

2. Will show link and QR of your Business Profile that you can share to your customer.

<figure><img src="/files/NKCZxDVPEDDltUljMgBO" alt=""><figcaption></figcaption></figure>


# Business Profile List

You can see and manage each Business Profile that has been made before on **Business Profile List** page.

1\.    On [Merchant Page](https://faspay.co.id/merchantpage/auth/login), click **Faspay Billing.**

2\.    Click **Business Profile.**

<figure><img src="/files/OJ6gqEQJXgfinc6Ti9te" alt="" width="167"><figcaption></figcaption></figure>

3. It will show **Business Profile List.**

<figure><img src="/files/bAv8G9ZPedkYXRepY4io" alt=""><figcaption></figcaption></figure>

## Sorting Business Profile Data

### Sorting by Profile Name

Click **Sort Icon** on **Profile Name** cell.

<table data-header-hidden><thead><tr><th width="80"></th><th></th></tr></thead><tbody><tr><td><img src="/files/Kr8yt6r1EnhOs5UEQA2A" alt="" data-size="original"></td><td>Ascending order (sort A to Z)</td></tr><tr><td><img src="/files/peqoHqHOHXvq2MPEWKMB" alt="" data-size="original"></td><td>Descending order (sort Z to A)</td></tr></tbody></table>

<figure><img src="/files/1vqVXhTVBCshr95RXNAl" alt=""><figcaption></figcaption></figure>

### Sorting by Profile Id

Click **Sort Icon** on **Profile Id** cell.

<table data-header-hidden><thead><tr><th width="81"></th><th></th></tr></thead><tbody><tr><td><img src="/files/Kr8yt6r1EnhOs5UEQA2A" alt="" data-size="original"></td><td> Ascending order (sort newest to oldest)</td></tr><tr><td><img src="/files/peqoHqHOHXvq2MPEWKMB" alt="" data-size="original"></td><td>Descending order (sort oldest to newest)</td></tr></tbody></table>

<figure><img src="/files/sAshF7oKMH6GhkDILMx2" alt=""><figcaption></figcaption></figure>

### Sorting by Date Created

Click **Sort Icon** on **Date Created** cell.

<table data-header-hidden><thead><tr><th width="81"></th><th></th></tr></thead><tbody><tr><td><img src="/files/Kr8yt6r1EnhOs5UEQA2A" alt="" data-size="original"></td><td> Ascending order (sort newest to oldest)</td></tr><tr><td><img src="/files/peqoHqHOHXvq2MPEWKMB" alt="" data-size="original"></td><td>Descending order (sort oldest to newest)</td></tr></tbody></table>

<figure><img src="/files/NgP4vUOHfA42etlwnUSS" alt=""><figcaption></figcaption></figure>

## Searching Business Profile Data

You can search your business profile data by using these parameters:

* Profile Name (Business profile name)
* Profile ID (Profile ID number)
* Date created (Business profile date created)

This the sample of search results by **Profile Name: Erika**.

<figure><img src="/files/T04mV6ankhpSE3A7MeZZ" alt=""><figcaption></figcaption></figure>

## Edit Business Profile

You can edit business profile that has been made by following this steps.

1\.    Click **edit icon** on **Actions column** for Business Profile that you want to edit.

<figure><img src="/files/hzsp24qpALKh2NngMF1l" alt=""><figcaption></figcaption></figure>

2\.    Edit the data as needed, then click **Save All Change.**

<figure><img src="/files/ZbFeOHW2wbTZwKWwWUXb" alt="" width="563"><figcaption></figcaption></figure>

3\.    The data successfully changed.

<figure><img src="/files/kL9LsTPKWo20SqABXEkp" alt="" width="374"><figcaption></figcaption></figure>

## Duplicate Business Profile

1. Click **duplicate icon** on **Actions column.**

<figure><img src="/files/7k8q8m46OzzEtwUPqRwz" alt=""><figcaption></figcaption></figure>

2. Click **Add Profile**, to validate that the Business Profile will be duplicated.

<figure><img src="/files/gL9uAWlr41osHvWwzqHM" alt="" width="375"><figcaption></figcaption></figure>

{% hint style="info" %}
If needed you can also rename the Business Profile before click Add Profile.
{% endhint %}

3. The business profile successfully duplicated.

<figure><img src="/files/7WTn26t9acZSTVd0yfZ0" alt=""><figcaption></figcaption></figure>

## Share Business Profile

1\.    Click **share icon** on **Actions column** for the Business Profile that you want to share.

<figure><img src="/files/xmfaRDzLIoPZ0vvKw2I9" alt=""><figcaption></figcaption></figure>

2\.    Will show QR and link of your Business Profile that you can share to your customer.

<figure><img src="/files/hewNLFgKKApGZSS4TKol" alt=""><figcaption></figcaption></figure>

## Delete Business Profile

1\.    **Checklist** on the **Business Profile** that you want to delete.

2\.    Click **Delete.**

<figure><img src="/files/ARtxwSrvAQFcmo8vjqeu" alt=""><figcaption></figcaption></figure>

3\.    Click **Yes,** to validate deletion.

<figure><img src="/files/Siqjvw1T2HuAmmjvbdj0" alt="" width="374"><figcaption></figcaption></figure>

4\.    Click **OK**, and the Business Profile successfully deleted.

<figure><img src="/files/b9uo5IJfu8pHczFAthML" alt="" width="375"><figcaption></figcaption></figure>


# Access Business Profile Page

The business Profile page can be accessed from QR or a link shared by merchant.

## Customer Page

1. Open your camera, **Scan QR Business Profile** and **click the Business Profile link.**
2. Will show merchant business profile.l

<figure><img src="/files/ssD1knIaxD85EP3fB7Cl" alt="" width="563"><figcaption></figcaption></figure>

### **Access Product Catalog**

1. Click **Product Catalog**.
2. List of product items offer by merchant will be displayed.

<figure><img src="/files/kaVQ8SzxNKlwN116ihcS" alt="" width="563"><figcaption></figcaption></figure>

### **Pay Billing**

#### **Billing type Static Close Amount**

In this billing type as a customer, the nominal amount that you need to pay for has been predetermined and cannot be changed.

1. Click **Billing.**
2. On the Bill Summary, click **Pay Now.**
3. To complete the payment, you will be redirected to the Faspay Xpress page. In details can be seen [here](https://docs.faspay.co.id/getting-started/faspay-xpress/user-guide).

<figure><img src="/files/b0BKfnrRYTYukUZbCGlH" alt=""><figcaption></figcaption></figure>

#### **Billing type Static Open Amount**

In this billing type, as a customer, you can set the nominal amount that you want to pay.&#x20;

1. Click **Billing.**
2. On the Bill Summary, **input nominal Payment Amount.**
3. Next, click **Pay Now.**
4. To complete the payment, you will be redirected to the Faspay Xpress page. In details can be seen [here](https://docs.faspay.co.id/getting-started/faspay-xpress/user-guide).

<figure><img src="/files/YCmzMtIt7PnCnB6ZEYI1" alt=""><figcaption></figcaption></figure>

#### **Billing type Static Open/Close & Dynamic Close**

In this billing type, as a customer, you can choose items that you want to pay.

1. Click **Billing**.
2. On the Bill Summary, **checklist** the **items** that you want to pay.
3. Next, click **Pay Now**.
4. To complete the payment, you will be redirected to the Faspay Xpress page. In details can be seen [here](https://docs.faspay.co.id/getting-started/faspay-xpress/user-guide).

<figure><img src="/files/ZC8Rmfj745lD4N4MbeXl" alt=""><figcaption></figcaption></figure>

5. If there are no outstanding bills to be paid, the information page will be displayed.

<figure><img src="/files/CzMNbfMAn0hZ0lIRhUVe" alt="" width="188"><figcaption></figcaption></figure>

### **Make a Payment**

1. To make a payment, click **Payment.**
2. Input nominal, description, email and phone number, then click **Select Payment Method.**
3. To complete the payment, you will be redirected to the Faspay Xpress page. In details can be seen [here](https://docs.faspay.co.id/getting-started/faspay-xpress/user-guide).

<figure><img src="/files/S2jwBuTC3TryszUO7IvP" alt=""><figcaption></figcaption></figure>

**Field Parameter Payment Information Form**

<table><thead><tr><th width="174">Field Label</th><th>Description</th></tr></thead><tbody><tr><td>Nominal</td><td>Transfer nominal</td></tr><tr><td>Description</td><td>Transfer Description</td></tr><tr><td>Email</td><td>Recipient's email of transfer receipt</td></tr><tr><td>Phone Number</td><td>Customers phone numbers</td></tr></tbody></table>

## Merchant Page

1. On Business Profile List page, click **Profile Name.**

<figure><img src="/files/IhC8wCUDA0nmL0n7p5r4" alt=""><figcaption></figcaption></figure>

2. Will show Business Profile page.

<figure><img src="/files/qklorHmmXHaK8ASjxmgp" alt=""><figcaption></figcaption></figure>


# Access Order List

If you activated order feature on QR Business Profile page, you can access the order list of  your customer through Faspay Billing → Busines Profile, click Order List.

<figure><img src="/files/HAXPYFcKmI3c6u0B3jHE" alt=""><figcaption></figcaption></figure>

### Update Order Status

You can update the order status through **Faspay Billing → Business Profile → Order List.**

#### Update Order Status from Unprocessed to In Process

1. Select the order(s) that you want to updat&#x65;**.**

{% hint style="info" %}
You can select more than one order at a time.
{% endhint %}

2. Click **Change Order.**

<figure><img src="/files/WYHKY7flNSL7dubSsOiW" alt=""><figcaption></figcaption></figure>

{% hint style="warning" %}
Orders with Completed status cannot be updated.
{% endhint %}

3. Click **Yes**, to confirm the order status update.

<figure><img src="/files/cT2jhTyygh5obju1b1B3" alt=""><figcaption></figcaption></figure>

4. The order status will be updated to **In Process.**

<figure><img src="/files/IROlG27gLfYT86b1F7iT" alt=""><figcaption></figcaption></figure>

<figure><img src="/files/egzWGgEUUV3M5sJMS3eS" alt=""><figcaption></figcaption></figure>

#### **Update Order Status from In Process to Completed**

1. Select the order(s) that you want to update.

{% hint style="info" %}
You can select more than one order at a time.
{% endhint %}

2. Click **Change Order.**

<figure><img src="/files/S2lnFJ9hEMCO0W0G60Bt" alt=""><figcaption></figcaption></figure>

{% hint style="warning" %}
Orders with Completed status cannot be updated.
{% endhint %}

3. Click **Yes**, to confirm the order status update.

<figure><img src="/files/nVt1GKLSFrrx3BgR2CRR" alt=""><figcaption></figcaption></figure>

4. The order status will be updated to **Completed.**

<figure><img src="/files/DRGoQehWGHiuwlaBFjoB" alt=""><figcaption></figcaption></figure>

<figure><img src="/files/pqQk6QPZDKqp2grGYZMe" alt=""><figcaption></figcaption></figure>

### **Export Order List**

You can Export your order list through **Faspay Billing → Busines Profile → Order List,** click\
**Export Excel.**

<figure><img src="/files/ubduOEcMLC2ZA9ONauVZ" alt=""><figcaption></figcaption></figure>

Here’s the order list in excel format.

<figure><img src="/files/ngJf0D8kXTzQ1LKBYrFY" alt=""><figcaption></figcaption></figure>

{% hint style="info" %}
Notes :&#x20;

* File will be exported in format order\_list\_ddmmyyyy-ddmmyyyy.xlsx.
* All the order list will be included in the exported file, except you are using some data filters, so it will be based on the data filters, that are being used.
  {% endhint %}


# Access Booking List

Booking List contains a list of booking that made by your customer, accessible through Faspay Billing → Busines Profile, klik Booking List.

<figure><img src="/files/j5Ki0zT2gvX1MNvSd2TN" alt=""><figcaption></figcaption></figure>

### Export Booking List

You can export the booking list through **Faspay Billing → Busines Profile → Booking List,**\
then click **Export Excel.**

<figure><img src="/files/HJx5z3JlOknW8PgXut0D" alt=""><figcaption></figcaption></figure>

Here’s the order list in excel format.

<figure><img src="/files/iAEdqKcH787D2PbL2iAA" alt=""><figcaption></figcaption></figure>


# Transaction History on Business Profile

## Transaction History

Transaction History of your QR Business Profile is accessible at Merchant Page, **Faspay Billing/Business Profile/Transaction History**. Here’s transaction history list of your customers.

<figure><img src="/files/RjXnNBToXAZk9Ky8QNod" alt=""><figcaption></figcaption></figure>

### Searching Transaction History

You can search your transaction history by using these parameters:

* Transaction Date (Date of transaction)
* Transaction ID (Transaction ID number)
* Profile Name (Business profile name)
* Customer Name (Customer name)
* Category Source (Category “payment/billing”)
* Transaction Nominal (Transaction amount)
* Status (Transaction status)

<figure><img src="/files/L09rKxgwunrejUNN2sc7" alt=""><figcaption></figcaption></figure>

This the sample of search results by **Profile Name: Basudara Store, Status: Expired**.

<figure><img src="/files/xIEiJ2l1KxlIxxjVHj8S" alt=""><figcaption></figcaption></figure>

### Download Transaction History

Transaction history can be downloaded in Excel format by click **Export Excel.** You can also filter the history data that you want to export by selecting a specific range of transaction dates.

<figure><img src="/files/1SlSOUeHERcYN3D5sbi2" alt="" width="375"><figcaption></figcaption></figure>

Here’s the transaction history that has been downloaded in Excel format.

<figure><img src="/files/T0D4TML4lVAbbyKA9DbZ" alt=""><figcaption></figcaption></figure>


# Lite Sales App

Lite Sales App enables Your customer to make a payment on offline store easily by QR code.

## Get Started

1. To started using Lite Sales App, open **Faspay Billing -> Business Profile -> Transaction History -> Lite Sales App**.

<figure><img src="/files/SFMygFe4VHbyTGs33dzw" alt=""><figcaption></figcaption></figure>

2. Next create Password for Your Lite Sales App, **input password** **on field** **Create Password** and **Confirm Password,** then click **Confirm**.

<figure><img src="/files/4oqWSLpSsk3rrn7G4Q2k" alt="" width="563"><figcaption></figcaption></figure>

{% hint style="warning" %}
Password must contain at least 8 characters and a combination of uppercase letters, lowercase letters and numbers.
{% endhint %}

3. Password successfully created.

<figure><img src="/files/3u1B5ryVGkx4ei2YmqoP" alt="" width="298"><figcaption></figcaption></figure>

4. Now You can access the Lite Sales App by scan QR code or click **Copy Link** then open on Your browser. If needed You can also click **Download PNG** to download QR code.

<figure><img src="/files/HiaVgye4xoAMfLaIONhT" alt="" width="563"><figcaption></figcaption></figure>

### Open **Lite Sales App**

1. Copy Your Lite Sales App URL from **Faspay Billing->Business Profile->Transaction History->Lite Sales App->Copy Link.**

<figure><img src="/files/voXNf2DadlQE7tjqKGS9" alt=""><figcaption></figcaption></figure>

To access Your Lite Sales App from browser, You can follows these steps:

1. Open link through Your browser.
2. **Input Password** then click **Confirm**.
3. Show the Lite Sales App.

<figure><img src="/files/n25HKSGFiH6Jx6ckfPV3" alt=""><figcaption></figcaption></figure>

### **In Store Payment**

In Store Payment enables Your customer to make a payment on Your offline store through various payment method. Follow these steps to make In Store Payment:

1. Click **In Store Payment.**
2. **Input detail payment**, such as **Nominal**(must be filled), **Profiles** and **Notes**.
3. Choose the payment method.

<figure><img src="/files/G5PkXAgIK5LPAa5POCQV" alt=""><figcaption></figcaption></figure>

#### Pay with QRIS

You can get payment with QRIS by following these steps:

1. Ensure that the nominal payment are filled correct, then click **Pay with QRIS.**
2. Ask Your customer to **Scan QRIS** use their payment app, then finish the payment.
3. Click **Inquiry Payment** to view update of the payment status.
4. Payment status show.

<figure><img src="/files/NkyIi3aPTMZCyWX1kGrd" alt=""><figcaption></figcaption></figure>

{% hint style="warning" %}
QRIS will expired on 10 minutes.
{% endhint %}

You can regenerate QRIS by click **Regenerate QR with this nominal.**

<figure><img src="/files/UjyVBrJqwCqwU1imdl3K" alt="" width="375"><figcaption></figcaption></figure>

#### **Pay with Others**

To make a payment use another method, You can follow these steps:

1. Ensure that detail payment are correct, click **Pay with Others.**
2. Ask Your customer to scan QR code use their smartphone camera or QR scanner App.
3. Next, Your customer can finish the payment via Faspay Xpress. Details payment via Faspay Xpress can be seen[ here.](/getting-started/faspay-xpress/faspay-xpress-4.0/payment-method)

<figure><img src="/files/gsmRFskx5RRvI3rwyNTo" alt=""><figcaption></figcaption></figure>

{% hint style="warning" %}
The QR code will expired on 10 minutes, click **OK** when pop up show to refresh the page and get the new QR code for the same payment.
{% endhint %}

<figure><img src="/files/kywTIhFQf9gWj2qCqCdP" alt="" width="188"><figcaption></figcaption></figure>

### **Transaction History**

Transaction History is page that shows the 10 latest transactions. You can show the transaction history by following these steps:

1. On **Lite Sales App**, click **Transaction History.**
2. Will show the **Transaction History List.**

<figure><img src="/files/rTCyT6xCJWEdZ70KzXWo" alt="" width="563"><figcaption></figcaption></figure>

### **Order List**

If you activated order feature for your store, you can access your customers order list through\
lite sales app by clicking Order List.

<figure><img src="/files/Zy3U9QcgGagFSp5Cc9Gi" alt=""><figcaption></figcaption></figure>

The order list can be viewed based on the same order status, as follows:

* **All Order Status List (Unprocessed, In Process, Completed)**

<figure><img src="/files/RlzqmLOnl3TRATiGt7in" alt="" width="275"><figcaption></figcaption></figure>

* **In Process Order List**

<figure><img src="/files/f56KiT144mW8PHAlF2gI" alt="" width="273"><figcaption></figcaption></figure>

* **Completed Order List**

<figure><img src="/files/kKql4P9KnMLJblAOkmv3" alt="" width="263"><figcaption></figcaption></figure>

* **Unprocessed Order List**

<figure><img src="/files/MNGtpdNgYHIEwZzvDlxG" alt="" width="258"><figcaption></figcaption></figure>

### **Updating Order Status**

Below are the steps to update the order status through the Lite Sales App :

#### Update Order Status from Unprocessed to In Process

1. Select the order with the status **Unprocessed,** then click **In Process**.

<figure><img src="/files/ITgV8IDGW8L8gPoisQRZ" alt="" width="258"><figcaption></figcaption></figure>

2. The order status will be updated to **In Process**.

{% hint style="warning" %}
Orders with Completed status cannot be updated.
{% endhint %}

#### Update Order Status from In Process to Completed&#xD;

1. Select the order with the status **In Process**, then click **Completed**.

<figure><img src="/files/kN7qMmqMcpqhNeE4d9bS" alt="" width="269"><figcaption></figcaption></figure>

2. The order status will be updated to **Completed**.

{% hint style="warning" %}
Orders with Completed status cannot be updated.
{% endhint %}

### **Logout from Lite Sales App**

To exit from Lite Sales App, click **Logout.**

<figure><img src="/files/bKbjJILVjYq6Io0oy1mM" alt="" width="375"><figcaption></figcaption></figure>

### **Change Lite Sales App Password**

1. Change the Lite Sales App Password on **Faspay Billing->Business Profile->Transaction History,** then click **Lite Sales App->Reset Password.**

<figure><img src="/files/Sf7Vl9zOKvpKbOM9fW6x" alt=""><figcaption></figcaption></figure>

2. **Input new Password**, then click **Confirm.**

<figure><img src="/files/99hVqCC7BkJEB3IovXxl" alt="" width="563"><figcaption></figcaption></figure>

{% hint style="warning" %}
Password must contain at least 8 characters and a combination of uppercase letters, lowercase letters and numbers.
{% endhint %}

3. New password successfully saved.

<figure><img src="/files/h3xzYDXtdbQ4sTvv8UOQ" alt="" width="375"><figcaption></figcaption></figure>


# Billing Settings

## Guide

1. Open **Settings.**
2. Click **Faspay Billing Settings** $$^{NEW}$$.

<figure><img src="/files/30b0UVEA5OPujDSfOd7f" alt="" width="201"><figcaption><p><strong>Faspay Billing Settings</strong> <span class="math">^{NEW}</span></p></figcaption></figure>

3. So, it will display the Billing Settings page.

<figure><img src="/files/sbtUfS7sAgtbYCjJVPdd" alt=""><figcaption></figcaption></figure>

The following is an explanation of setting that can be made from Billing Setting page:

* **Notification**

  The settings in the notification column are done to provide information to the merchant, if there is a payment from the customer to the invoice made. The following is an explanation of the features available in the notification:

  1. **Payment Notification:** this feature serve to provide information on payment transactions made by customer.
  2. **Overdue Notification:** this feature serve to provide information from invoice that are due for payments made by customer.
  3. **Email Notification:** this feature serve to provide information on all transactions from invoice made by customer through the email platform.
* **Invoice language**

  The setting in the Invoice language column is done to provide an alternative choice of language from the invoice created. The available languages are English and Indonesian.
* **Email  template**

  Setting the invoice template column is done for if the merchant wants to create its own invoice subject, headers, and notes format to be displayed on the invoice page that will be given to the customer. This template is available in both English and Indonesian features.

  For **Show notes on Invoice PDF**:

  \-        If **checked,** notes will appear on invoice document pdf file and on preview mode.

  \-        If **unchecked**, notes will not appear on the invoice document.
* **Features**

  Setting in the Features column is done if the merchant provide features on the invoice page such as:

  1. **E-Faktur Module :** This feature enable customer to manage tax invoice number, tax invoice file or send tax invoice file into merchant from Faspay Billing.
  2. **Tax On Line Items :** This feature is used to provide setting for tax bills per item.
  3. **Discount On Line Items :** This feature is used to provide a discount setting per item.
  4. **Proforma Invoice :** This feature is used to provide setting in sending proforma invoice to customer.
  5. **Withholding Tax Slip (Proof of cut) :** This feature is used to provide setting in uploading proof of cut document.&#x20;


# Faspay Xpress

We understand that time and resources are valuable assets to your business. Developing channel payment can sometimes be a challenge for you since it will take both your time and resources, which means more cost. Think of how many channels and banks there are available.

How about using Faspay Xpress? Faspay Xpress was designed to cater to our merchant's need for a single payment page but lacks the resources to make one. All you need to do is connect your API to use to call this payment page. With this feature, whenever you decide to switch on or switch off a channel.

<figure><img src="/files/9aCvaCZqpXZPoomyGCtV" alt=""><figcaption><p>Xpress Transaction Flow</p></figcaption></figure>


# Faspay Xpress 4.0

As for making payments using Faspay Xpress 4.0, there are several payment channel methods such as Virtual Account (VA), Internet Banking, Mobile Banking, Credit Card, E-Money, Online Credit, and also Retail Payment. There are the following steps for payment using the payment method from the Payment Channels.

[>>Preview Faspay Xpress 4.0<<](https://xpress-sandbox.faspay.co.id/v4/post/demo)


# Xpress Settings

On Faspay Xpress you can customize color theme by adjusting the business color. Also, you have an option to enable the additional fee for your customer that making payment through Faspay Xpress. These Settings is accessible on Merchant Page at **Settings -> Profile -> Xpress Settings**

<figure><img src="/files/vR27IeGcRnSSXh6OBxws" alt=""><figcaption></figcaption></figure>

### Setting Fee

On Xpress Settings you can set admin fee that will be charged to your customers. This admin fee only applicable for Faspay Business (Dynamic VA) and Faspay Billing (Dynamic VA/Static VA Close)

#### **Apply Admin Fee**

If you need to charge your customers with admin fees you can enable it by click the toggle button.

* **Yes:** enable admin fees
* **No:** disable admin fees

<figure><img src="/files/0TyWkWic8THVftt5WQSP" alt="" width="369"><figcaption></figcaption></figure>

**Fee Name**

If you enable admin fee, then you can set your fee name.

<figure><img src="/files/xuMXbwSf5J1JrVHoMdoW" alt="" width="563"><figcaption></figcaption></figure>

{% hint style="info" %}
You can't include certain words in Fee Name, such as:

* Transaction
* Trx
* transaksi
  {% endhint %}

**Fee Amount**

Next set the fee amount that will be charged to your customers. If needed you can also include Faspay channel fee on your customer invoice by checklist the Include **Faspay channel fee.**

<figure><img src="/files/w8y3nWejpXvlgvdCEj1R" alt="" width="563"><figcaption></figcaption></figure>

{% hint style="info" %}
The channels fee that applied is based on the [listed channel](#setting-channel-list)v&#x20;
{% endhint %}

#### **Setting Channel List**

You can select specific channels that will be charged to your customer's invoice. To set the list, it can be done on **Xpress Settings** page, set the list on **Channel** fiel&#x64;**.** When customers conduct to make a payment using Faspay Xpress and select one of the listed channel, the channel fee will automatically added to grand total.

<figure><img src="/files/LLSiJuc56KKIzqwMXXMB" alt="" width="563"><figcaption></figcaption></figure>

{% hint style="info" %}
**Select All** will include all of your payment channels that you've been registered for.
{% endhint %}

### Setting Color

Click on **Merchant Color**, then choose the color that you want on color picker for your Faspay xpress page, then click anywhere to close the color picker.

<figure><img src="/files/3rjfOT0vBmX3KWuDIVNt" alt=""><figcaption></figcaption></figure>

If you have finished [setting fee](#setting-fee), and [color ](#setting-color)for your Faspay Xpress page, then click **Save.**

<figure><img src="/files/e4XSmRBXKit9SfFve30P" alt=""><figcaption></figcaption></figure>

The additional fee and channel fee are added to the Grand Total on your customer's outstanding, also the color has been applied on your Faspay Xpress page.

<figure><img src="/files/STQSaXvMHrlzfro4xxxf" alt="" width="188"><figcaption></figcaption></figure>

{% hint style="info" %}
**Grand Total Calculation:**

**Invoice =**  Rp20000

**Additional Fee** = Rp1000

**Channel Fee =** Rp3000

**Grand Total Formula = Invoice+ Additional Fee + Channel Fee**

**Grand Total =** Rp20000 + Rp1000 + Rp3000= **Rp24000**
{% endhint %}

{% hint style="info" %}
You can [contact our sales & partnership teams ](https://faspay.co.id/en/contact-us/)for detailed information about channel fees.
{% endhint %}


# Setting Language

To set the language you can click the toggle button at the right top of the page, as default it will be in English.

<figure><img src="/files/tem0qgW3rKdYewhTg2y6" alt="" width="375"><figcaption></figcaption></figure>


# Payment Method

Here’s a guide to make payment using several payment in Faspay Xpress V4.0.

## Virtual Account

This is guide how to make a payment using Virtual Account.

1. On your order summary click **Choose Payment**, you can also input your WhatsApp number(optional), in case there’s problem with your payment you will be contacted.
2. Select one of the VA payment method, click **Choose.**
3. Click **Pay**. \*If you need to change the payment method, click **Change** before click Pay.
4. Click **Yes** to confirm your payment method.
5. On your Transaction Order Detail you can copy your VA number to finish your payment use your bank account. Quick guide to complete your payment accessible [**here**](/getting-started/faspay-xpress/faspay-xpress-4.0/quick-payment-guide). Then, check your payment status [here](/getting-started/faspay-xpress/faspay-xpress-4.0/payment-status).

<figure><img src="/files/yDTsru6RL3rkwCrjpmbD" alt=""><figcaption></figcaption></figure>

## Internet Banking

This is guide how to make a payment using Internet Banking.

1. On your order summary click **Choose Payment**, you can also input your WhatsApp number(optional), in case there’s problem with your payment you will be contacted.
2. Select one of the Internet Banking payment method, click **Choose.**
3. Click **Pay.** \*If you need to change the payment method, click **Change** before click Pay.
4. Click **Yes** to confirm your payment method.
5. Finish your payment using your internet banking account. Quick guide to complete your payment accessible [**here**](/getting-started/faspay-xpress/faspay-xpress-4.0/quick-payment-guide)**.** Then, check your payment status [here](/getting-started/faspay-xpress/faspay-xpress-4.0/payment-status).

<figure><img src="/files/aSbxRZ9gU3pPXfVDiz9t" alt=""><figcaption></figcaption></figure>

## Mobile Banking

This is guide how to make a payment using Mobile Banking.

1. On your order summary click **Choose Payment**, you can also input your WhatsApp number(optional), in case there’s problem with your payment you will be contacted.
2. Select Mobile Banking payment method, click Choose.
3. Click **Pay.** \*If you need to change the payment method, click **Change** before click Pay.
4. Click **Yes** to confirm your payment method.
5. On your Transaction Order Detail you can copy your VA number to finish your payment on your mobile banking account. Quick guide to complete your payment accessible [**here**](/getting-started/faspay-xpress/faspay-xpress-4.0/quick-payment-guide)**.** Then, check your payment status [here](/getting-started/faspay-xpress/faspay-xpress-4.0/payment-status).&#x20;

<figure><img src="/files/O0ssdAPXmGkgU6WwdT0H" alt=""><figcaption></figcaption></figure>

## Credit Card (CC)

This is guide how to make a payment using Credit Card. On credit card payment method, you can choose between Installment or Full Payment.

1. On your order summary click **Choose Payment,** you can also input your WhatsApp number(optional), in case there’s problem with your payment you will be contacted.
2. Select one of the CC payment method, click **Choose.**
3. Click **Pay.** \*If you need to change the payment method, click **Change** before click Pay.&#x20;
4. Click **Yes** to confirm your payment method.
5. Finish your payment by input the details of your CC account, then click **Pay.** Then, check your payment status [here](/getting-started/faspay-xpress/faspay-xpress-4.0/payment-status).

<figure><img src="/files/yRRufeU5RJ5Yl6hQJ76j" alt=""><figcaption></figcaption></figure>

## E-Money

This is guide how to make a payment using E-Money. For E-Money method, you can choose between redirecting to your E-Money app or using QRIS method.

### E-Money App

1. On your order summary click **Choose Payment,** you can also input your WhatsApp number(optional), in case there’s problem with your payment you will be contacted.
2. Select one of the E-Money payment method, click **Choose.**
3. Click **Pay.** \*If you need to change the payment method, click **Change** before click Pay.
4. Click **Yes** to confirm your payment method.
5. It will automate redirect to your E-Money app, then you can finish your payment using your E-Money account. Then, check your payment status [here](/getting-started/faspay-xpress/faspay-xpress-4.0/payment-status).

<figure><img src="/files/NulJEU4zEgMxiiAPf3Uk" alt=""><figcaption></figcaption></figure>

### QRIS&#x20;

This is guide how to make a payment using QRIS.

1. On your order summary click **Choose Payment,** you can also input your WhatsApp number(optional), in case there’s problem with your payment you will be contacted.
2. Select one of the QR payment method, click **Choose**.
3. Click **Pay.** \*If you need to change the payment method, click **Change** before click Pay.
4. Click **Yes** to confirm your payment method.
5. Finish your payment by scanning the QR code, you can also download the QR code by clicking Download QR. Then, check your payment status [here](/getting-started/faspay-xpress/faspay-xpress-4.0/payment-status).

<figure><img src="/files/PJWuzbTofSdSF8dhB8xw" alt=""><figcaption></figcaption></figure>

## Online Credit

This is guide how to make a payment using Online Credit.

1. On your order summary click **Choose Payment,** you can also input your WhatsApp number(optional), in case there’s problem with your payment you will be contacted.
2. Select one of the Online Credit payment method, click **Choose.**
3. Click **Pay.** \*If you need to change the payment method, click **Change** before click Pay.
4. Click **Yes** to confirm your payment method.
5. Finish your payment using your online credit account. Then, check your payment status [here](/getting-started/faspay-xpress/faspay-xpress-4.0/payment-status).

<figure><img src="/files/3QiJU7fVps1jVkBW3Uoc" alt=""><figcaption></figcaption></figure>

## Retail Payment

This is guide how to make a payment using Retail Payment.

1. On your order summary click **Choose Payment,** you can also input your WhatsApp number(optional), in case there’s problem with your payment you will be contacted.
2. Select one of the Retail Payment method, click Choose.
3. Click **Pay.** \*If you need to change the payment method, click **Change** before click Pay.
4. Click **Yes** to confirm your payment method.
5. On your Transaction Order Detail use the VA number to finish your payment on retail that chosen. Quick guide to complete your payment accessible here. Then, check your payment status [here](/getting-started/faspay-xpress/faspay-xpress-4.0/payment-status).

<figure><img src="/files/EPo0HqZrfiDqCL3GJzvY" alt=""><figcaption></figcaption></figure>


# Quick Payment Guide

You can see a quick guide to complete your payment that shows at your Transaction Order Detail, on How To Pay section.

1. On **How to Pay** section **click** the **dropdown button** on one of the guides.
2. In detail it will show a guide to complete your payment.

<figure><img src="/files/dO3VLuNRLAnv6KwCBg9w" alt="" width="375"><figcaption></figcaption></figure>


# Send your Order Details and Payment Instructions

## Send Order Details and Payment Instructions to Email

You can send your order details and payment instructions to your email following these step:

1. On Transaction Order Detail click **Email.**
2. Input your email address, then click **Submit.**
3. The detail successfully sent to your email.

<figure><img src="/files/hszlxzfUnmmh0mFKge0y" alt="" width="563"><figcaption></figcaption></figure>

4. Here’s your order detail attached with payment instructions in PDF file.

<figure><img src="/files/UqigFLaTwfppUSk6Ntrr" alt=""><figcaption></figcaption></figure>

## Save Order Details and Payment Instructions to PDF File

1. On Transaction Order Detail click **Save to PDF.**

<figure><img src="/files/9YsBkKNtgnBHWGWS4TAS" alt="" width="210"><figcaption></figcaption></figure>

2. PDF file has been successfully downloaded, it contains your order details and payment instructions.

<figure><img src="/files/UKu3wyrDXYBQU1TzmDNi" alt=""><figcaption></figcaption></figure>


# Payment Status

1. Click **I Already Paid** to check your payment status.
2. Will show your payment status, click **Finish Payment** if the status is **Awaiting Payment/Payment in Process.**
3. On Rating Popup you can rate your payment transactions, in details [**here**](/getting-started/faspay-xpress/faspay-xpress-4.0/rating-payment)**.**
4. Shows that your payment has been completed successfully.

<figure><img src="/files/h29KS8e2oRClBxluT2Ny" alt=""><figcaption></figcaption></figure>

5. If your payment is still in progress, it will show **Payment in Process** pag&#x65;**.**

<figure><img src="/files/wU6qgmdDV0E1m5exPm1G" alt="" width="214"><figcaption></figcaption></figure>

6. If the payment fails it will show **Payment Failed** page.

<figure><img src="/files/UivWalg5JpUrJPfEXANx" alt="" width="206"><figcaption></figcaption></figure>

{% hint style="info" %}
There are **4 payment status**, including:

* **Awaiting Payment:** Customer does not complete the payment yet.
* **Payment in Process:** Payment in progress.
* **Payment Successful:** Payment has been completed successfully.
* **Payment Failed:** Payment has failed
  {% endhint %}


# Payment Receipt

On your payment with status success, you can get your payment receipt

1. Click **Share.**
2. Then you can **click** on one of these **Download/Email PDF.**

<figure><img src="/files/2ZNhVxkqiGB0yz6wnQ8Q" alt="" width="375"><figcaption></figcaption></figure>

{% hint style="info" %}
The difference between **Download** and **Email PDF:**

* **Download:** It will automatically save the payment receipt on your device
* **Email PDF:** You need to input your email address, then the receipt will sent to your email
  {% endhint %}

3. Here’s the example of payment receipt that has been downloaded in PDF file.

<figure><img src="/files/QFv0M7cbJA8JKbB5h3Iw" alt=""><figcaption></figcaption></figure>

4. Here’s the example of email, attached with your payment receipt in PDF file.

<figure><img src="/files/kMyAD20xc6wymQqjlD5L" alt=""><figcaption></figcaption></figure>


# Rating Payment

You can rate your transactions that has been completed. There are 2 options:

1. Click **Skip,** if you don’t have any feedback.
2. If you want to give feedback, input your feedback, you can also choose between not satisfied or satisfied, then click **Submit.**

<figure><img src="/files/X2mloaLK4Qa33HbVKp93" alt="" width="375"><figcaption></figcaption></figure>


# Faspay SendMe

The Easy, Secure, and Real Time Disbursement Service to All Banks. Faspay SendMe helps you to disburse funds instantly to all banks across Indonesia by simply embedding our API into your website.

## Start From Here!

<table data-view="cards"><thead><tr><th></th><th></th><th></th><th data-hidden data-card-target data-type="content-ref"></th></tr></thead><tbody><tr><td></td><td>Introduction</td><td></td><td><a href="/pages/-MKpEbgvurPy_p77Y7uN">/pages/-MKpEbgvurPy_p77Y7uN</a></td></tr><tr><td></td><td>Credentials</td><td></td><td><a href="/pages/-MKpEldDrod0THNvX-WZ">/pages/-MKpEldDrod0THNvX-WZ</a></td></tr><tr><td></td><td>List of Service API</td><td></td><td><a href="/pages/-MKpF66ZGkvQebSjqkAW">/pages/-MKpF66ZGkvQebSjqkAW</a></td></tr><tr><td></td><td>Authentication</td><td></td><td><a href="/pages/-MKpH1wqcs0HqB2RfuNV">/pages/-MKpH1wqcs0HqB2RfuNV</a></td></tr></tbody></table>

## Features of SendMe

Get to know more about SendMe features [here.](/merchant-page-reference/faspay-sendme)

<table data-view="cards"><thead><tr><th></th><th></th><th></th><th data-hidden data-card-target data-type="content-ref"></th></tr></thead><tbody><tr><td></td><td>Cash Out</td><td></td><td><a href="/pages/szJKGVlfeqkNQYGC3dQt">/pages/szJKGVlfeqkNQYGC3dQt</a></td></tr><tr><td></td><td>E-Wallet</td><td></td><td><a href="/pages/yK2byQmeMmI0ED4W05Ze">/pages/yK2byQmeMmI0ED4W05Ze</a></td></tr></tbody></table>


# Introduction

Faspay SendMe(Disbursement) is one of Faspay's products that help you to disburse money across all the Banks in Indonesia instantly using our automated API services with 24/7 hour suppor&#x74;**.** Faspay Disbursement also helps you avoid human errors caused by manual processes or struggles using multi-bank accounts.

<figure><img src="/files/qxo4tcrM3RbPbJO7x8cw" alt=""><figcaption><p>Flow SendMe (Disbursement) Transaction</p></figcaption></figure>


# Credentials

If want use account service, partner’s use 6 credential ID from Faspay :

* Faspay Key
* Faspay Secret
* App Key
* App Secret
* Client Key (generated)
* Client Secret (generated)
* IV

{% hint style="info" %}
&#x20;**The credential will given by faspay when the partner is in the integration stage.**
{% endhint %}


# List Of Service API

The endpoint SendMe can be accessed with the following details:

URL Dev: **<https://sendme-sandbox.faspay.co.id>**

URL Prod: **<https://sendme.faspay.co.id>**

<table><thead><tr><th width="121.33333333333331">Method</th><th width="346">Endpoint URL</th><th>Service Name</th></tr></thead><tbody><tr><td><strong>GET</strong></td><td>/account/api/tokens</td><td> <strong>Get access token</strong></td></tr><tr><td><strong>POST</strong></td><td>/account/api/register</td><td> <strong>Registration account</strong></td></tr><tr><td><strong>POST</strong></td><td>/account/api/register/confirm</td><td> <strong>Confirm registration account</strong></td></tr><tr><td><strong>POST</strong></td><td>/account/api/transfer</td><td> <strong>Transfer account to account</strong></td></tr><tr><td><strong>GET</strong></td><td>/account/api/inquiry_name/&#x3C; va_partner >/&#x3C; va_number ></td><td> <strong>Inquiry name</strong></td></tr><tr><td><strong>GET</strong></td><td>/account/api/balance_inquiry/&#x3C; va_partner ></td><td> <strong>Inquiry balance</strong></td></tr><tr><td><strong>GET</strong></td><td>/account/api/account_mutasi/&#x3C; va_partner >/&#x3C; start_date >/&#x3C; end_date ></td><td> <strong>Mutasi account</strong></td></tr><tr><td><strong>GET</strong></td><td>/account/api/inquiry_status/&#x3C; virtual_account >/&#x3C; trx_no >/&#x3C; trx_id ></td><td> <strong>Inquiry status transaction</strong></td></tr><tr><td></td><td>*trx id optional, if inquiry without trx_id :</td><td></td></tr><tr><td><strong>GET</strong></td><td>/account/api/inquiry_status/&#x3C; virtual_account >/&#x3C; trx_no ></td><td> <strong>Inquiry status transaction</strong></td></tr></tbody></table>


# Authentication


# Header

To access all the services you’ll need the access token, to get the access token, you need to be generated header authorization by faspay\_secret, app\_key, app\_secret with encrypt method rule : AES 256 and for security Header you can generate with some parameter like below :

<table><thead><tr><th width="288">Key</th><th>Value</th></tr></thead><tbody><tr><td><strong>Faspay-Key</strong></td><td>Provide by faspay</td></tr><tr><td><strong>Faspay-Timestamp</strong></td><td>datetime (Y-m-d H:i:s)</td></tr><tr><td><strong>Faspay-Signature</strong></td><td>Signature please refer to signature section</td></tr><tr><td><strong>Faspay-Authorization</strong></td><td> Encrypt method : AES 256 (<strong>FASPAY_SECRET:APP_KEY:APP_SECRET</strong>)</td></tr><tr><td><strong>Content-Type</strong></td><td>application/json</td></tr></tbody></table>


# Authorization

This part will explain how Faspay account use encrypt method AES 256 for authorization.

Example

* String data that will be encrypted -> **$plaintext = "APP\_KEY:APP\_SECRET";**

* Algorithm used for encryption -> **$algo = "aes256";**

* The Key used for encryption -> **faspay\_secret** (generated by Faspay) Step for encrypted **the key** :

  1. Hashing key uses the sha 256 algorithm and its output is raw binary data.
  2. Then, taken 32 characters from the front. Ex : $password = substr(hash('sha256', $key, true), 0, 32);

* **IV** for encryption (generated by faspay) Step for encrypted IV :

  1. Hashing IV uses the md5 algorithm.
  2. Then taken 16 characters from behind. Ex : $iv = substr(md5($key.self::$iv), -16);

* Encryption using openssl by including **the plaintext, algo, password and iv** for the encryption process, and encryption output is binary raw data. $encrypted = openssl\_encrypt($plaintext, $algo, $password, OPENSSL\_RAW\_DATA, $iv);

* the encryption results are re-encrypted using the base64 encode method to make lowercase hexits. **$base64 = base64\_encode($encrypted);**


# Signature

Signature is used by Faspay to verify that your request is not altered by attackers. The signature process use format as follows :

{% hint style="info" %}
&#x20;**SHA-256 HMAC is used to generate the signature with your API secret as the key**
{% endhint %}


# Generate signature token

To generate signature token, you can use this formula :

* **Signature** = encrypt method rule HMAC(StringToSign, faspay\_secret)

<table><thead><tr><th width="225">Parameter</th><th>Type</th></tr></thead><tbody><tr><td><strong>method</strong></td><td>GET</td></tr><tr><td><strong>path</strong></td><td>define URL service that will be used (list of service)</td></tr><tr><td><strong>timestamp</strong></td><td>datetime (Y-m-d H:i:s). Sample : 2018-10-09 14:24:00</td></tr><tr><td><strong>token</strong></td><td>base64_encode <strong>(CLIENT_KEY:CLIENT_SECRET)</strong></td></tr><tr><td><strong>request_body</strong></td><td>for this service, set <strong>request body</strong> to empty string</td></tr><tr><td><strong>StringToSign</strong></td><td>" [method]:[path]:[timestamp]:[access_token]:[request_body]"</td></tr><tr><td></td><td>*) without [] and ""</td></tr><tr><td> <strong>faspay_secret</strong></td><td>will given by faspay</td></tr></tbody></table>


# Generate signature other service

To generate another service on Faspay account you can use that format below :

* **Signature** = encrypt method rule HMAC (StringToSign, faspay\_secret)

<table><thead><tr><th width="214">Parameter</th><th>Type</th></tr></thead><tbody><tr><td><strong>method</strong></td><td>POST / GET(based on service API)</td></tr><tr><td><strong>path</strong></td><td>define URL service that will be used (list of service API)</td></tr><tr><td><strong>timestamp</strong></td><td>datetime (Y-m-d H:i:s). Sample : 2018-10-09 14:24:00</td></tr><tr><td><strong>token</strong></td><td>base64_encode <strong>(CLIENT_KEY:CLIENT_SECRET:ACCESS_TOKEN)</strong></td></tr><tr><td></td><td> <strong>AccessToken</strong> is a token that is already owned by the partner in accordance with the service token that will be used</td></tr><tr><td><strong>request_body</strong></td><td> for this service, set <strong>request body</strong> to empty string</td></tr><tr><td><strong>StringToSign</strong></td><td>"[method]:[path]:[timestamp]:[access_token]:[request_body]"</td></tr><tr><td></td><td>*) without [] and ""</td></tr><tr><td><strong>faspay_secret</strong></td><td>will given by faspay</td></tr></tbody></table>


# HTTP Method

* HTTP Method is HTTP Method such as GET, POST, PUT, PATCH, DELETE.
* HTTP Method must be given in upper case


# Relative URL

* Relative URL is the URL after the hostname & port number.
* Relative URL also includes the query string and must begin with a slash character, example :

<table><thead><tr><th width="367">Full URL</th><th>Relative URL</th></tr></thead><tbody><tr><td><a href="https://example.com/account/api/tokens">https://example.com/account/api/tokens</a></td><td> <strong>/account/api/tokens</strong></td></tr><tr><td><strong>https://example.com or https://example.com/</strong></td><td> <strong>/</strong></td></tr></tbody></table>

Relative URL must be URI-encoded according to the following rules:

* Do not URI-encode forward slash ( / ) if it was used as path component.
* Do not URI-encode question mark ( ? ), equals sign ( = ), and ampersand ( & ) if they were used as query string component: as separator between the path and query string, between query parameter and its value, and between each query parameter and value pairs.
* Do not URI-encode these characters: A-Z, a-z, 0-9, hyphen ( - ), underscore ( \_ ), period ( . ), and tilde ( \~ ) which are defined as unreserved characters in RFC 3986.
* Percent-encode all other characters not meeting the above conditions using the format: %XY, where X and Y are hexadecimal characters (0-9 and uppercase A-F). For example, the space character must be encoded as %20 (not using ’+’, as some encoding schemes do) and extended UTF-8 characters must be in the form %XY%ZA%BC.

The query string parameters must be re-ordered according to the following rules:

* Sorted by parameter name lexicographically
* If there are two or more parameters with the same name, sort them by parameter values.


# Request Body

* RequestBody need to be hashed with AES-256.
* If the RequestBody is empty, set it to empty string.
* The request body is performed according to the following rules:

  a. Remove characters '\r', '\n', '\t' dan space

  b. hashing with algorithm encrypt method rule (AES 256)

  c. Change to UPPERCASE


---

[Next Page](/llms-full.txt/1)