# Upload Document

Document Upload is a feature available on the Billing List menu and is used to store supporting documents related to invoices made. The following are the steps to upload a document:

## Guide

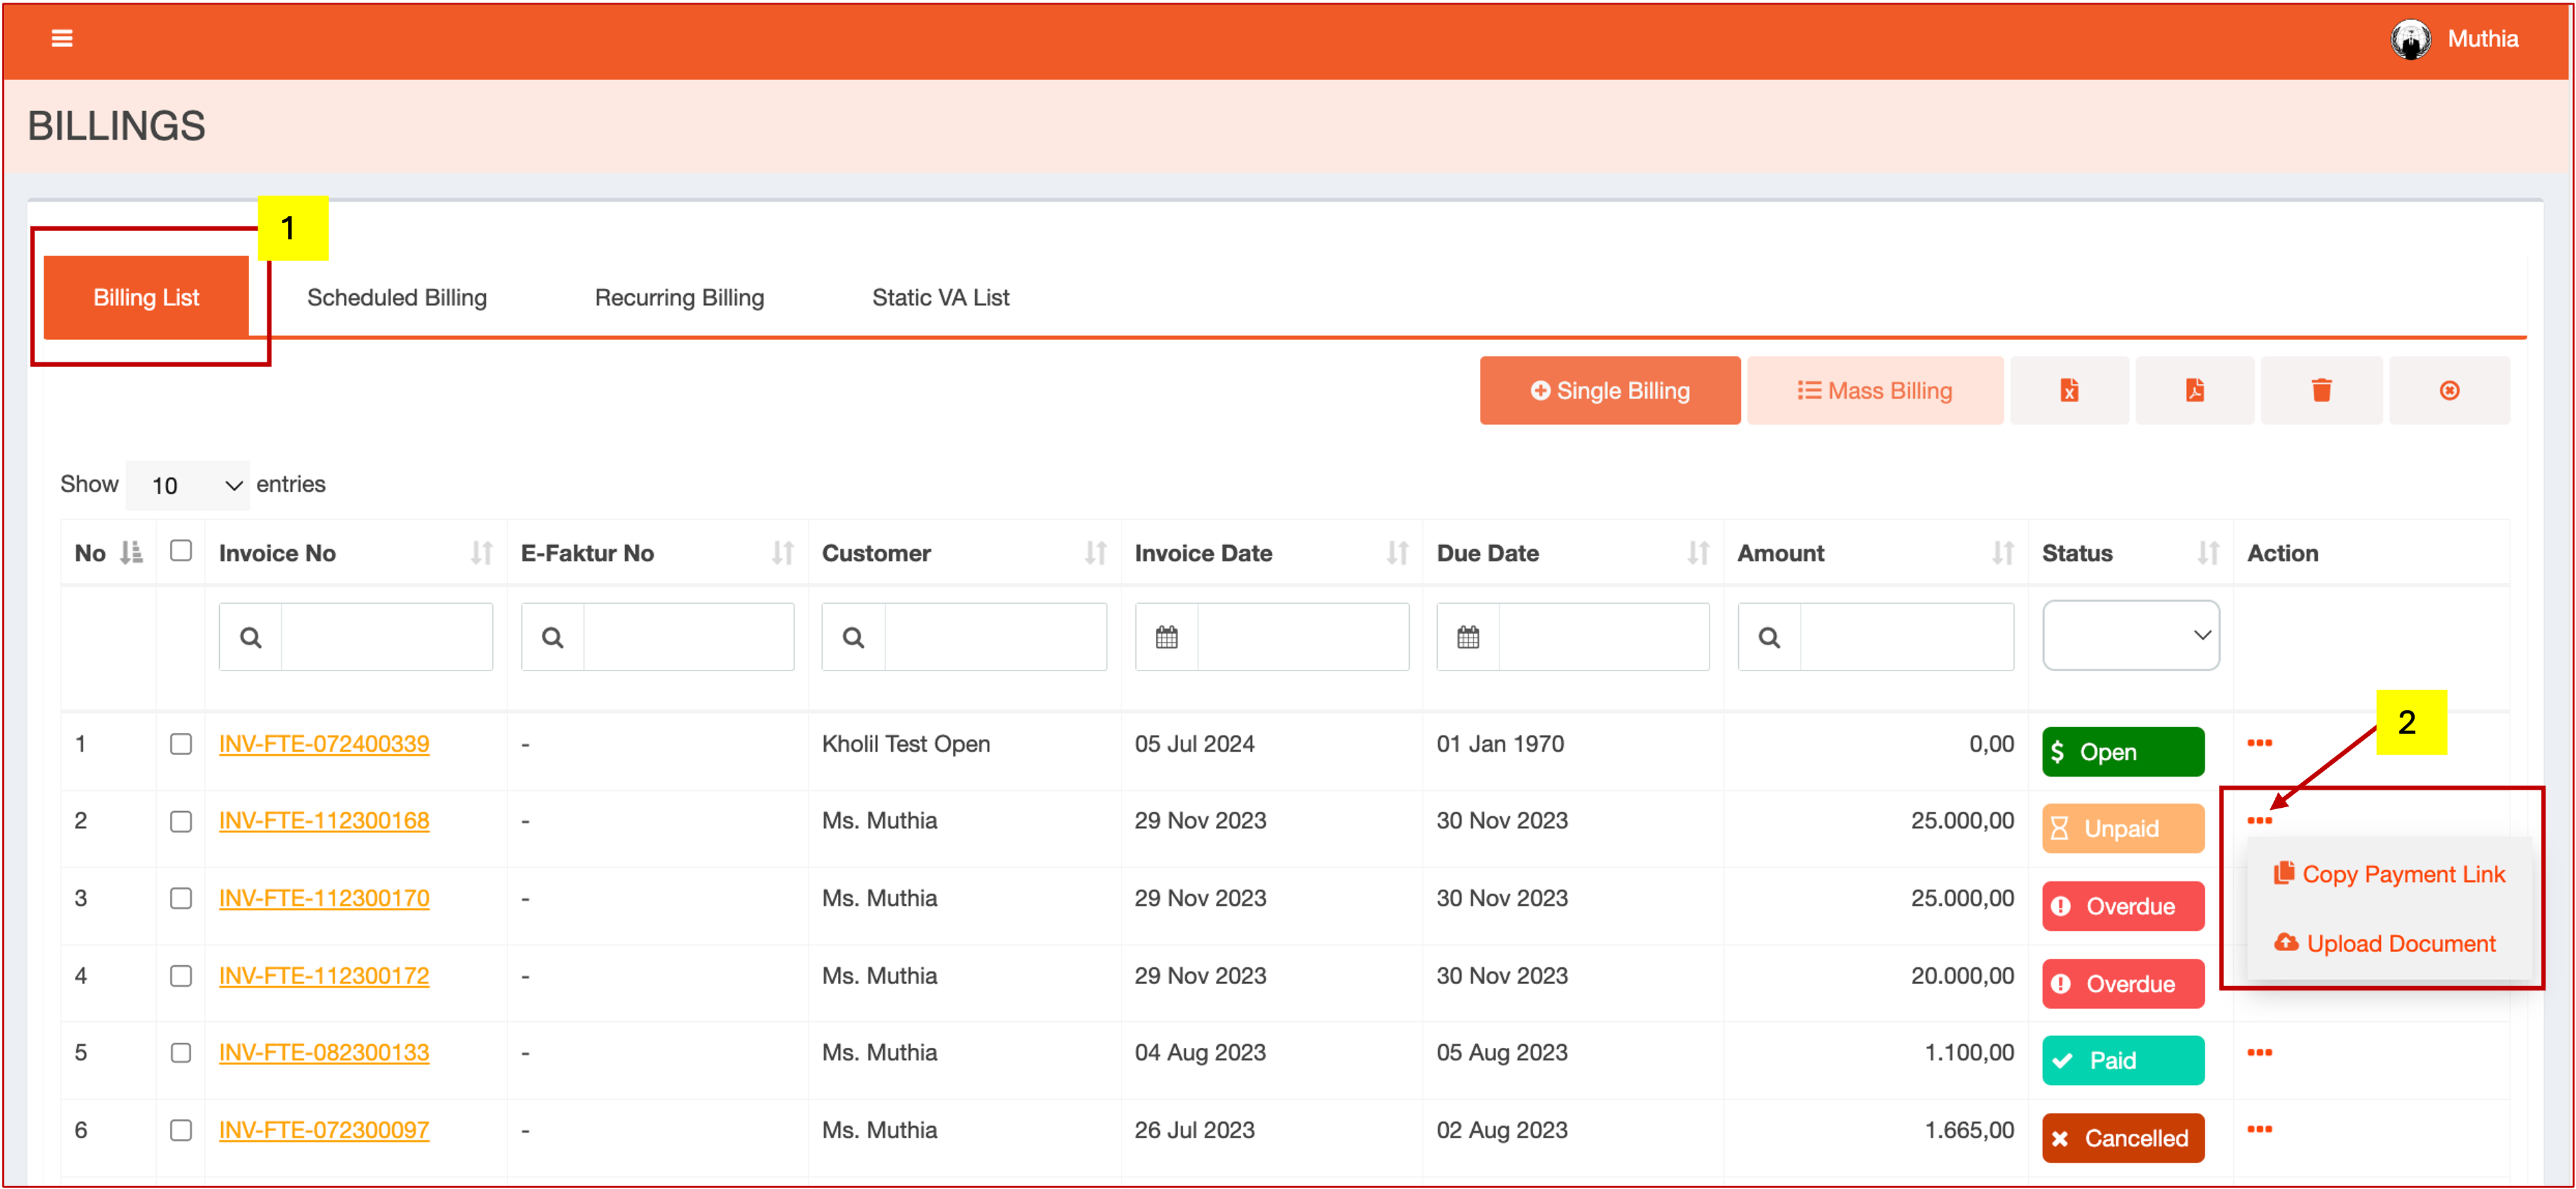
1. On the Billing List Menu page, select one of the invoices and click the three dots in the actions column to open the options. Next, click "**Upload Document**".

<figure><img src="/files/PEaVkY0eQi5Ro1l0MJXL" alt=""><figcaption></figcaption></figure>

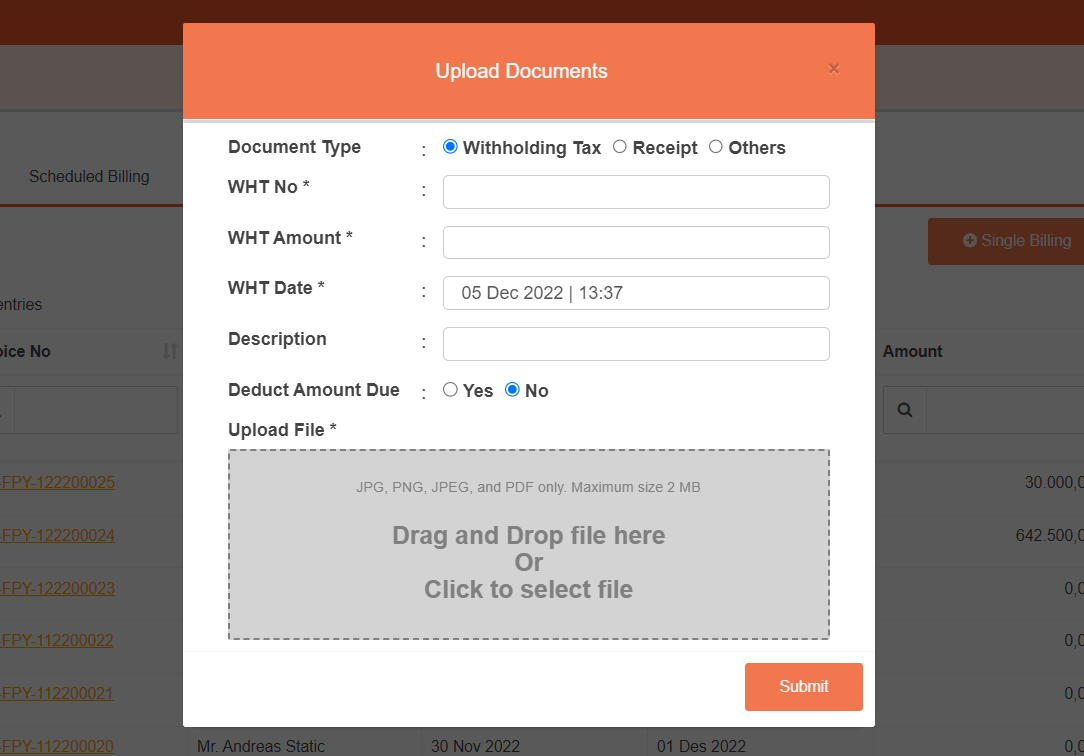
1. The pop-up "**Upload Documents**" form will be displayed. Drop the file and fill in the required fields related to the document to be uploaded.

<figure><img src="/files/Aa1oIpTiLrr2PtJd0QMG" alt="" width="375"><figcaption><p>Upload Documents Form</p></figcaption></figure>

**Field Parameter Upload Documents Form**

| Field                                              | Description                                                                               |
| -------------------------------------------------- | ----------------------------------------------------------------------------------------- |
| Document Type                                      | Types of document uploaded                                                                |
| <p>WHT No\*</p><p>(Withholding Tax Number)</p>     | Withholding Tax Number                                                                    |
| <p>WHT Amount\*</p><p>(Withholding Tax Amount)</p> | Total Withholding Tax                                                                     |
| <p>WHT Date\*</p><p>(Withholding Tax Date)</p>     | Withholding Tax Date                                                                      |
| Description                                        | Description of uploaded document                                                          |
| Deduct Amount Due                                  | Option, whether the WHT entered directly reduces the number of invoices to be paid or not |

{% hint style="info" %}
**Notes:**

1. Document Type:
   * Withholding Tax (this radio button will appear if, the check in the billing setting withholding tax is available).&#x20;
   * The "WHT No", "WHT Amount", "**WHT Date**", and "**Deduct Amount**" fields are available if the user selects the **Withholding Tax** document type.
   * Deduct amount due:
     1. If Yes, then you will cut the outstanding amount on the invoice.
     2. If No, do not deduct the outstanding amount in the invoice, only the attachment in the supporting document/ as an archive.

2. Format Document:
   * JPG, PNG, JPEG, and PDF format only.
   * Maximum size 2MB.

3. Invoices with all statuses can be uploaded documents.
   {% endhint %}

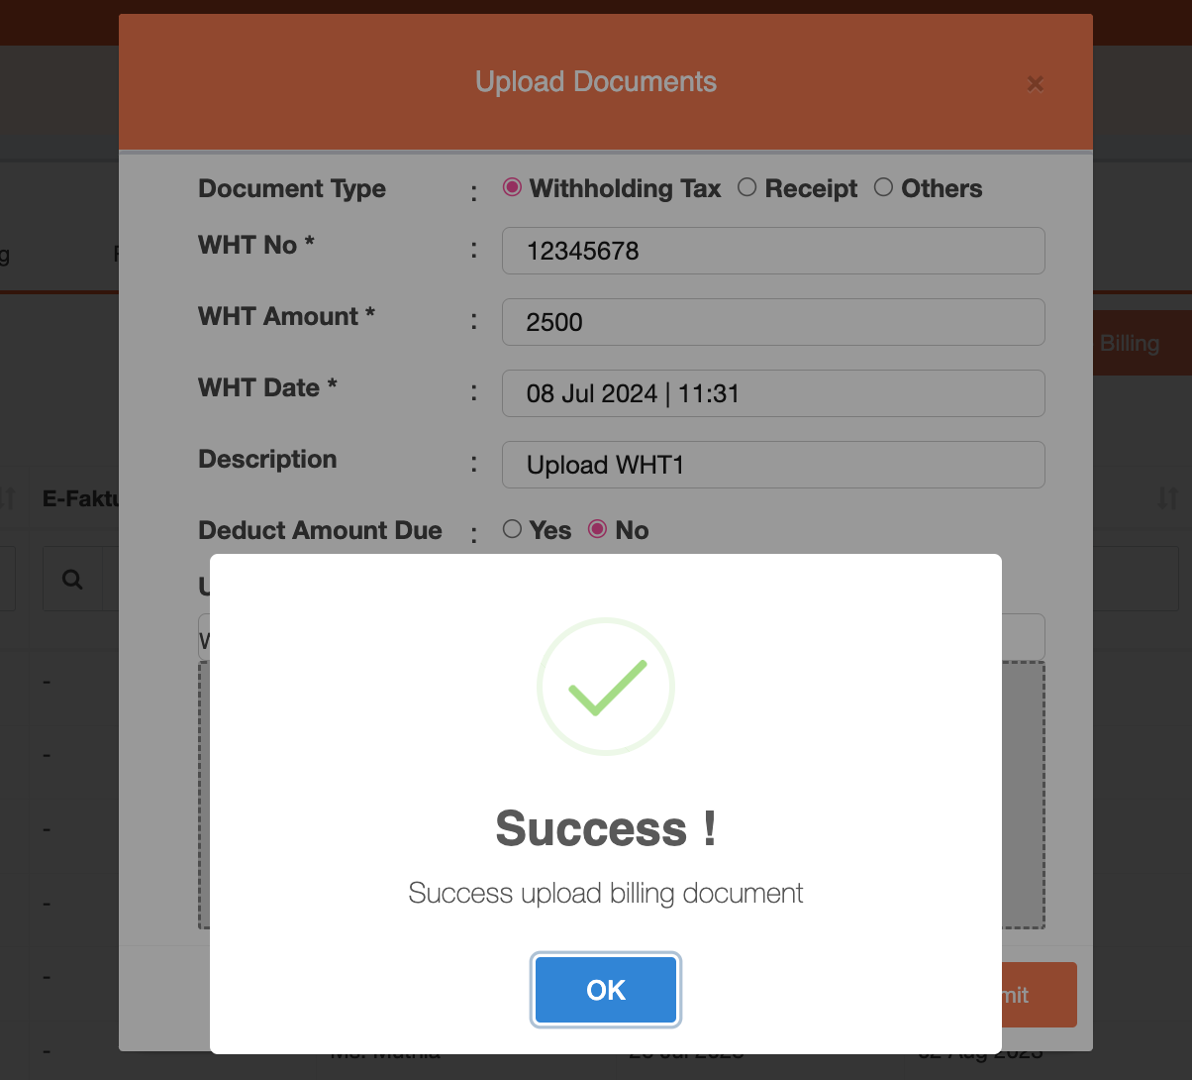
4. The following is an example of uploading a document.

### **Withholding Tax**

* Input the uploaded document data and click "**Submit**”.
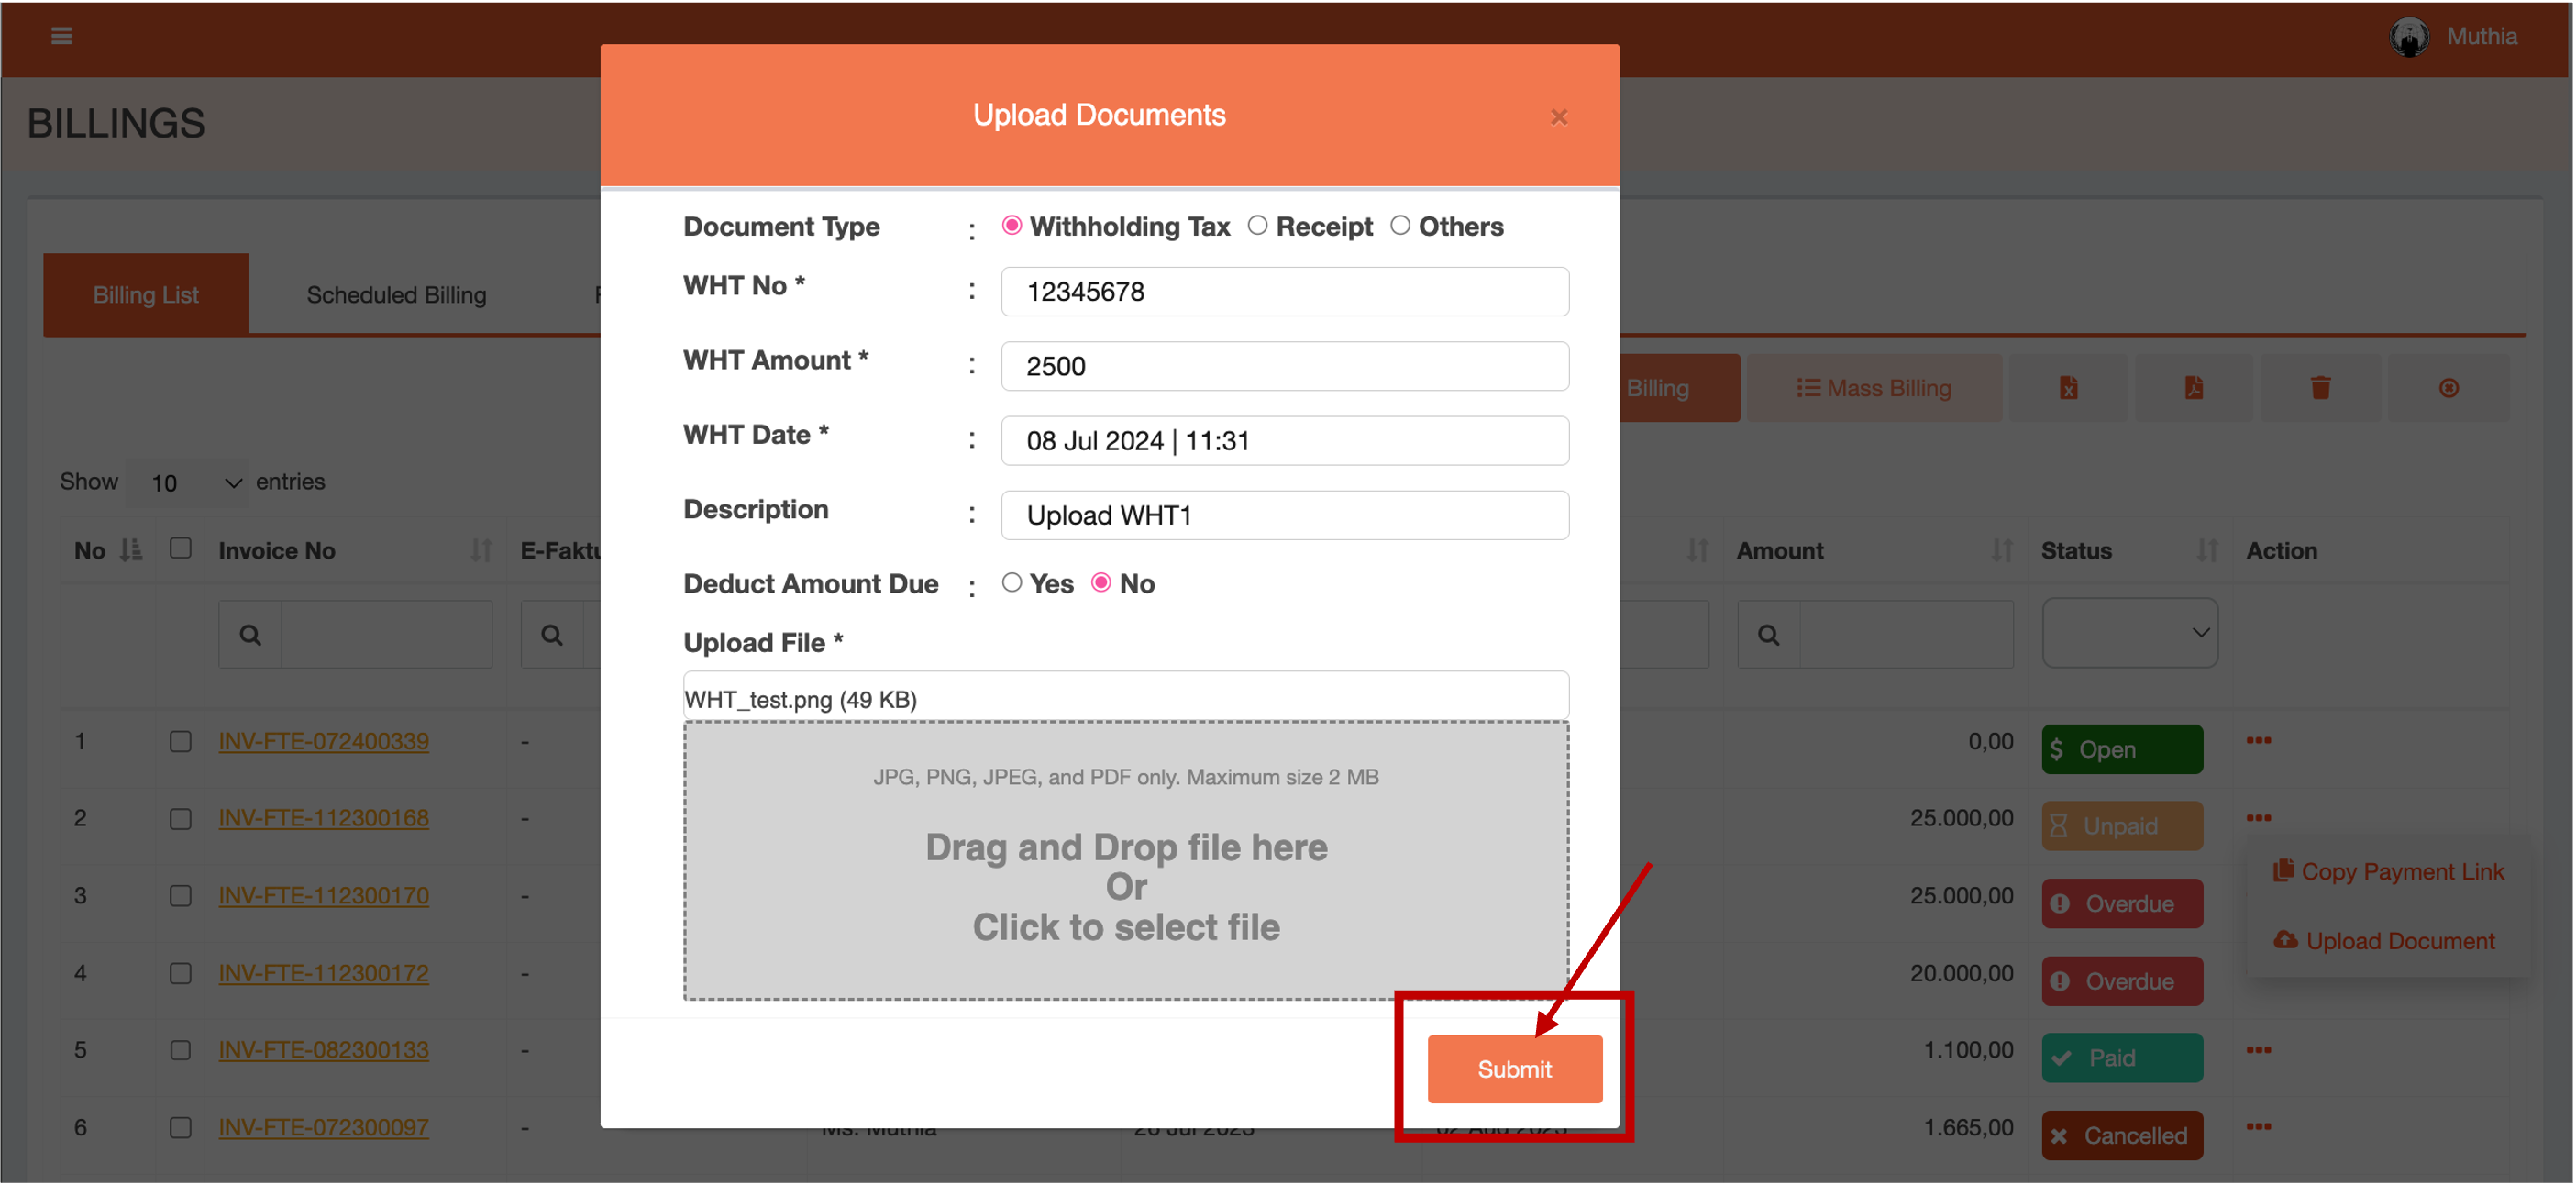
<figure><img src="/files/I8o3TmEUIiz4CFsjuVeK" alt=""><figcaption><p>Upload Documents</p></figcaption></figure>

* Next, it will display a Success Uploads billing document notification message that, clicks "**OK**" button to continue the process.

<figure><img src="/files/9b9UXBIc8bN2C5gsWysQ" alt=""><figcaption><p>Success Notification Message</p></figcaption></figure>

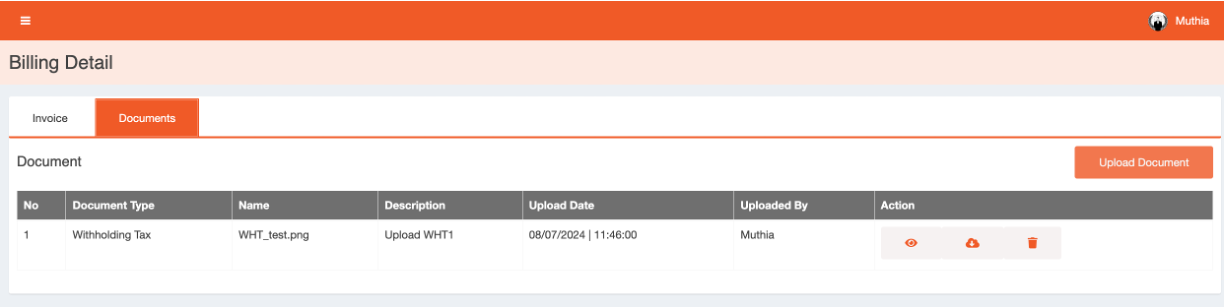
* Next, click the Invoice number on the Billing List Page to see the result of the document that was successfully uploaded.

<figure><img src="/files/MmZX8MEphBCN0XxTFfN1" alt=""><figcaption><p>Documents Page </p></figcaption></figure>

| Button                                      | Description               |
| ------------------------------------------- | ------------------------- |
| ![](/files/SG3L0sS7H6hF1pvCTlKC)  (View)    | To view a document        |
| ![](/files/LOPQnUbohB4wyWPuJzIb) (Download) | To download document data |
| ![](/files/2JztyAqlaLr99cjSQctN)  (Delete)  | To delete a document      |

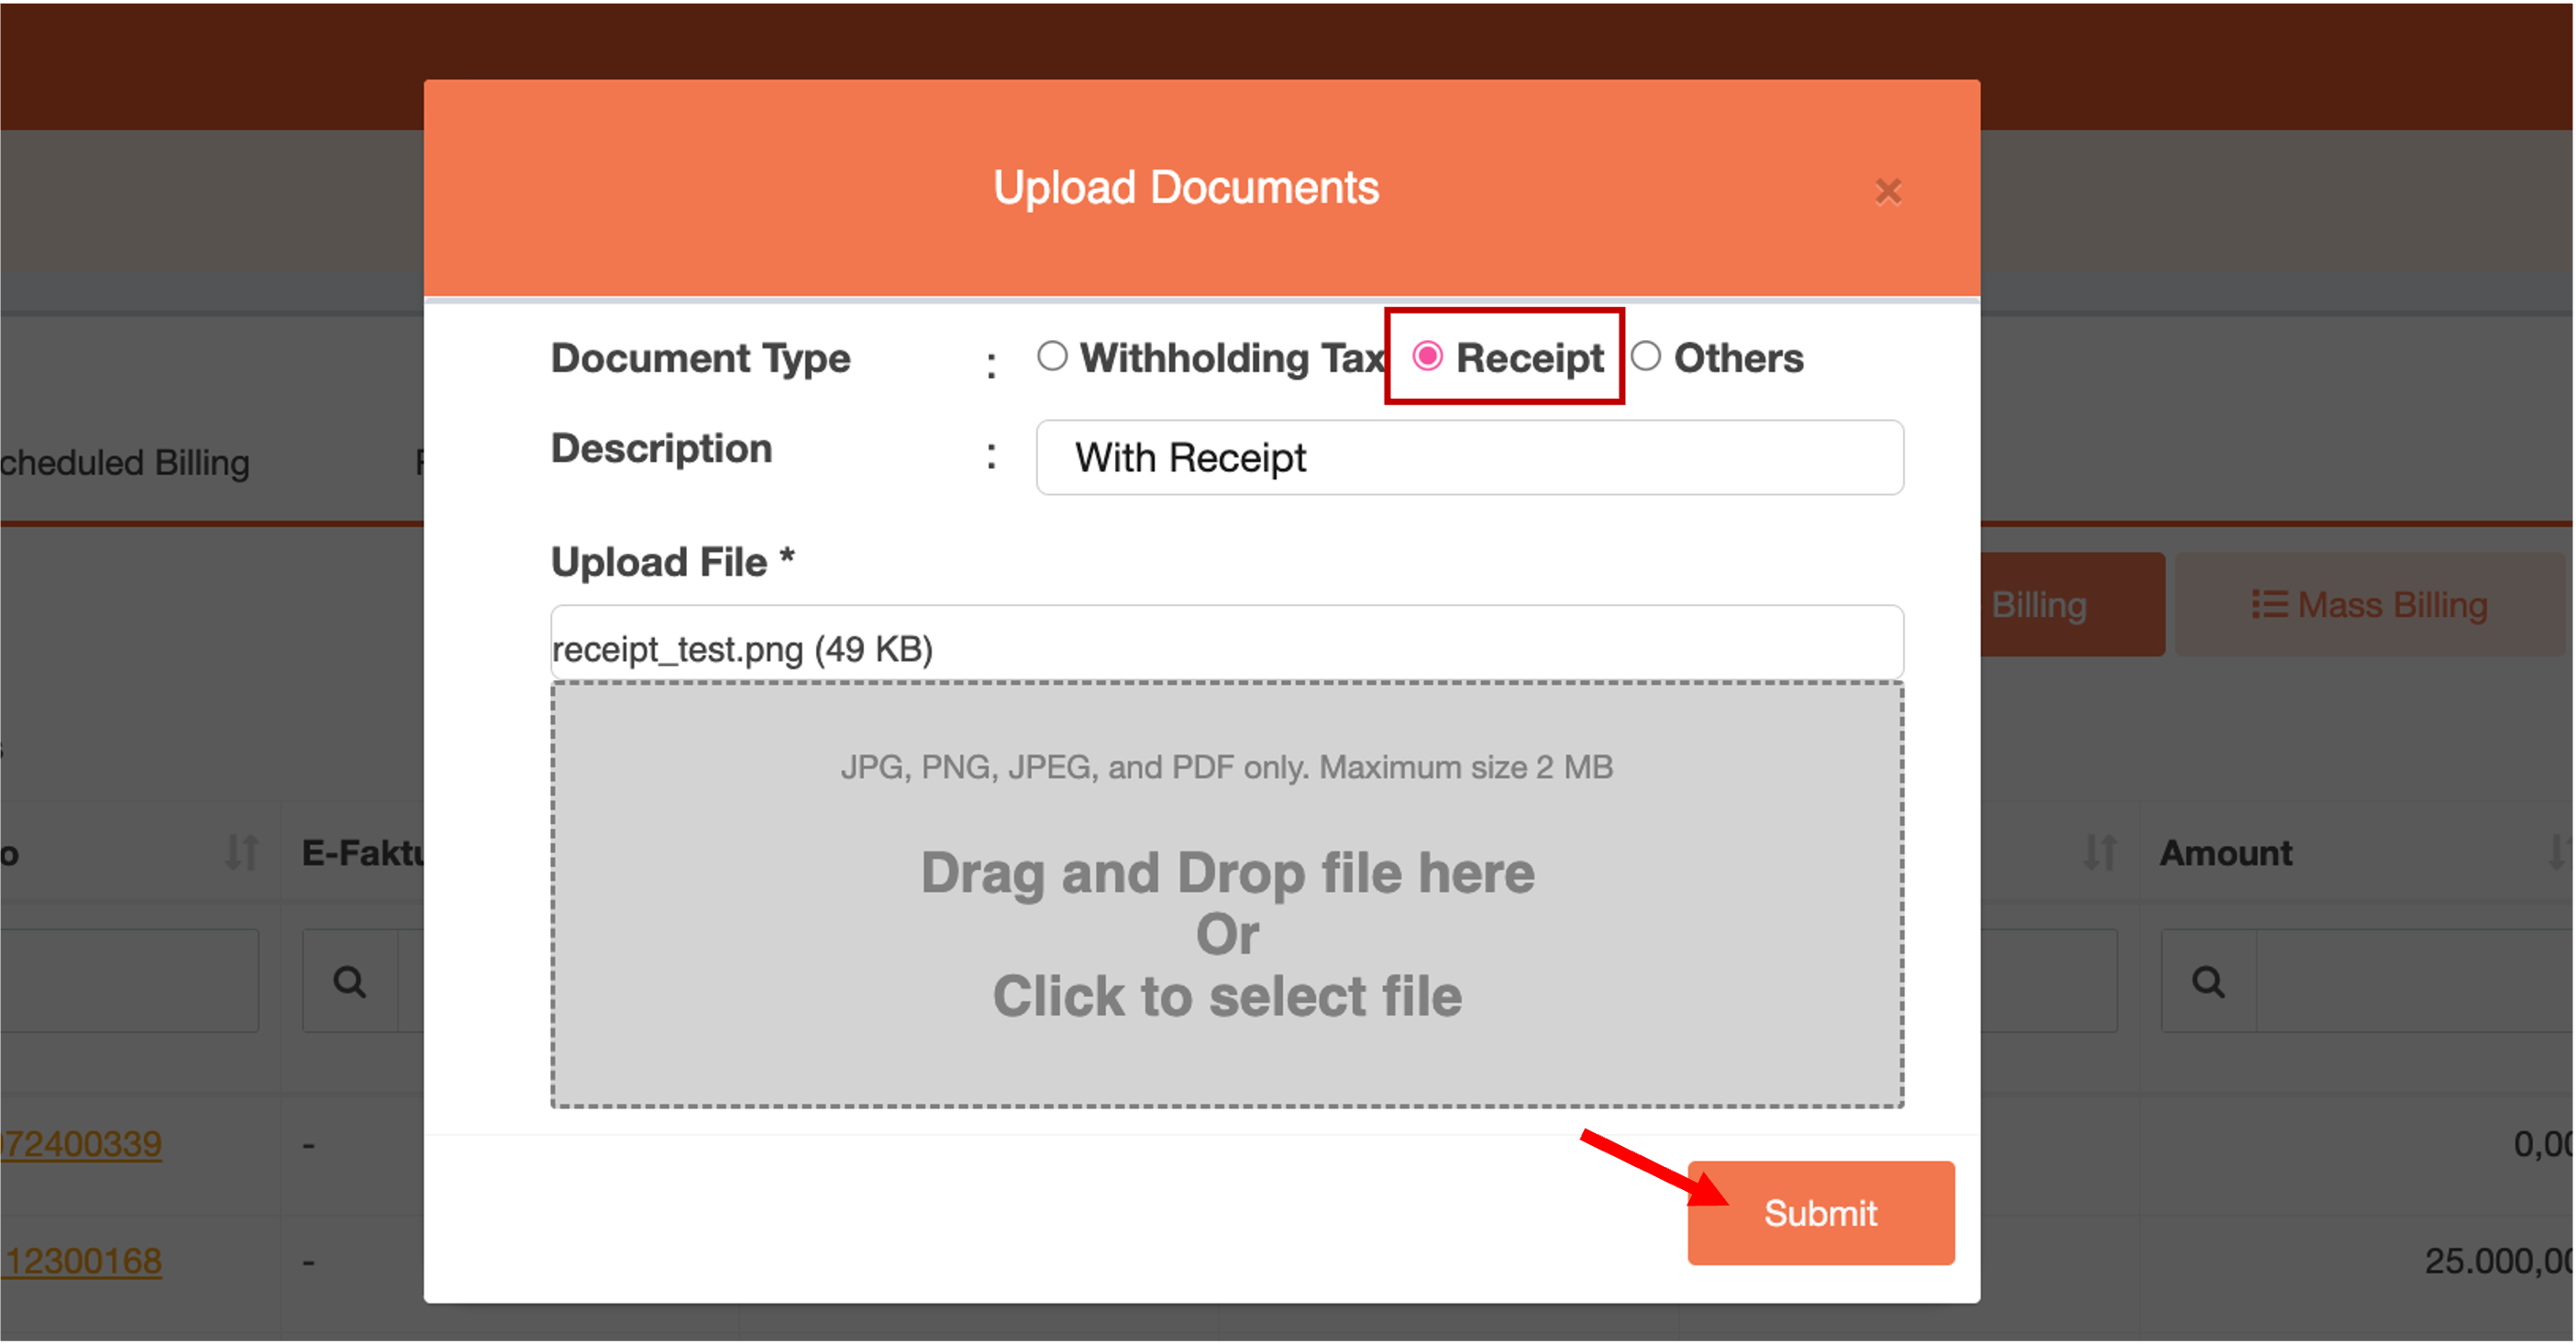
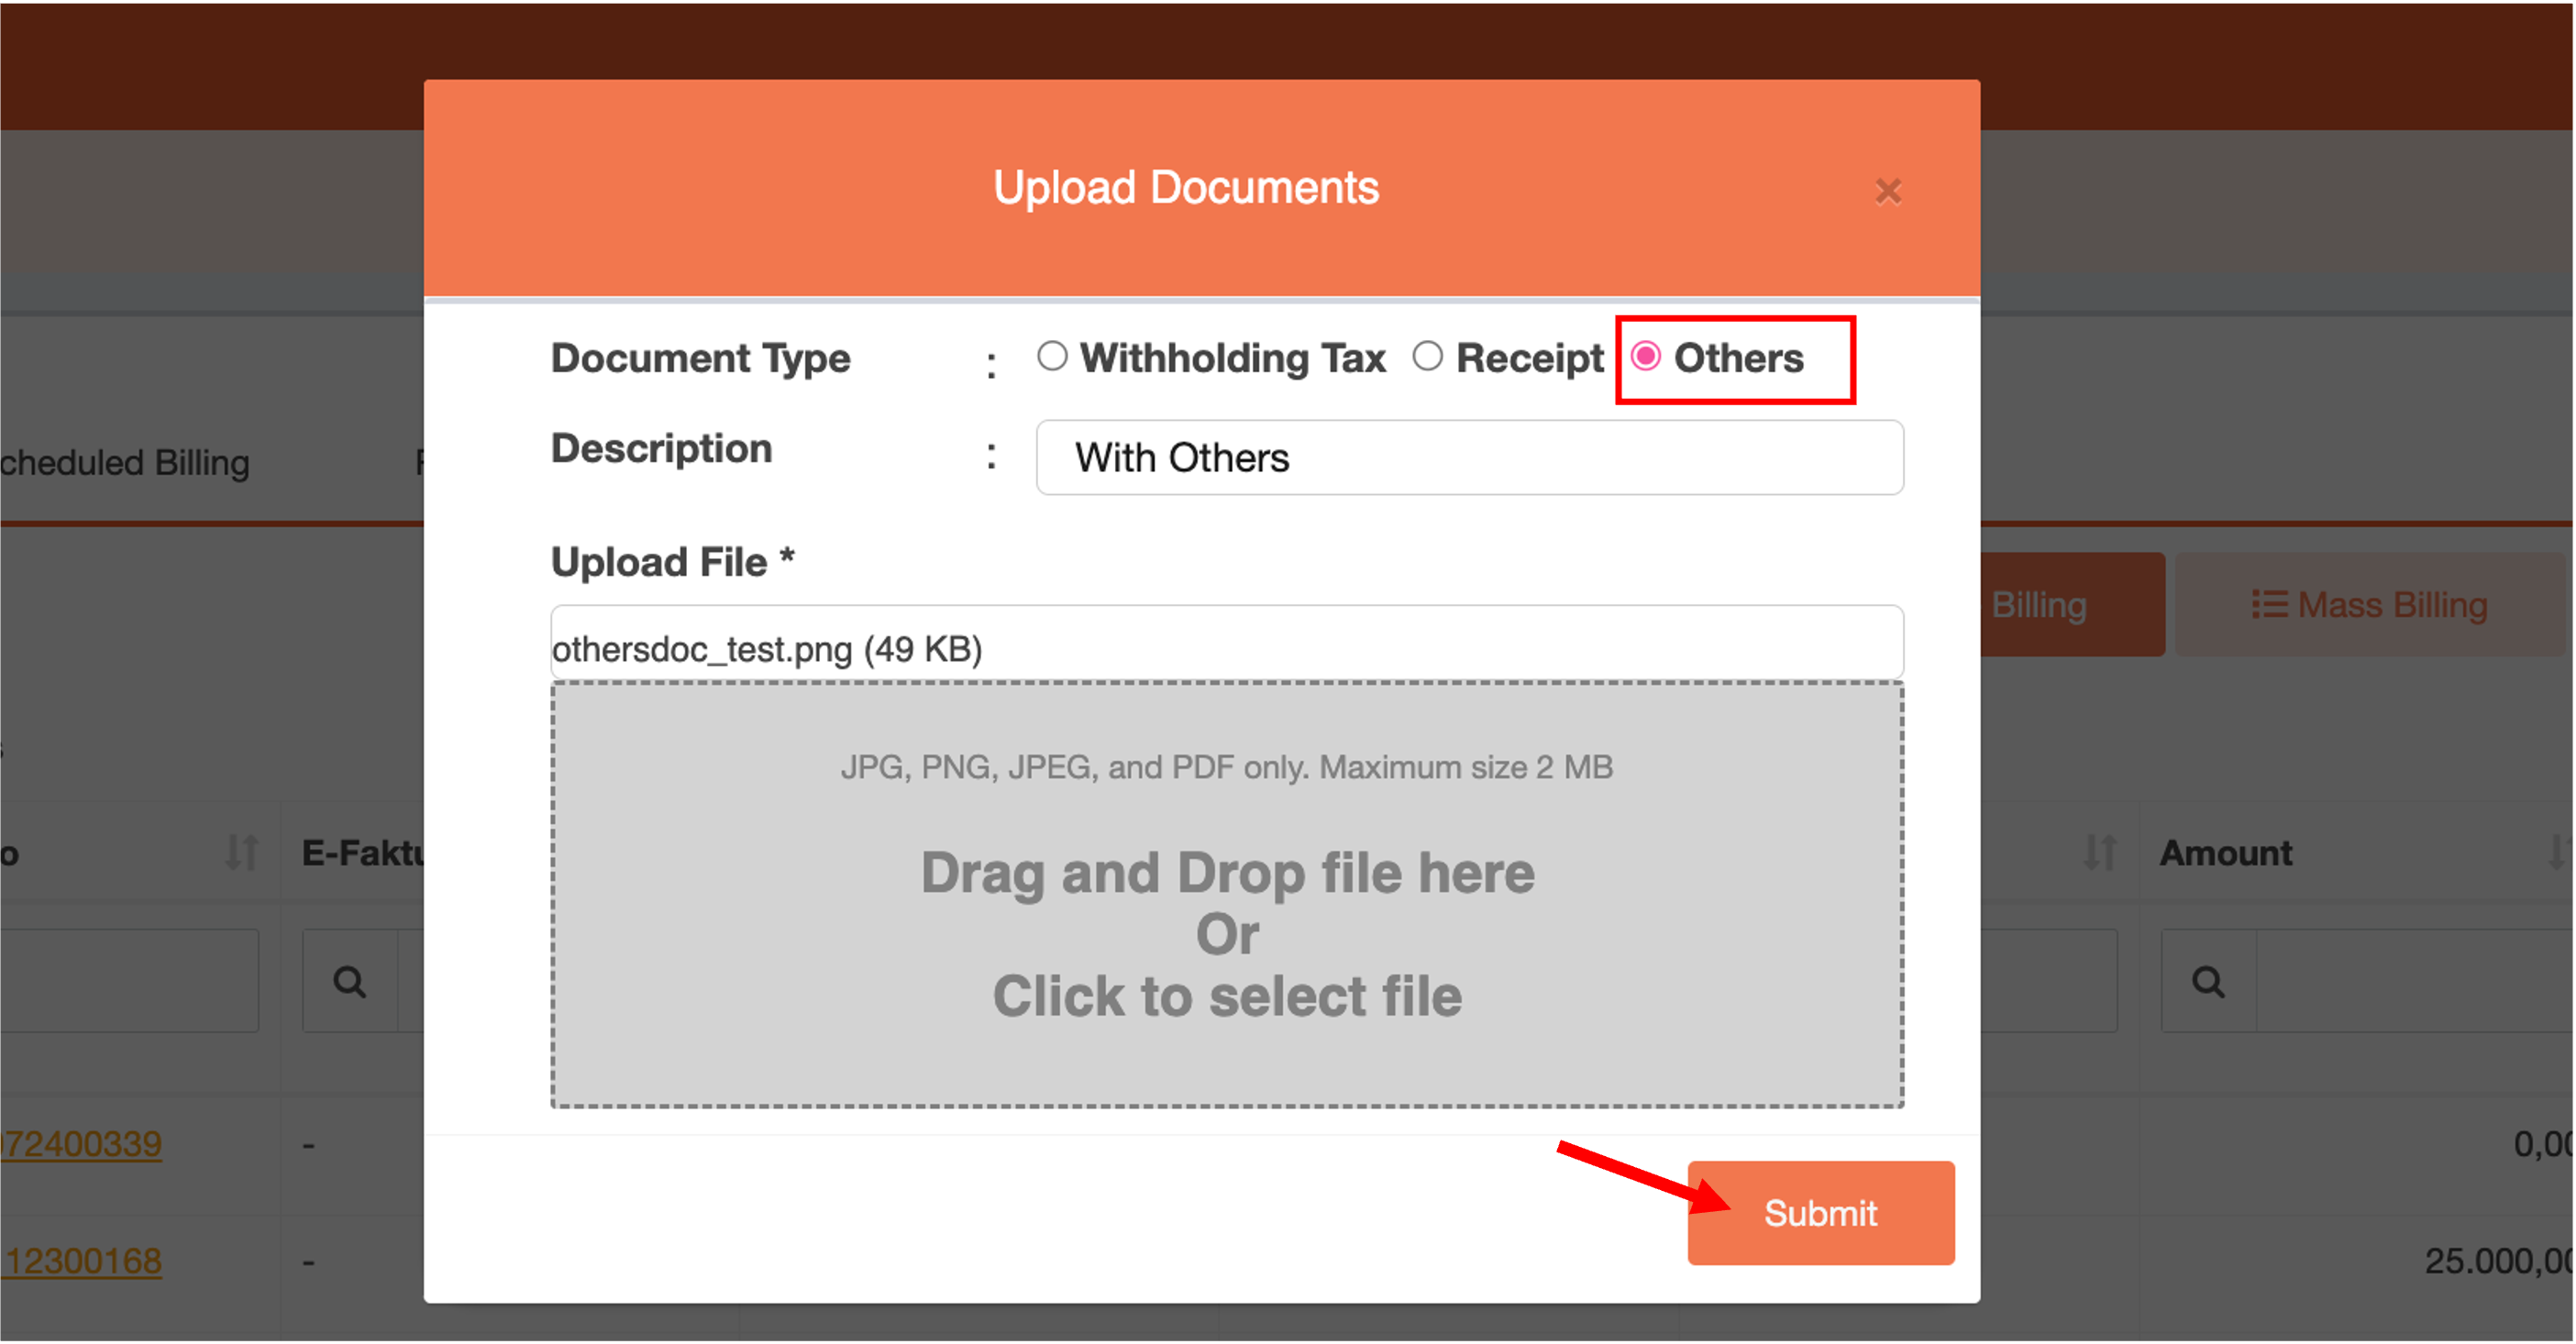
### **Receipt & Others**

* Input the uploaded document data and click the **"Submit”** button.

<figure><img src="/files/WwkZA10x8EFfIaR7kRt2" alt=""><figcaption><p>Receipt Documents</p></figcaption></figure>

<figure><img src="/files/zWWRsYXq6IBHae0z1a5m" alt=""><figcaption><p>Others Documents</p></figcaption></figure>

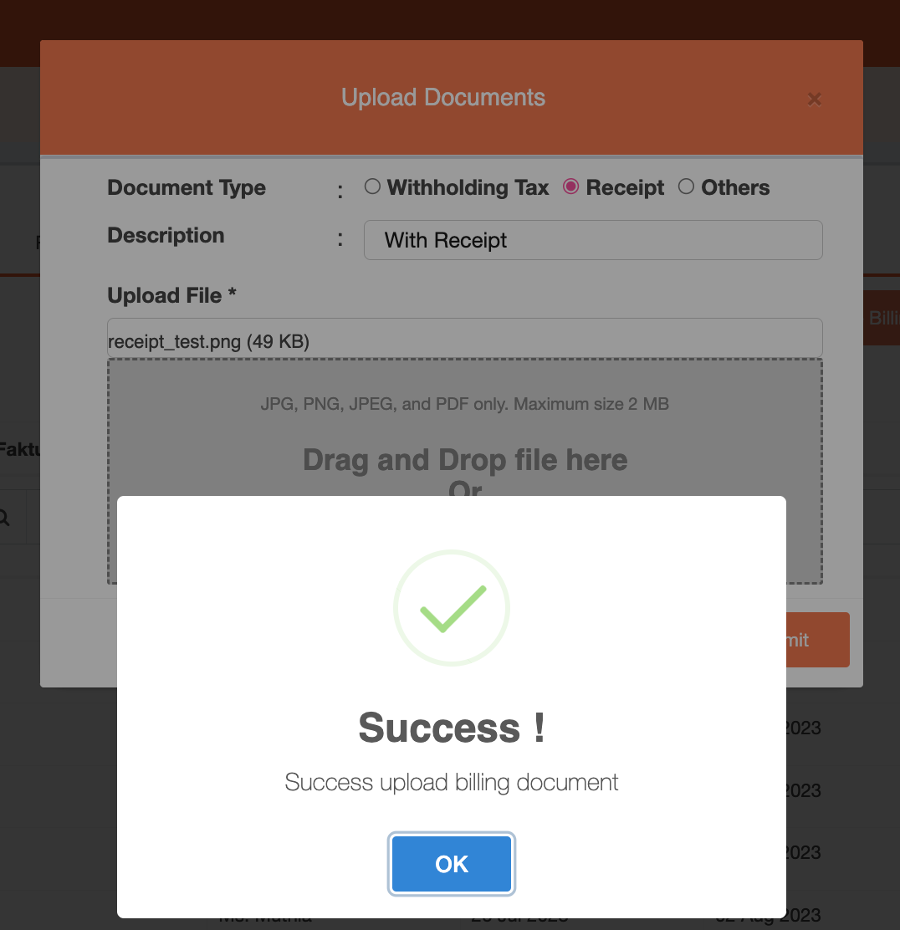
* Next, it will display a Success Uploads billing document notification message that, clicks "**OK**" button to continue the process.

<figure><img src="/files/R5ohqDWrkumFZfFhl2XR" alt=""><figcaption><p>Success Notification Messages</p></figcaption></figure>

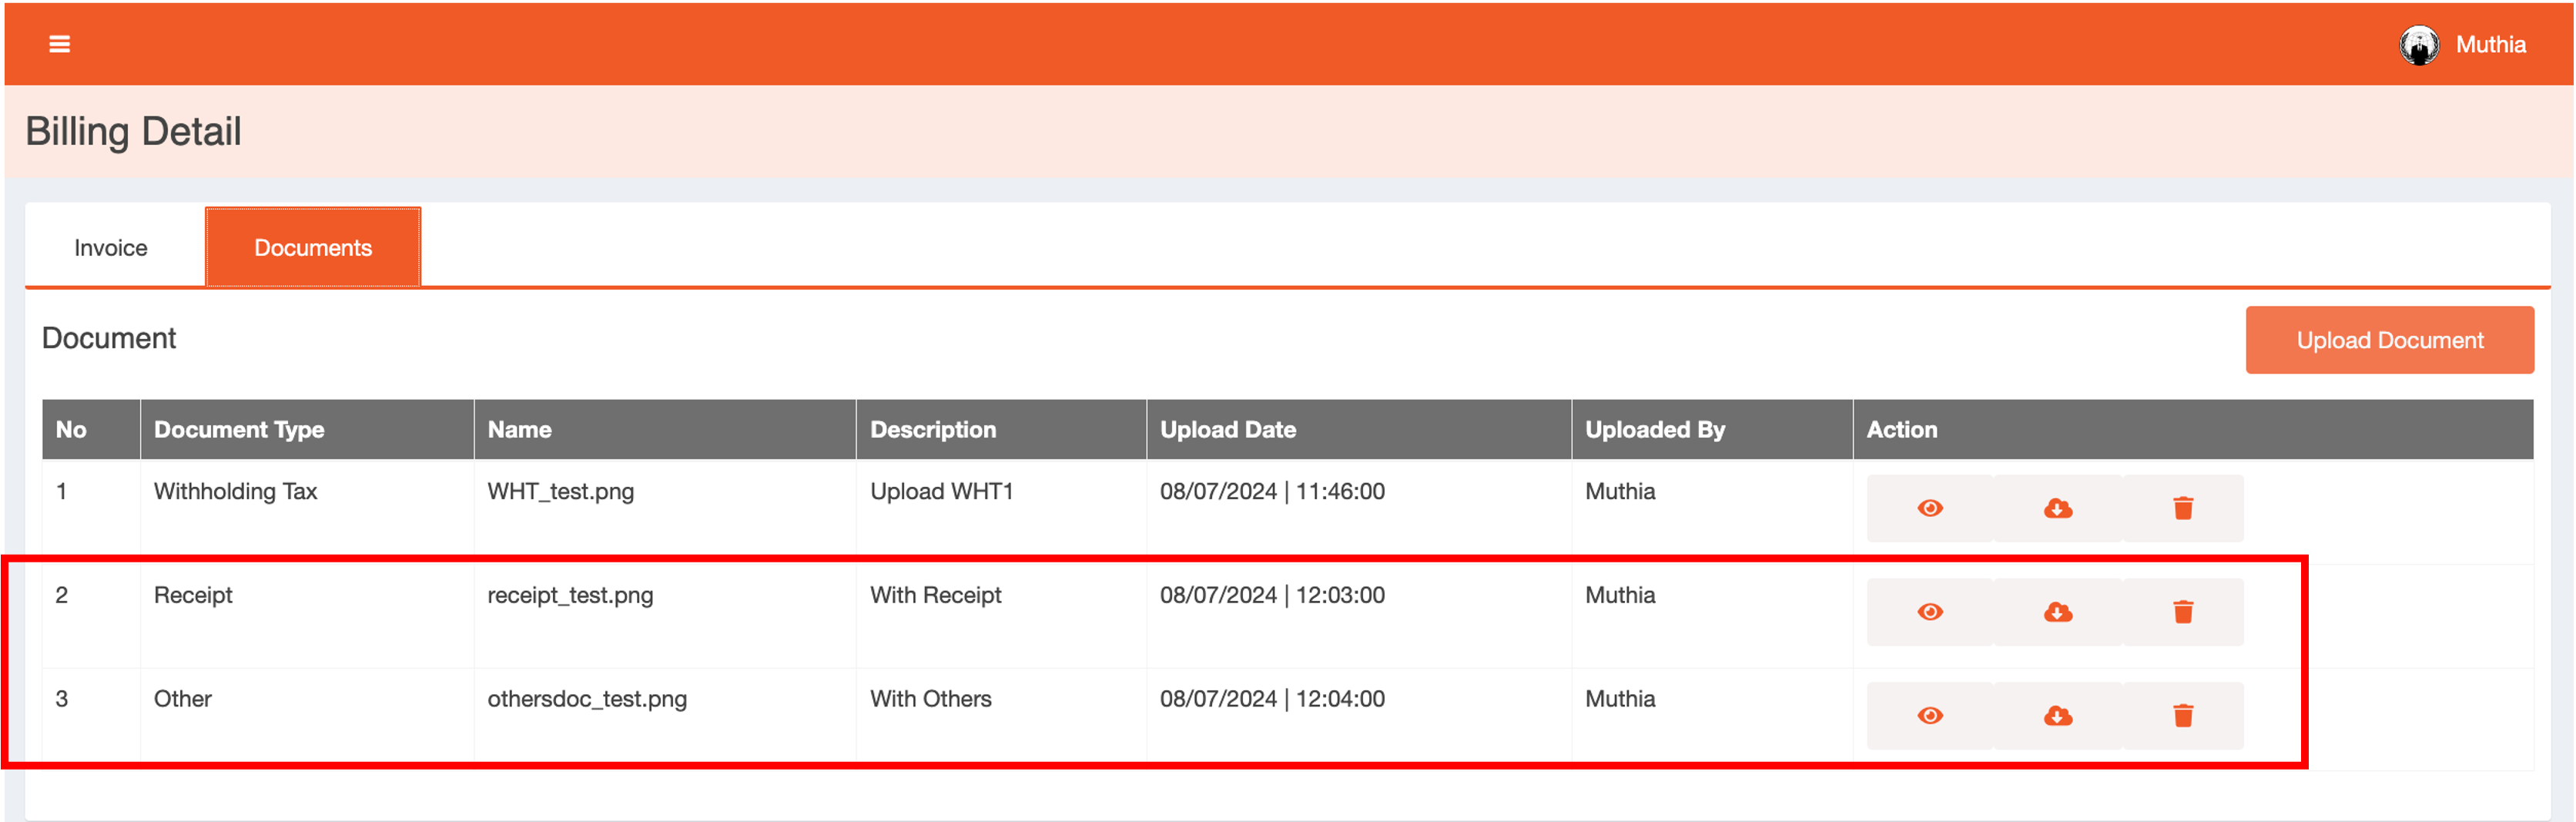
* Next, click the Invoice number on the Billing List Page to see the result of the document that was successfully uploaded.

<figure><img src="/files/XCVe0ZGXjSt92qQNiMM5" alt=""><figcaption><p>Documents Page</p></figcaption></figure>

| Button                                      | Description               |
| ------------------------------------------- | ------------------------- |
| ![](/files/KnNxYCIPcKFuJdqgoBSC) (View)     | To view a document        |
| ![](/files/UYZO9bEcwbPr5fRVgZ5D) (Download) | To download document data |
| ![](/files/i4TzJFH0Lgt0DIUWbdbW) (Delete)   | To delete a document      |

## How To Payment

In making payment on Faspay Billing, several steps must be considered, as follows:

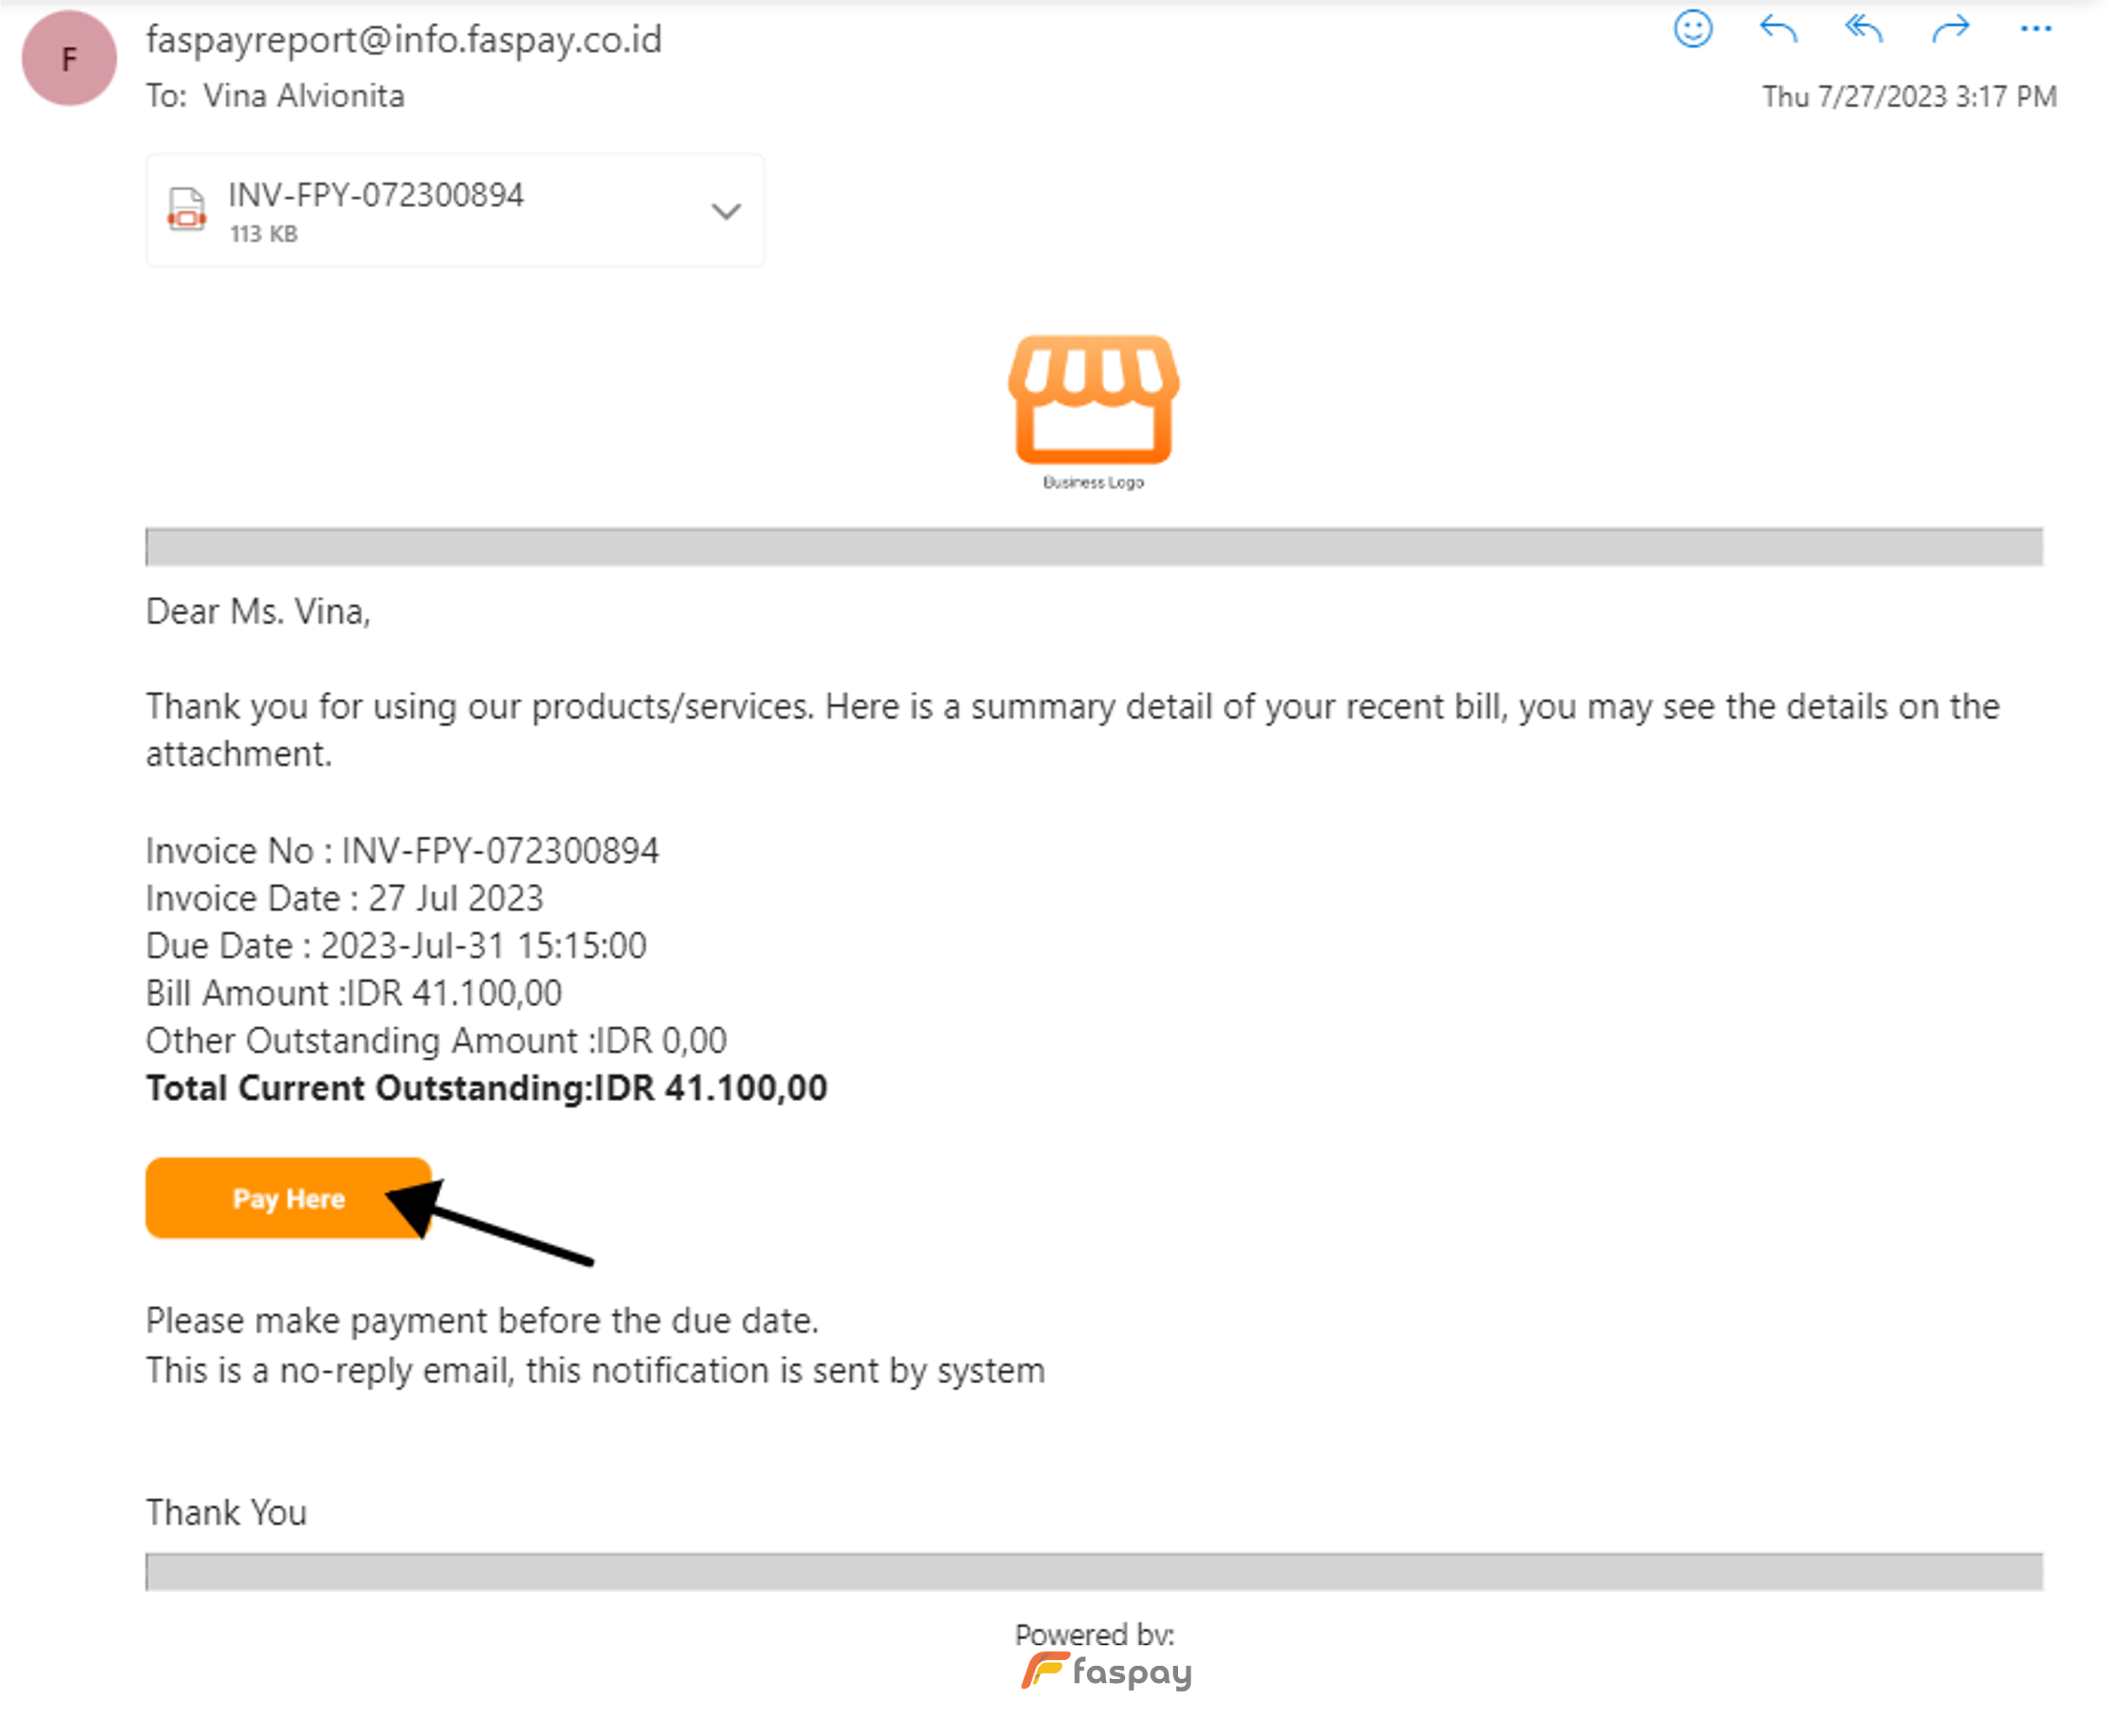
1. Merchants will receive an invoice that must be paid via email notification. Here's the email that was received by Merchant, click "**Pay Here**".

<figure><img src="/files/0qGJfxwKMakiGCGZUVSp" alt=""><figcaption><p>Email Notification</p></figcaption></figure>

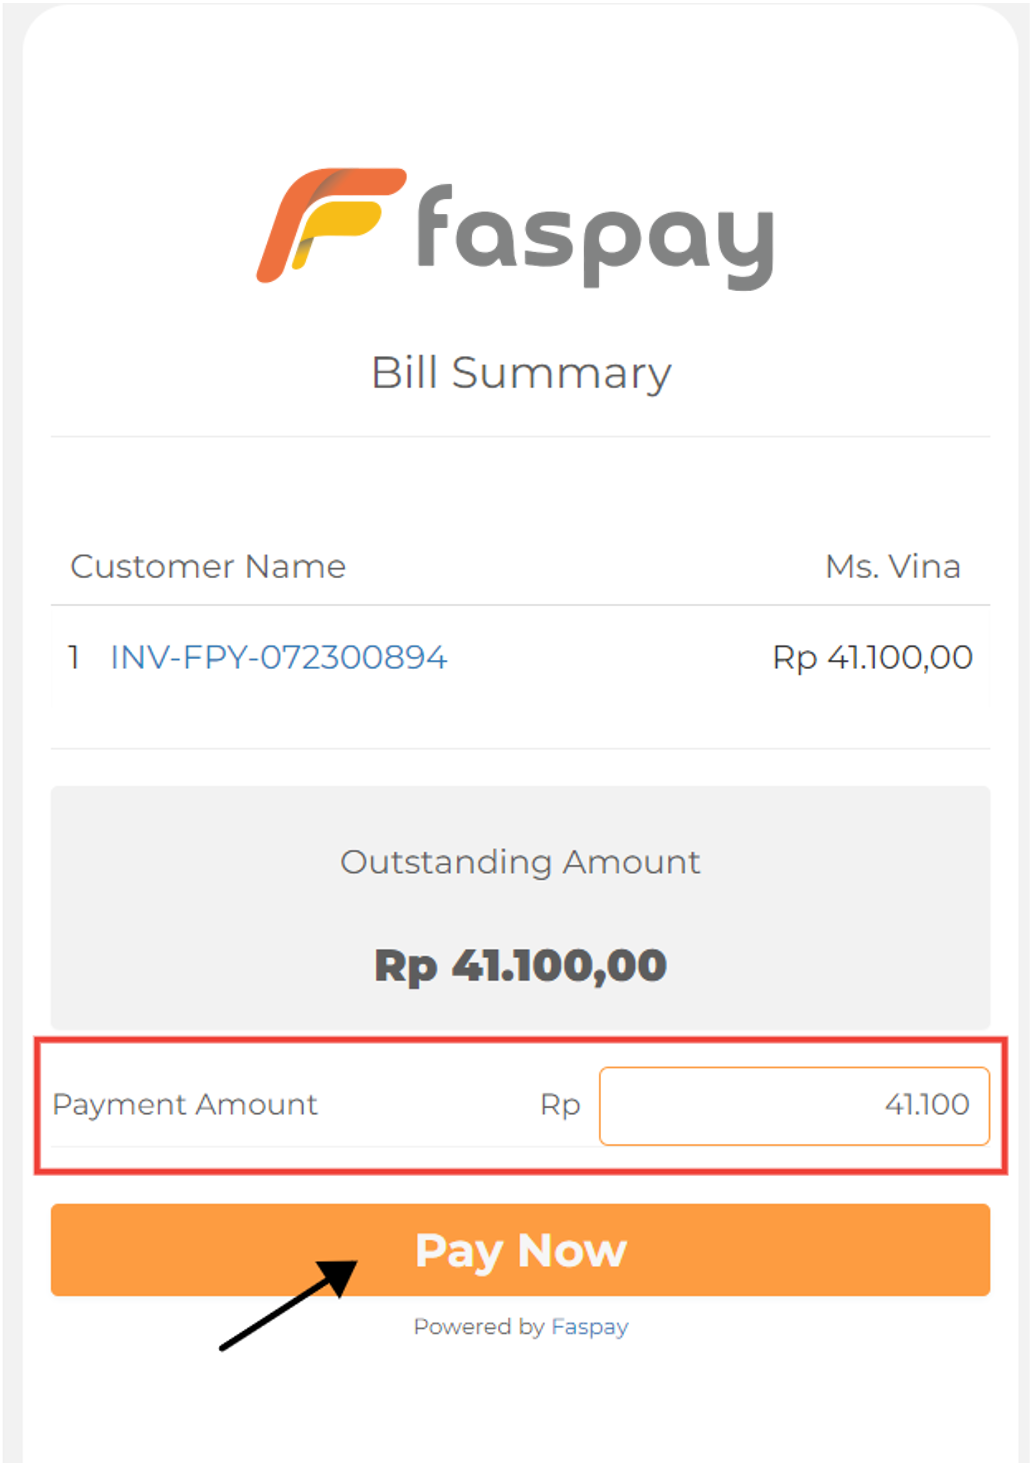
2. Next, it will show Bill Summary, input the Payment Amount, then click **Pay Now.**&#x20;

<figure><img src="/files/qDe2H0FObzRRKHLxVB41" alt="" width="375"><figcaption><p>Billing Summary</p></figcaption></figure>

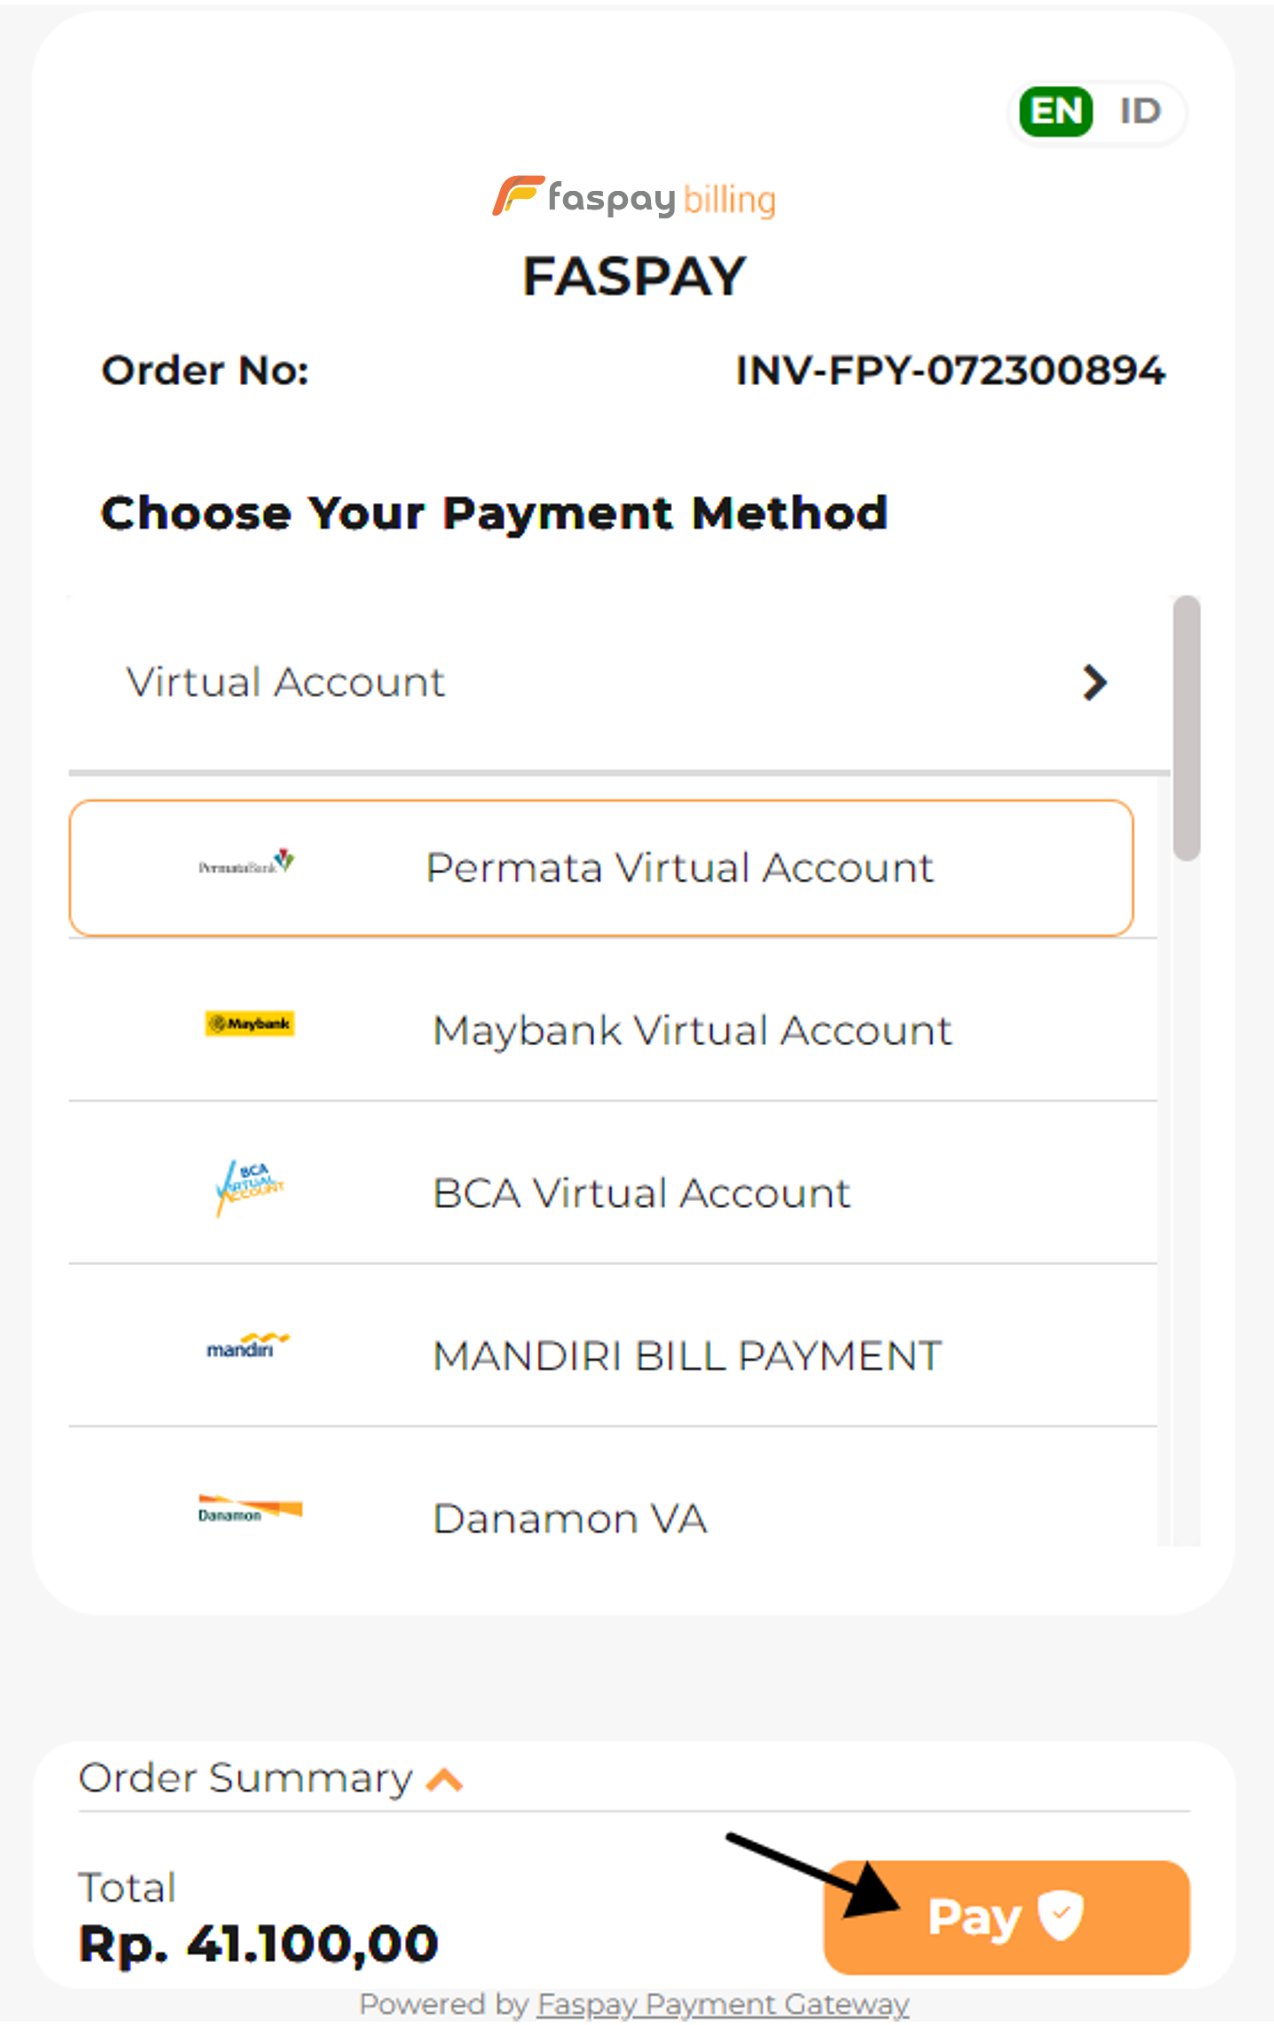
3. Select a payment method, then click the **Pay** button.

<figure><img src="/files/Cx8AnCThHL29wjB6tCuU" alt="" width="375"><figcaption><p>Choose Payment Method</p></figcaption></figure>

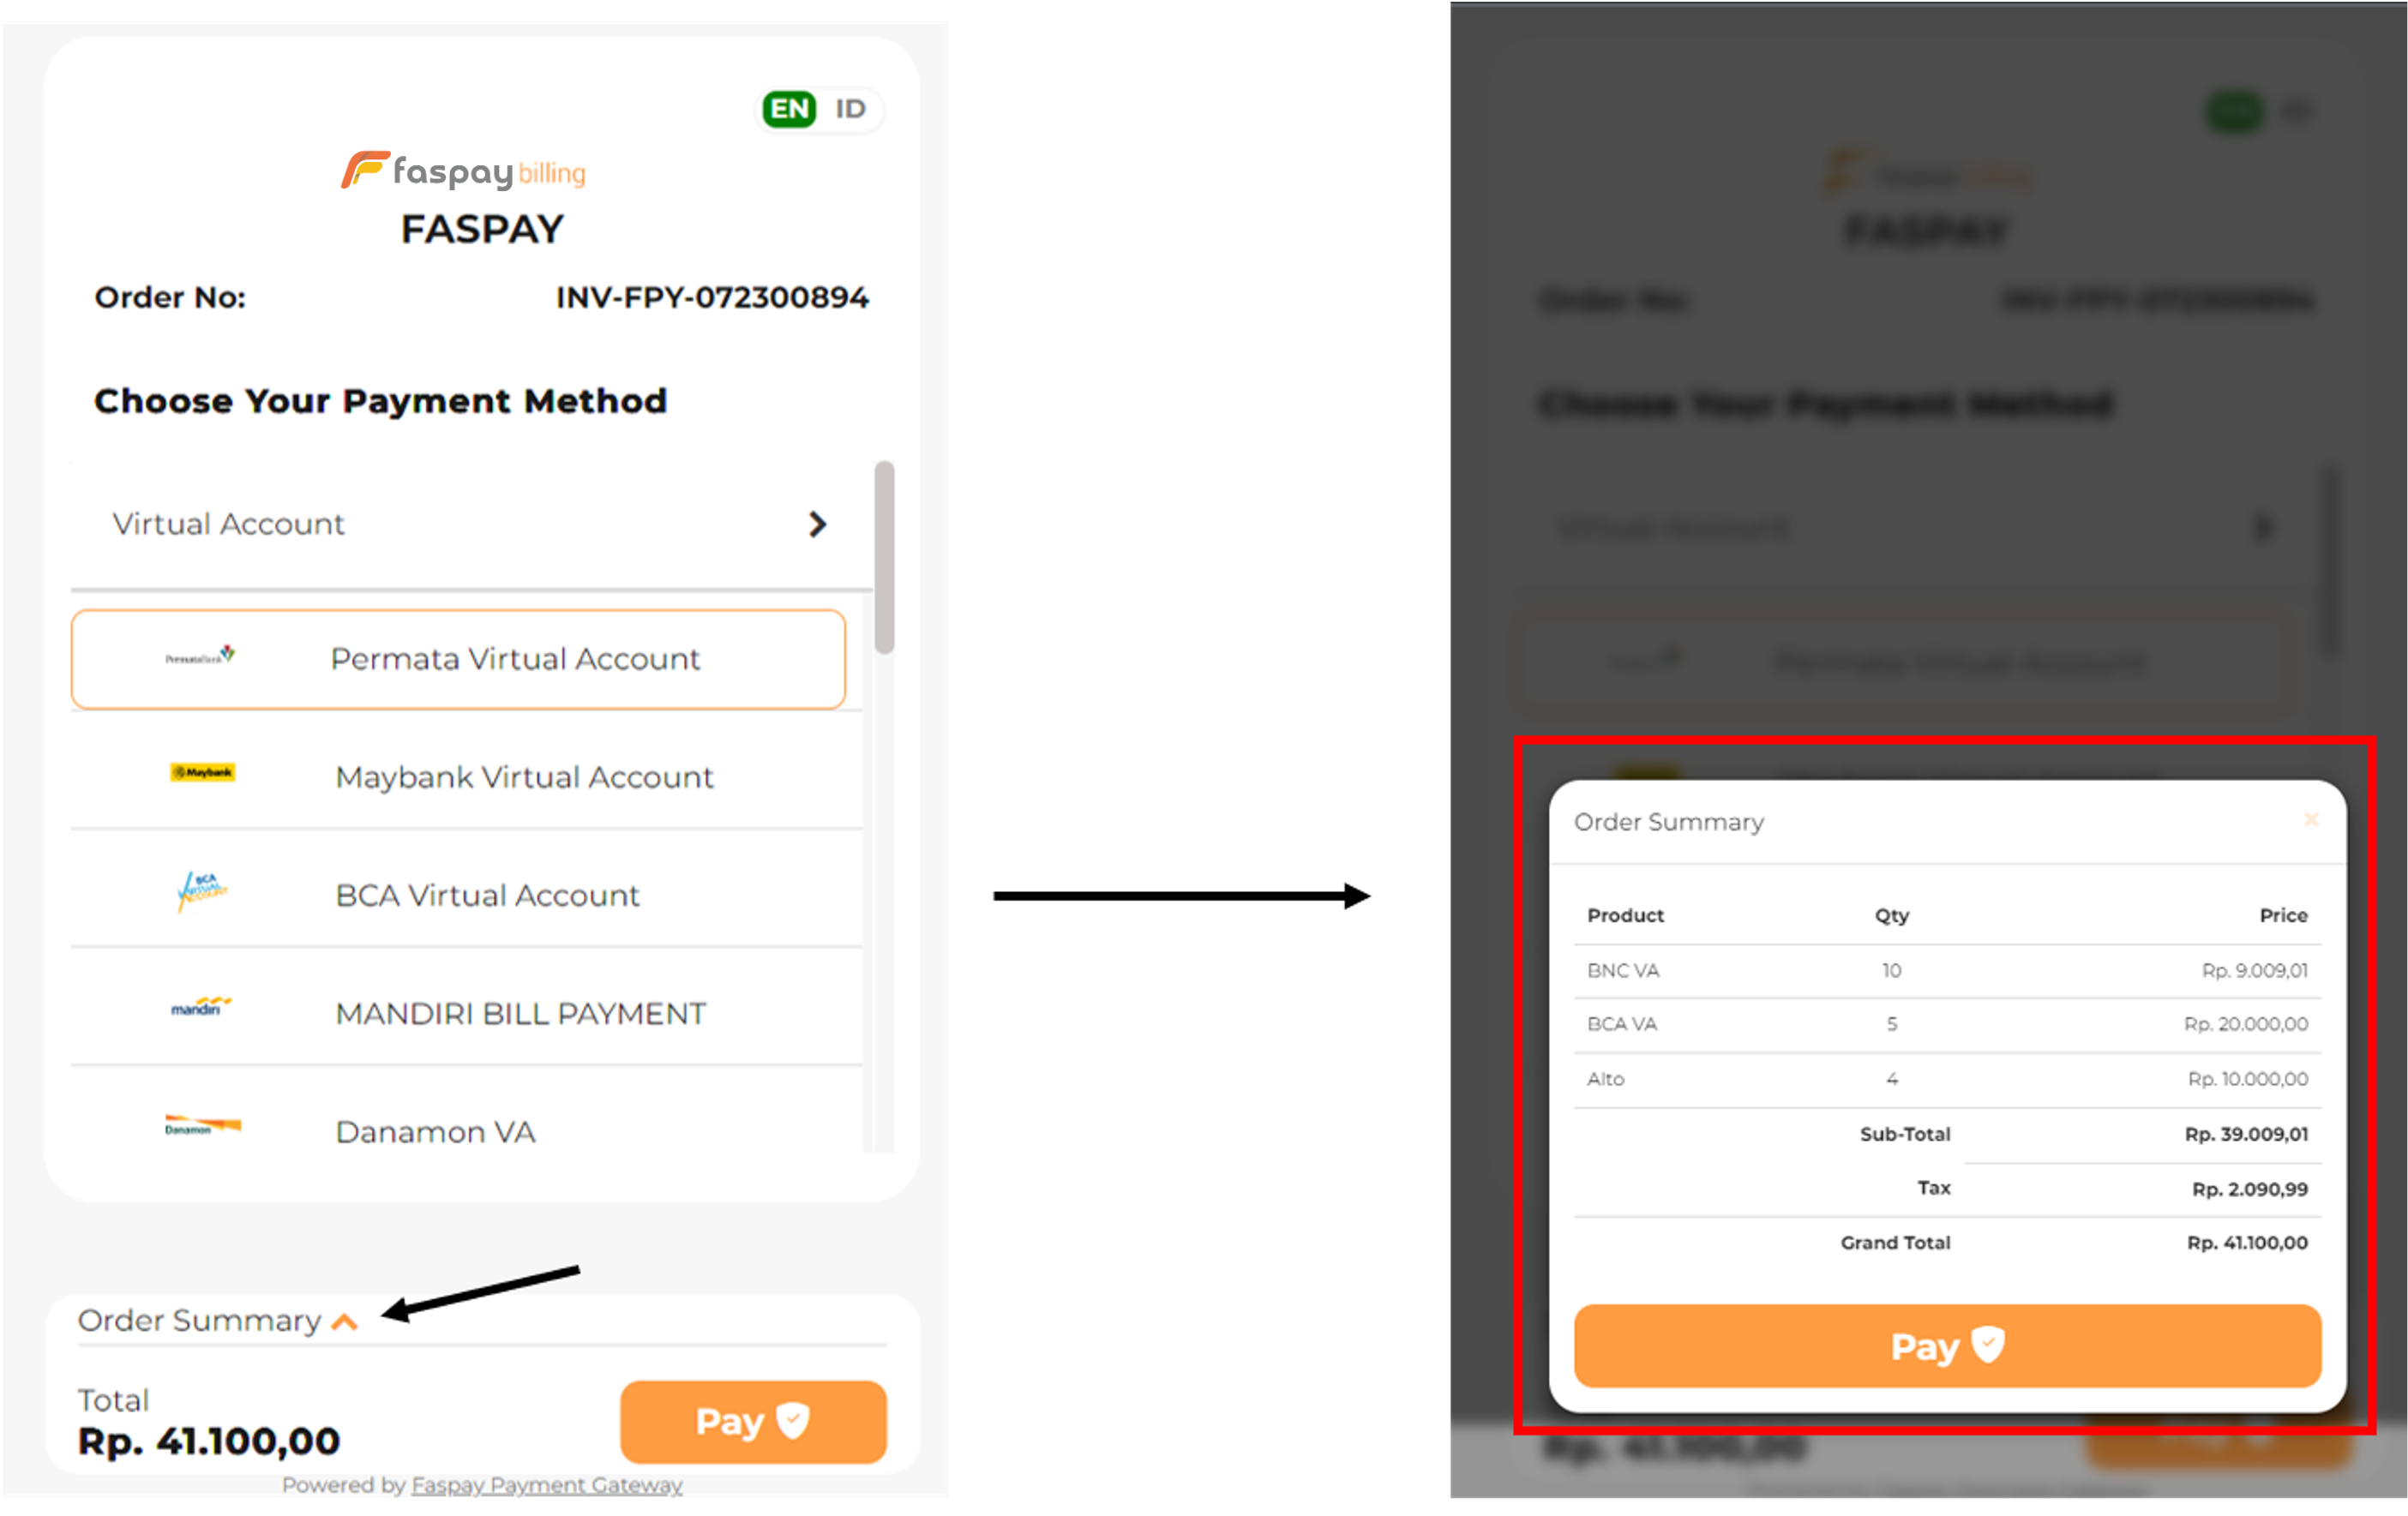
3. Users can also see order summary detail by clicking dropdown button at Order Summary

<figure><img src="/files/3Ae2CiAuhph1z4LOO8S0" alt=""><figcaption><p>Order Summary</p></figcaption></figure>

3. The following is an example of payment via Permata VA. Click "**Yes**" to continue the process.

<figure><img src="/files/UqKXi6t2bYpefLGB43zD" alt="" width="272"><figcaption><p>Confirm Payment</p></figcaption></figure>

5. Next, display the invoice detail page. Copy the virtual account number to make payment on each payment instrument.

<figure><img src="/files/q8wQxVSOoPWByNde6o5U" alt="" width="333"><figcaption><p>Invoice Detail Page</p></figcaption></figure>

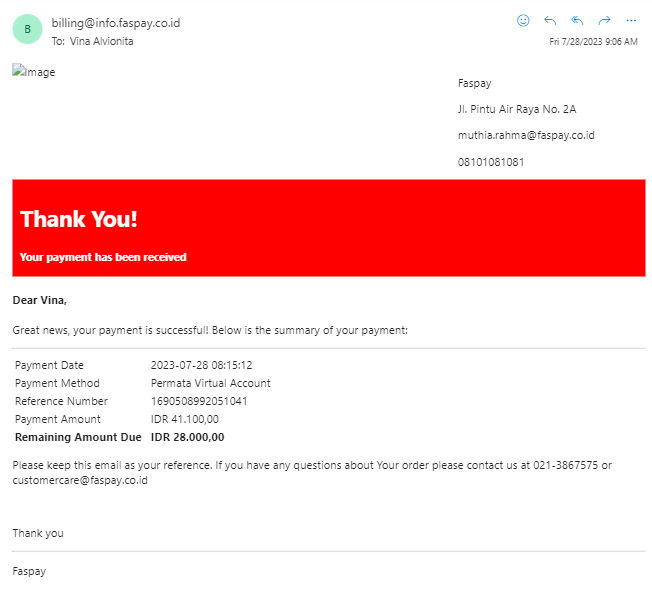
6. If the payment is successful, a notification will be received on the registered email.

<figure><img src="/files/vdikd9PSBA6JciVW7ALy" alt=""><figcaption><p>Email Notification</p></figcaption></figure>

&#x20;


---

# Agent Instructions: Querying This Documentation

If you need additional information that is not directly available in this page, you can query the documentation dynamically by asking a question.

Perform an HTTP GET request on the current page URL with the `ask` query parameter:

```
GET https://docs.faspay.co.id/getting-started/faspay-billing-2.0/how-to-use/billings/billings-list/upload-document.md?ask=<question>
```

The question should be specific, self-contained, and written in natural language.
The response will contain a direct answer to the question and relevant excerpts and sources from the documentation.

Use this mechanism when the answer is not explicitly present in the current page, you need clarification or additional context, or you want to retrieve related documentation sections.